📝 Manual de Usuario
🚀 Instalación y Requisitos
Para integrar el chat, acceda a https://chatbot.zampisoft.com/account/?tab=installation, copie el código de inserción y péguelo dentro de las etiquetas <head></head> o <footer></footer> de cada página donde desee mostrar el chat.
Ejemplo de implementación:
<script id="chat-init" src="https://chatbot.zampisoft.com/account/js/init.js?id=842421972"></script>Requisitos
-
Compatibilidad: Su proyecto debe soportar HTML y PHP.
-
Entorno: No abra el chat directamente desde un archivo local; utilice un servidor local como Xampp.
-
Versiones Mínimas: JQuery 1.1+, PHP 8.0+, MySQL 5.5+.
-
Módulos PHP: Deben estar habilitados
CURL,ZIP ARCHIVEyMBSTRING. -
Configuración recomendada:
POST MAX SIZE = 20MB,MEMORY LIMIT = 512MB,MAX INPUT VARS = 5000.
Configuración óptima
ZampiBot es una herramienta potente, pero su gran cantidad de funciones puede dificultar su configuración rápida. Para agilizar el proceso, proporcionamos una lista de las funciones más utilizadas que recomendamos configurar. Al incorporar todas estas funciones, tendrá acceso a las más esenciales y beneficiosas.
- Activar notificaciones por correo electrónico desde Configuración > Notificaciones Asegúrese de activar las siguientes opciones: Notificaciones por correo electrónico del agente, Administrador de sonidos > Conversaciones y mensajes entrantes, y Notificaciones push. Para obtener más información sobre cómo funcionan las notificaciones, puede hacer clic Aquí
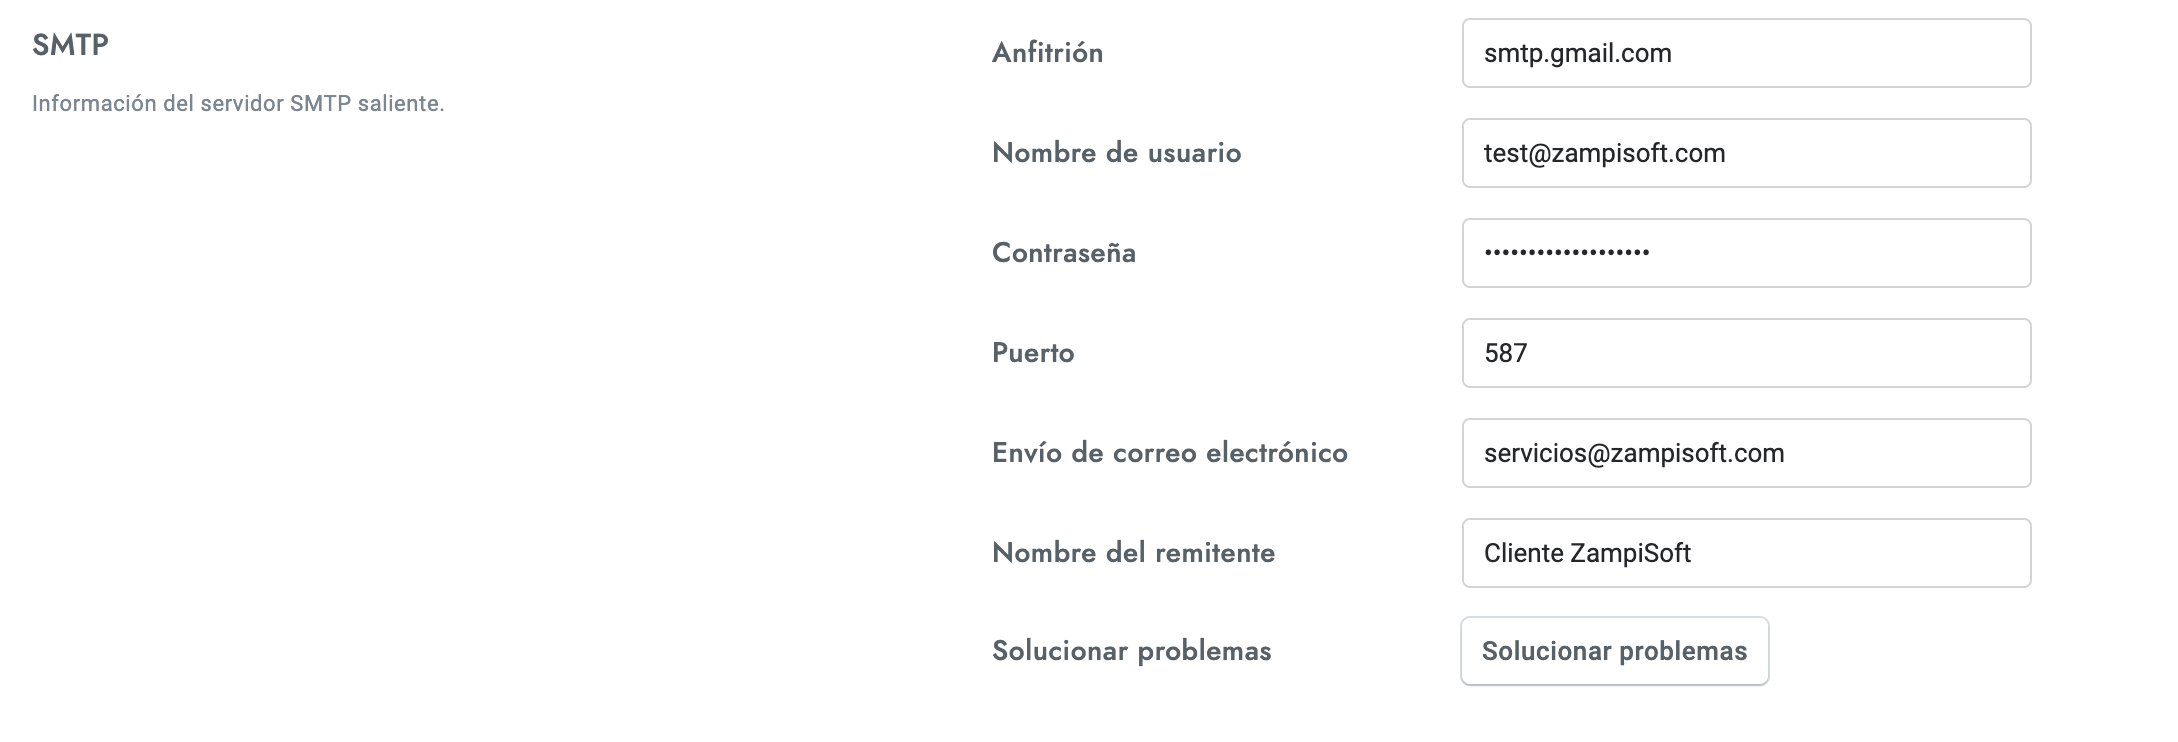
- Configurar el servidor SMTP en Configuración > Notificaciones > SMTP Para más detalles, consulta la sección de notificaciones por correo electrónico . Si usas la versión en la nube , el SMTP ya está activado, pero puedes usar el tuyo de todas formas.

- Navega a Configuración > Mensajes y formularios y configura el mensaje de seguimiento y el mensaje fuera de línea.
- Pusher ya está activado.
- Optimizar el rendimiento del sistema .
- En caso de que estés utilizando el chatbot, asegúrate de consultar la configuración óptima aquí .
- Si tiene dificultades para sincronizar servicios como Google o WhatsApp, nuestro equipo puede ayudarle a configurarlos. Al usar sus cuentas personales, como las de Google o Facebook, podrá disfrutar de créditos y cuotas gratuitas, y costos significativamente más bajos que con otros servicios de chat. Además, tendrá control total y transparencia sobre sus datos y gastos.
¿Tienes problemas?
Si tiene algún problema, contacte con nuestro equipo de soporte a través del chat a la derecha de esta página. Antes de contactarnos, asegúrese de que su servidor cumpla con todos los requisitos mencionados anteriormente.
403 Forbidden Error
El error 403 Prohibido es estrictamente un problema del servidor relacionado con los permisos de archivo o una regla de firewall que bloquea el acceso al recurso. No podemos ayudarle porque no está relacionado con nuestro producto. Envíe este mensaje y la URL del recurso bloqueado al soporte técnico de su servidor para que resuelvan el problema. A continuación, encontrará las causas más comunes del error 403 Prohibido.
- Complemento de WordPress— Si está utilizando la versión de WordPress, asegúrese de no tener ningún complemento de seguridad que genere el problema.
- Permisos de archivos— Los permisos de archivo del recurso son incorrectos. Deberían ser 644 para archivos y 755 para carpetas.
- CortafuegosEl firewall de tu servidor está bloqueando el recurso. Puedes comprobarlo desactivándolo o usando una VPN.
- ModSecurity— El ModSecurity de tu servidor está bloqueando el recurso. Puedes comprobarlo desactivándolo o usando una VPN.
- Cloudflare— El firewall de Cloudflare está bloqueando el recurso. Puedes comprobarlo desactivándolo o usando una VPN. Puedes solucionar el problema abriendo la configuración de tu sitio web de Cloudflare y comprobando..
Bloquear el zoom en dispositivos iOS
Al usar el chat en iPhones, el área de texto se amplía automáticamente cuando el usuario comienza a escribir un mensaje nuevo. Para detener el zoom, introduzca el código a continuación.<cabeza>área de todas las páginas que incluyen el chat.
<meta name="viewport" content="width=device-width, initial-scale=1, maximum-scale=1.0, user-scalable=no" />
El widget de chat no se muestra
Es posible que el chat no se muestre debido a los siguientes motivos:
- Es posible que no veas el chat porque lo has desactivado en la configuración. Para solucionarlo, visita la sección de configuración y desmarca todas las opciones relacionadas: Chat > Inicialización manual,Chat > Inicialización de inicio de sesión,Chat > Ocultar el chat fuera del horario de oficina,WordPress > Inicialización manual.
- Intenta deshabilitar cualquier complemento de rendimiento o técnicas como la caché o la minimización de JavaScript en tu sitio web, ya que podrían estar causando problemas. Una vez deshabilitados, vuelve a verificar.
- Intente deshabilitar cualquier CDN o proxy (por ejemplo, CloudFlare). Una vez deshabilitado, vuelva a verificar.
Las conversaciones no son visibles para los administradores o agentes.
Es posible que las conversaciones no se muestren debido a los siguientes motivos.
- Al agente se le ha asignado un departamento , pero las conversaciones no se han asignado a ese departamento específico.
- Se han activado una o más de las siguientes configuraciones: Varios > Enrutamiento, Varios > Cola,Varios > Ocultar conversaciones de otros agentes
- Estás utilizando el chatbot y la función de toma de control humana está activada.
Para los casos 1 y 2, asegúrese de iniciar sesión con el administrador/agente correcto o revise su perfil para comprobar que no haya departamentos asignados. En el caso 3, revise las conversaciones archivadas.
CONVERSACIONES
Gestionar conversaciones
Las conversaciones tienen un total de cuatro estados diferentes: marcar como leído, archivo, borrar y restaurar. Puedes administrar el estado de una conversación abriéndola en el área de conversaciones y luego haciendo clic en cualquiera de los botones de ícono correspondientes en la parte superior derecha de la ventana de conversación.
Buscar conversaciones
Puede buscar conversaciones por ID de departamento, ID de agente asignado, título de la conversación, ID de la conversación, texto del mensaje, nombre de los archivos adjuntos, nombre del usuario, apellido del usuario y correo electrónico del usuario. Si busca un texto de mensaje específico, la conversación que lo contiene se mostrará en la posición correcta y se resaltará.
Información
- Cuando se vacía la papelera, todas las conversaciones en la papelera se eliminan de forma permanente.
- Cuando un usuario envía un mensaje nuevo a una conversación archivada o eliminada, la conversación se restaura automáticamente y ahora será visible en la bandeja de entrada.
- Las conversaciones eliminadas se eliminan automáticamente después de 30 días.
- Cuando se elimina un usuario, todas las conversaciones y mensajes también se eliminan de forma permanente.
- Un agente puede eliminar sus mensajes abriendo el menú de mensajes y haciendo clic Borrar. El menú del mensaje se hace visible cuando pasa el cursor del mouse sobre el mensaje.
- La lista de conversaciones de la izquierda utiliza paginación automática, que está limitada a 100 resultados por desplazamiento.
Responder a un mensaje
Puedes responder a un mensaje abriendo el menú del mensaje y haciendo clic en Responder a. La función de respuesta solo es compatible con los siguientes servicios de mensajería:WhatsApp, Telegrama,Facebook Messenger.
Funciones editor de texto y mensajes automatizado
El editor de texto del área de administración y los mensajes automatizados (ejemplo: mensajes de bienvenida y suscripción) se pueden utilizar para crear mensajes estilizados:
- Todos los enlaces de texto se convierten automáticamente en hipervínculos clicables. Para establecer el nombre del enlace, añada la siguiente cadena a la URL:#sb-ejemplo. Reemplazar ejemplo con el nombre del enlace deseado y espacios en blanco con--.
- El editor también admite la sintaxis de formato de texto:
-
-
-
Negrita:
*texto* -
Cursiva:
__texto__ -
Tachado:
~texto~ -
Código:
`texto` -
Bloque de código:
```texto```
-
-
-
- HTML y otros lenguajes de programación: por razones de seguridad, no se permite HTML, JavaScript (JS) ni otros lenguajes de programación. Sin embargo, puede usar fragmentos de HTML mediante mensajes enriquecidos personalizados (que se explican más adelante).
- Para insertar un salto de línea en un mensaje, utilice la combinación de teclado MAYÚS + ENTER o CTRL + ENTER.
Fusionar campos
Los campos de combinación son cadenas que se reemplazan por valores externos cuando se usan. Pueden usarse en cualquier mensaje o mensaje automatizado, incluidos los mensajes de chatbot.
| Código | Descripción |
|---|---|
{user_name}
|
Nombre completo del usuario activo. |
{user_email}
|
Correo electrónico del usuario activo. |
{agent_name}
|
Nombre completo del agente activo. |
{agent_email}
|
Correo electrónico del agente activo. |
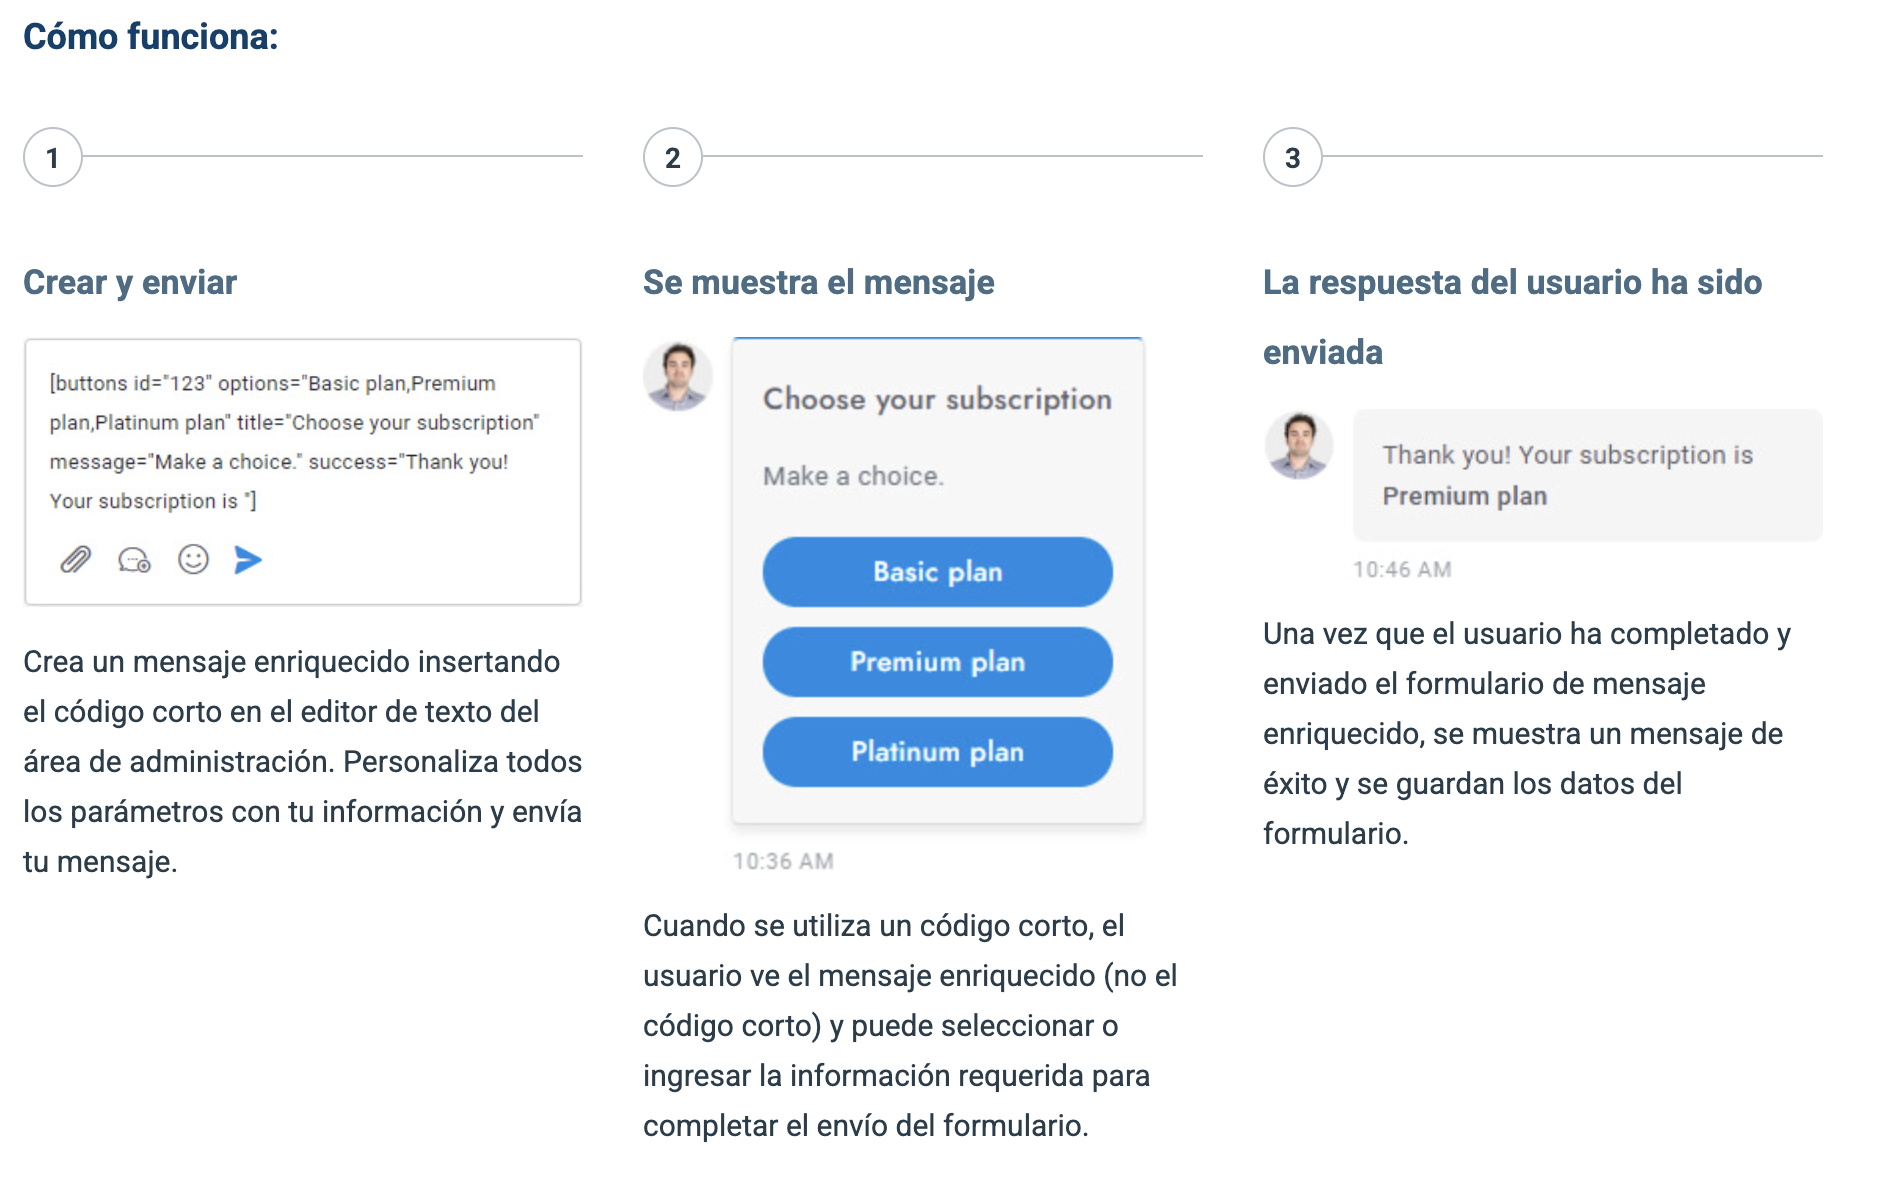
Mensajes enriquecidos
Los mensajes enriquecidos son mensajes especiales con funciones interactivas como botones, menús desplegables o entradas. Permiten que un agente solicite información al usuario mediante un formulario de entrada o muestre contenido interactivo. Se pueden insertar en un mensaje de chat mediante códigos cortos. Estos códigos aceptan diversos parámetros, como el título y la descripción. Los mensajes enriquecidos disponibles se enumeran a continuación.
| Nombre | Código Corto (Shortcode) | Descripción |
| Tarjeta | [card image="URL" header="TÍTULO" description="Texto" link="URL" link-text="Comprar" extra="$599" target="_blank"] |
Tarjeta de llamada a la acción con imagen, título, descripción y enlace. |
| Slider | [slider image-1="URL" header-1="TÍTULO" ...] |
Carrusel de tarjetas de llamada a la acción. Admite hasta 10 diapositivas. |
| Slider de imágenes | [slider-images images="URL,URL,URL"] |
Carrusel exclusivo para visualización de imágenes. |
| Chips | [chips options="A,B,C"] |
Lista de botones horizontales para respuestas rápidas. |
| Botones | [buttons options="A,B,C"] |
Lista vertical de botones de selección. |
| Selector | [select options="A,B,C"] |
Menú desplegable con lista de opciones. |
| Entradas | [inputs values="A,B,C" button="Enviar ahora"] |
Lista de campos de entrada de texto para el usuario. |
[email name="true" last-name="true" phone="true" placeholder=""] |
Formulario para recopilar correo y teléfono. Admite merge fields y el atributo required-messaging-apps="true" para forzar el registro en apps de mensajería. |
|
| Calendario | [timetable] |
Muestra un horario o cronograma interactivo. |
| Artículos | [articles link="URL"] |
Muestra la base de conocimientos con buscador. El atributo link sirve como respaldo en WhatsApp, Messenger o Telegram. |
| Lista | [list values="A,B,- C" numeric="true"] |
Lista de texto. Use el carácter - antes de un valor para crear una subcategoría. |
| Lista Doble | [list values="A:X,B:Y"] |
Lista de texto que incluye títulos y descripciones. |
| Lista con Imagen | [list-image values="URL:A,URL:B"] |
Lista que combina imágenes y títulos. |
| Tabla | [table header="A,B" values="A:B,C:D"] |
Estructura de datos en formato de tabla. |
| Botón | [button link="URL" name="Clic aquí" target="_blank" style="link"] |
Botón individual para abrir enlaces o artículos. Para abrir un artículo interno, use #article-ID en el enlace. |
| Video | [video type="youtube" id="ID_VIDEO" height="350"] |
Reproductor de YouTube o Vimeo. El id se obtiene directamente de la URL del video. |
| Imagen | [image url="URL_IMAGEN"] |
Visualización de una imagen simple. |
| Compartir | [share fb="URL" tw="URL" li="URL" wa="URL"] |
Botones para compartir contenido en redes sociales. |
-
Caracteres Especiales: Si su texto incluye comas (
,), dos puntos (:) o comillas ("), debe anteponer una barra invertida (\). Ejemplo:\,,\:,\". -
Traducciones: Para traducir el contenido de estos mensajes, asegúrese de que el texto original esté en inglés y configure las traducciones en:
Configuración > Traducciones > Interfaz. -
Personalización HTML: Puede crear mensajes estáticos personalizados con código HTML en:
Configuración > Misceláneas.Personajes especialesSi su texto incluye los caracteres,,:, o", debes anteponer el\carácter a ellos. Por ejemplo:
Parámetros globales
Todos los mensajes enriquecidos admiten los siguientes parámetros:
| Parameters | Description |
|---|---|
id="123" |
El ID del mensaje enriquecido (utilizado también para guardar los datos JSON). |
title="ABC" |
El título del mensaje enriquecido. |
message="ABC" |
La descripción enriquecida del mensaje que aparece debajo del título. |
success="ABC" |
El mensaje que aparece cuando el usuario completa y envía el mensaje enriquecido. La entrada del usuario se adjunta a este mensaje. |
settings="ABC" |
Campo adicional para valores extra opcionales. |
Utilice mensajes enriquecidos en el chatbot
Debes crear un chatbot de Dialogflow y luego simplemente ingresar el código corto del mensaje enriquecido en el respuesta de texto del Intención.
Respuesta de mensaje enriquecido
Cuando un usuario completa un mensaje enriquecido, los datos de respuesta se guardan en formato JSON en la base de datos en la tabla mensajes_sb y columnacarga útil. Ejemplo:
{"rich-messages":{"4Voyu":{"type":"email","result":{"email":["example@email.com","Your email..."]}}}}Traducciones de mensajes enriquecidos
Para traducir una cadena de mensaje enriquecido, el texto original del mensaje enriquecido debe estar en inglés; agregue el texto exacto en inglés y sus traducciones en Configuración > Traducciones > Interfaz.
Mostrar un mensaje enriquecido al inicializar el chat
Para mostrar un mensaje enriquecido, como una lista de botones, cuando un usuario inicia un chat por primera vez, inserte el código corto del mensaje enriquecido en el mensaje de bienvenida .
Mensajes enriquecidos personalizados
Puede crear mensajes enriquecidos personalizados con su propio contenido personalizado yendo a Configuración > VariosActualmente, los mensajes enriquecidos personalizados son estáticos y no ofrecen opciones interactivas como los códigos cortos. Sin embargo, puedes insertar códigos HTML personalizados.
Códigos HTML
Al crear un mensaje enriquecido personalizado, puede utilizar los siguientes códigos:
| Code | Description |
|---|---|
<a href="https://www.google.com" target="_blank" class="sb-rich-btn sb-btn">Click here</a> |
Link with button design. |
<a href="https://www.google.com" target="_blank" class="sb-rich-btn sb-btn-text">Click here</a> |
Link. |
<div class="sb-image"><img src="https://via.placeholder.com/1500x600" class="sb-image" /></div> |
Image that zoom on click. |
Mensajes integrados
Los mensajes integrados son mensajes preprogramados que envía automáticamente en ZampiBot. Puedes encontrarlos en Configuración > Mensajes.Mensaje de bienvenida
Envía un mensaje a los nuevos usuarios cuando visitan el sitio web por primera vez.
- Se admite el formato de texto .
- Se admiten campos de combinación .
- Se admiten mensajes enriquecidos .
- El mensaje de bienvenida no se envía a Slack.
- Las conversaciones que contienen sólo el mensaje de bienvenida (y ninguna respuesta) se archivan automáticamente.
Mensaje de seguimiento
Si ningún agente responde dentro del intervalo de tiempo especificado, se enviará un mensaje para solicitar los detalles del usuario, como su correo electrónico.
- Se admite el formato de texto .
- Se admiten campos de combinación .
- Puede enviar un correo electrónico de confirmación al usuario completando el formulario Correo electrónico de seguimiento campos. El correo electrónico utiliza la plantilla definida en Configuración > Notificaciones > Plantilla de correo electrónico.
- Si la demora no está configurado, se utiliza un intervalo de tiempo dinámico y se determina de la siguiente manera: Si Configuración > Varios > Horario de oficina. Si está configurado y la hora actual coincide con el horario de oficina definido, o si al menos un agente está conectado, el retraso se establecerá en 15 segundos. En todos los demás casos, el retraso se establecerá en 5 segundos.
- Los mensajes de seguimiento se envían un máximo de una vez cada 24 horas.
- Si el usuario proporciona una dirección de correo electrónico y la función de boletín informativo está habilitada, se suscribirá a la dirección de correo electrónico.
- El mensaje de seguimiento se envía solo a usuarios sin dirección de correo electrónico.
- Si la función de toma de control humana del chatbot está activada, el mensaje de seguimiento solo se envía durante la toma de control humana.
Calificación
Muestra el formulario de comentarios para calificar la conversación cuando esté archivada.
- El mensaje de calificación es compatible con los canales de mensajería. Los botones de calificación no se muestran en los canales de mensajería. Sin embargo, si se configuran Inteligencia Artificial y OpenAI, se analizará la respuesta del usuario para extraer la calificación.
- La calificación es visible en el panel derecho de la área de conversaciones, la calificaciones de los agentes se muestra en la área de informe y en el perfil del agente.
- Habilite el recordatorio de correo electrónico de calificación configurando el retraso (en horas). En el opción Retraso en el recordatorio por correo electrónico . El correo electrónico recuerda al usuario que debe proporcionar comentarios y se envía solo si no ha calificado la conversación después del tiempo establecido. Para que esta función funcione, también debe configurar la opción URL de redirección — Ingrese cualquier URL que incluya el widget de chat (por ejemplo, la URL de su sitio web). Una vez que el usuario haga clic en el widget Útil o No es útilAl acceder al enlace del correo electrónico, se redirigirá a la URL de redireccionamiento especificada y la calificación se guardará automáticamente. Se abrirá el chat con el panel de calificación, que permite al usuario proporcionar comentarios adicionales.
- Los correos electrónicos se envían a través de los trabajos cron .
Mensaje fuera de línea
Notificar al usuario cuando su mensaje se envía fuera del horario de oficina programado o todos los agentes están fuera de línea.
- Se admite el formato de texto .
- Se admiten campos de combinación .
- Para conocer más sobre la opción de horario de oficina, haga clic aquí .
- El mensaje sin conexión se envía al mismo usuario máximo 1 vez por hora.
- De forma predeterminada, el mensaje de desconexión también se envía si todos los agentes están desconectados, incluso en horario de oficina. Para evitarlo, active la opción Deshabilitar la verificación de agentes.
- Si la función de toma de control humana del chatbot está activada, el mensaje sin conexión solo se envía durante la toma de control humana.
- Si usted o cualquier otro agente está en línea usando Slack , ZampiBot también lo considerará como agente en línea.
Mensaje de privacidad
Presenta un mensaje de privacidad con los botones "Aceptar" y "Rechazar". Se requiere la aprobación del usuario al hacer clic en el botón "Aceptar" para comenzar a usar el chat. Esta función garantiza el cumplimiento de la política de privacidad y el RGPD.
- El mensaje de privacidad no se muestra si la opción Configuración > Usuarios > Requerir registro está habilitada.
- El mensaje de privacidad también se envía a canales de mensajería como WhatsApp, pero el usuario no puede aceptar o rechazar la política de privacidad. Las funciones de mensajería tampoco se bloquean. El mensaje se envía después de que el usuario inicie la conversación enviando su primer mensaje.
Mensaje emergente
Mostrar una notificación emergente a todos los usuarios.
- El mensaje emergente siempre se muestra hasta que el usuario lo cierra manualmente; luego permanece cerrado.
Archivos adjuntos
Aquí podrás acceder a información sobre la carga de archivos y los adjuntos de los mensajes.
- Los siguientes formatos de imagen se muestran automáticamente:.jpg, .jpeg, .png.
- Para obtener instrucciones sobre cómo enviar archivos adjuntos con un chatbot, haga clic aquí .
Información
Aquí puede acceder a información sobre una variedad de funciones asociadas con las conversaciones.
Etiquetas
Las etiquetas permiten una organización y agrupación más eficiente de las conversaciones. Consulte la información a continuación para obtener más detalles.
- Puedes administrar las etiquetas desde Configuración > Administrador > Etiquetas.
- Las etiquetas se pueden asignar a las conversaciones a través de diferentes métodos: a través del área de administración navegando a Configuración > Automatizaciones > Más, a través de acciones de Dialogflow y insertando la variable de JS SB_DEFAULT_TAGS en una página que muestre el chat o en una página web que muestre el chat o el panel de tickets.
- Para encontrar conversaciones con etiquetas específicas, simplemente introduzca los nombres de las etiquetas en la barra de búsqueda ubicada en la esquina superior izquierda del área de conversaciones de administración, o puede seleccionar la etiqueta deseada en el menú de filtros dedicado en la esquina superior izquierda. El filtro de etiquetas solo es visible si hay al menos una etiqueta asignada a una conversación.
- Comprueba la opción Etiqueta destacada para mostrar el icono de la etiqueta destacada en el área de conversaciones. Esto permite seleccionar las conversaciones asignadas a la primera etiqueta con un solo clic. La primera etiqueta en la parte superior siempre es la etiqueta destacada.
- Puedes desactivar las etiquetas desde Configuración > Administrador > Deshabilitar funciones > Etiquetas.
Notas
Las notas permiten a los agentes y administradores agregar comentarios a las conversaciones.
- Las notas solo son visibles para agentes y administradores.
- Si está utilizando OpenAI, le sugerimos habilitar la opción de extracción de datos de notas .
- Administrar la configuración de notas desde Configuración > Administrador > Configuración de notas.
- Puedes desactivar las etiquetas desde Configuración > Administrador > Deshabilitar funciones > Notas.
- Activa funciones avanzadas de IA con la app de Inteligencia Artificial. Más información aquí .
Transcripción
El agente o administrador puede enviar la conversación completa al usuario como un archivo de transcripción.
- Los agentes y administradores pueden enviar transcripciones de conversaciones a los usuarios haciendo clic en el botón Transcripción botón en la esquina superior derecha de la ventana de conversación del administrador.
- Los agentes y administradores pueden enviar automáticamente la transcripción al usuario cuando se archiva la conversación mediante el uso de cerrar mensaje disponible enConfiguración > Mensajes y formularios > Cerrar mensaje.
- La transcripción se puede enviar al usuario sólo si el usuario tiene una dirección de correo electrónico.
- Si la conversación ha sido traducida, la transcripción también incluirá los mensajes traducidos.
Misceláneas
- El formato de fecha y hora se detecta automáticamente según la configuración de idioma del navegador.
USUARIOS
Administrar usuarios
Administrar usuarios desde el Área de usuariosen el menú izquierdo del área de administración.
Importar usuarios
Puedes importar usuarios desde Configuración > Usuarios > Importar usuarios Solo se admiten archivos CSV. Puede descargar un archivo CSV de ejemplo aquí . En el archivo de ejemplo, la primera fila es el encabezado y las columnas...Altura yC olor de pelo ¿Se agregan campos de usuario personalizados desde? Configuración > Usuarios > Campos personalizados.
Buscar usuarios
Puede buscar usuarios por nombre, apellido, correo electrónico y campos personalizados.
Eliminar usuarios
Puedes eliminar un usuario abriendo la opción de edición de usuarioy luego hacer clic Eliminar usuario. Para eliminar varios usuarios a la vez, seleccione los usuarios que desea eliminar de la tabla Usuarios y luego haga clic en la esquina superior derecha.Eliminar icono.
- Cuando se elimina un usuario, todas sus conversaciones y mensajes se eliminan automáticamente de forma permanente.
- Los archivos adjuntos de la conversación se eliminarán permanentemente. Si AWS S3 está habilitado, también se eliminarán los archivos de AWS S3.
- Si un usuario de un usuario eliminado regresa al sitio web, se crea automáticamente un nuevo usuario.
- Los visitantes se eliminan automáticamente cada 24 horas.
Fusionar usuarios
Puede fusionar dos usuarios en una misma tabla de usuarios. Seleccione dos usuarios y haga clic en el botón Fusionar usuarios botón en la parte superior.
- Cuando se fusionan dos usuarios, todas sus conversaciones se combinan en la nueva cuenta de usuario.
- El sistema identifica y fusiona automáticamente la información relevante de ambos usuarios en la nueva cuenta.
Columnas adicionales de la tabla de usuarios
Para mostrar columnas adicionales en la tabla de usuario, vaya a Configuración > Administración> Columnas adicionales de la tabla de Usuarios y agregue las nuevas columnas. El valor de cada columna es el slug del detalle del usuario o del detalle adicional que desea mostrar. El slug está en minúsculas y los espacios se reemplazan por el carácter-Por ejemplo, el slug del detalle adicional de usuario "Fecha de nacimiento" es "fecha-de-nacimiento".
Tipos de usuarios
| Tipo | Descripción |
|---|---|
usuario |
Un "usuario" es cualquier usuario con un correo electrónico. |
|
Un "lead" es cualquier usuario sin detalles de usuario, que se registra automáticamente y con al menos una conversación. |
visitante |
Un "visitante" es cualquier usuario que no haya iniciado una conversación. Nota: Los visitantes se eliminan automáticamente cada 24 horas. |
Administrar agentes y administradores
Administrar, crear y eliminar agentes y administradores desdeÁrea de usuarios.
- Configurar los privilegios y permisos de los agentes desde Configuración > Administración > Privilegios del agente.
- Puede crear un supervisor a partir de Configuración > Administración> Supervisor. El supervisor es un agente especial con privilegios específicos y debe ser administrador. Puede agregar varios supervisores añadiendo ID de administrador separados por comas.
- Para crear un agente o administrador de anuncios, vaya a área de usuarios y haga clic en el botón Agregar usuario en la parte superior derecha.
- Solo los agentes y administradores pueden iniciar sesión en el área de administración de ZampiBot.
- Cuando activa el complemento ZampiBot en WordPress, se crea automáticamente una cuenta de administrador utilizando el mismo nombre de usuario y contraseña que el usuario actualmente conectado.
Recopilar detalles del usuario
Puede recopilar detalles del usuario, como su nombre y correo electrónico, a través de varios métodos:
- Con un formulario de pre-chat utilizando el formulario de registro .
- Con el mensaje de seguimiento .
- Con flows en el chat .
Registro
El formulario de registro es una herramienta previa al chat que requiere que el usuario ingrese información específica antes de iniciar la conversación. Es ideal para solicitar datos clave, como el nombre y el correo electrónico, asegurando que cada contacto esté debidamente identificado.
Configuración y Activación
Para gestionar las opciones de registro, diríjase a: Configuración > Usuarios
Funcionamiento del Formulario
-
Uso como Formulario Pre-Chat: Puede limitar la información solicitada (por ejemplo, pedir solo el nombre de usuario o el email) configurando la opción Requerir registro en la modalidad Formulario de inscripción y habilitando los campos deseados en la lista de Campos de registro.
-
Visibilidad del Inicio de Sesión: El formulario de inicio de sesión solo se mostrará si el campo de correo electrónico ha sido habilitado previamente en los ajustes.
-
Integración con WordPress: El campo de contraseña se mostrará siempre de forma automática cuando el sistema de usuarios esté configurado para sincronizarse con WordPress.
-
Inicio de Sesión Automático: El sistema permite que un usuario inicie sesión automáticamente mediante el uso de parámetros de URL, lo que agiliza la experiencia del cliente.
Gestión de Usuarios Existentes (OTP)
Si un usuario intenta registrarse utilizando un correo electrónico que ya se encuentra en su base de datos, Zampibot enviará automáticamente una OTP (Contraseña de un solo uso) a su email para permitirle autenticarse e iniciar sesión de forma segura.
[!NOTE] En situaciones de uso real, los registros duplicados son poco frecuentes ya que los usuarios suelen permanecer conectados en el mismo dispositivo; esta función es especialmente útil para evitar conflictos durante las fases de prueba del sistema.
Información
Contraseña (OTP)
La función OTP verifica el correo electrónico del usuario durante el registro mediante el envío de un código de un solo uso a su dirección de correo electrónico. El usuario debe introducir este código en el formulario de registro. Habilítela desde Configuración > Usuarios > Verificación de correo electrónico, y personaliza el correo electrónico OTP desde Configuración > Usuarios > Correo electrónico de verificación de correo electrónico. El correo electrónico también utiliza la plantilla definida en Configuración > Notificaciones > Plantilla de correo electrónico. Tenga en cuenta que la OTP siempre se envía, incluso si la función está deshabilitada, cuando un usuario intenta registrarse con un correo electrónico ya registrado.
URL de verificación de inicio de sesión
La función de URL de verificación de inicio de sesión se puede encontrar en Configuración > Usuarios > URL de verificación de inicio de sesión. En ZampiBot esta función permite autenticar un inicio de sesión externo y registrar e iniciar sesión automáticamente al usuario. ZampiBot enviará una solicitud a la URL especificada, añadiendo la dirección de correo electrónico del usuario y la contraseña ingresada en el formulario de inicio de sesión del chat como parámetros de URL. Los parámetros se denominan email y password Ejemplo:https://ejemplo.com/login.php?email=ejemplo@mail.com&contraseña=12345678. La respuesta esperada de la URL debe ser un objeto JSON como el siguiente:
{
    "first_name": "John",
    "last_name": "Doe",
    "email": "johon@example.com",
    "profile_image": "https://zampisoft.com/user.svg",
    "department": null,
    "password": "",
    "details": {
        "location": [
            "Location",
            "New York, United States"
        ],
        "country_code": [
            "Country code",
            "America/New_York"
        ]
    }
}
El valor first_name es requerido.
Enlace de inicio de sesión y contraseña olvidada
Si un usuario olvida su contraseña, puede hacer clic en Has olvidado tu contraseña y se enviará un correo electrónico con un enlace de inicio de sesión a la dirección de correo electrónico registrada. Al hacer clic en el enlace, el usuario iniciará sesión automáticamente. Puede personalizar el correo electrónico que se envía a los usuarios desde Configuración > Usuarios > Correo electrónico del enlace de inicio de sesión. El correo electrónico utiliza la plantilla definida en Configuración > Notificaciones > Plantilla de correo electrónico. Esta función solo está disponible si en Requerir registro está configurado para Formulario de registro e inicio de sesión o Formulario de inicio de sesión.
Misceláneas
- Los nuevos usuarios se muestran automáticamente en la tabla de usuarios en tiempo real.
- Para ver usuarios en línea, habiliteConfiguración > Usuarios > Registrar a todos los visitantes.
- Si está utilizando la versión en la nube , esta configuración se activa automáticamente) en Configuración > Usuarios > Registrar a todos los visitantes(activada por defecto). Esta función cubre todos los tipos de usuarios, incluyendo visitantes y clientes potenciales. Las notificaciones solo se envían una vez por usuario en un periodo de 24 horas.
- Los agentes y administradores pueden configurar su estado como en línea o fuera de línea desde el panel de perfil inferior izquierdo. Si la opción...Configuración > Notificaciones > Modo Ausente. Si está activo, el estado desconectado se activa automáticamente cuando el agente o administrador ha estado inactivo en el área de administración durante al menos 10 minutos. La inactividad se define como no realizar clics, movimientos ni pulsaciones de teclas. La función de desconexión automática no está habilitada en dispositivos móviles.
- La tabla de usuarios utiliza paginación automática, que está limitada a 100 resultados por desplazamiento.
Ajustes
Horario de oficina
Puede configurar el horario de oficina desdeConfiguración > Varios > Horario de oficinaEl horario de oficina se utiliza para:
- Enviando el mensaje fuera de línea .
- Deshabilitar y ocultar el chat fuera del horario de oficina.
- Deshabilitar el chatbot durante el horario habitual de oficina y habilitarlo fuera del horario de oficina.
Más información
- Si un día solo tiene una hora de inicio y una hora de fin, introdúzcalas en los dos primeros campos. Por ejemplo, utilice De 10:00 a 17:00 horas y de (vacío) a (vacío), no10:00 AM a (vacío) y (vacío) a 5:00 PM.
- No deje valores vacíos. Establézcalos encerradoen cambio.
- Tienes que establecer valores paracerradoSi desea establecer un día entero como no horario de oficina.
- El horario de oficina está en formato UTC. Establezca su UTC desdeConfiguración > Varios > Zona horaria.
- El formato de fecha y hora del horario coincide automáticamente con el utilizado en el país del idioma del navegador del usuario.
Artículos
Los artículos de la base de conocimientos ofrecen respuestas instantáneas a los clientes para ayudar a reducir el volumen de atención al cliente. Puede acceder a los artículos desde el menú izquierdo de ZampiBot.
Cómo visualizar el área de artículos
- Los artículos se pueden mostrar en el panel de chat habilitándolos desdeConfiguración > Artículos > Mostrar en el panel.
- Alternativamente, los artículos se pueden compartir en cualquier conversación de chat a través del código corto de mensaje enriquecido. [articles].
Sigue estos pasos para mostrar los artículos en una página de tu dominio y sitio web. Puedes mostrarlos de tres maneras:
MÉTODO API REST
Inserta el código a continuación en tu página. Reemplazar [URL DE ZAMPIBOT] con la URL de la instalación de su ZampiBot y[TU-TOKEN] con cualquier token de administrador. Si usa la versión en la nube , la URL es https://chatbot.zampisoft.com/script/include/api.php. Para obtener el token, haga clic aquí . Además, elimine los dos primeros scripts. Incluya la etiqueta nojquery => true. Si ya tienes jQuery incluido en tu página, incluye el atributo nojs => true. Si ya tienes el código de inserción de chat incluido en tu página.
<div id="sb-articles">
     <script src="[URL ZAMPIBOT]/js/min/jquery.min.js"></script>
     <script id="sbinit" src="[URL ZAMPIBOT]/js/main.js"></script>
     <?php
     $ch = curl_init('[URL ZAMPIBOT]/include/api.php?articles=true&' . (empty($_GET['category']) ? (empty($_GET['article_id']) ? (empty($_GET['search']) ? '' : '&search=' . urlencode($_GET['search'])) : '&article_id=' . $_GET['article_id']) : '&category=' . $_GET['category']) . (empty($_GET['lang']) ? '' : '&lang=' . $_GET['lang']));
     $parameters = [
         CURLOPT_RETURNTRANSFER => true,
         CURLOPT_SSL_VERIFYPEER => false,
         CURLOPT_USERAGENT => 'ZampiBot',
         CURLOPT_POST => true,
         CURLOPT_CONNECTTIMEOUT => 5,
         CURLOPT_POSTFIELDS => http_build_query([
                                   'token'=> '[YOUR-TOKEN]',
                                   'function' => 'init-articles'
                               ])
     ];
     curl_setopt_array($ch, $parameters);
     $response = curl_exec($ch);
     curl_close($ch);
     echo $response;
     ?>
</div>
MÉTODO JAVA SCRIPT
Inserta el código a continuación en tu página. Este método no se recomienda para SEO, ya que los artículos se cargan de forma asincrónica y es posible que los motores de búsqueda no indexen la página. Si está utilizando la versión en la nube , la URL https://chatbot.zampisoft.com/script
<script src="[ZAMPIBOT-URL]/js/min/jquery.min.js"></script>
<script id="sbinit" src="[ZAMPIBOT-URL]/js/main.js"></script>
<script>var SB_ARTICLES_PAGE = true;</script>
<div id="sb-articles" class="sb-loading"></div>
Navegación de una página
La navegación de una página del artículo aparece automáticamente en todos los artículos. Se genera a partir de la página del artículo. h2 y h3 bloques de encabezado.
Reescritura de URL
Puede habilitar la reescritura de URL desde Configuración Artículos > Reescritura de URL. Las URL predeterminadas de ZampiBot no son intuitivas e incluyen parámetros. Puedes reescribirlas mediante un archivo de .htaccess. El código a continuación reescribe las URL de las categorías y las páginas de artículos. La URL de las categorías cambia de articles.php?categories=ID a articles/category/ID. La URL del artículo cambia dearticles.php?article_id=ID a articles/ID.
<IfModule mod_rewrite.c>
RewriteEngine On
RewriteRule ^articles?$ articles.php [L]
RewriteRule ^articles/category/(.*)$/?$ articles.php?category=$1 [L,QSA]
RewriteRule ^articles/(.*)$/?$ articles.php?article_id=$1 [L,QSA]
</IfModule>Idioma
- Puedes agregar nuevas traducciones de artículos abriendo un artículo. Haz clic en el + en la esquina superior derecha y seleccione el idioma al que desea traducir el artículo. Para eliminar una traducción, pase el cursor sobre el icono de la bandera del idioma y haga clic en el icono de basura.
- Puede habilitar la traducción automática de artículos y categorías activando tanto la función multilingüe mediante traducción como Configuración > Artículos > Idioma > Traducción automática. También debes configurar el idioma predeterminado de tus artículos desde Configuración > Artículos > Idioma > Idioma predeterminado. El idioma utilizado para la traducción automática es el idioma del usuario detectado por ZampiBot. También puedes forzar un idioma específico añadiendo el parámetro URL lang=LANGUAGE-CODE
- El menú de idiomas se muestra al final del artículo. Muestra todas las traducciones disponibles.
- Si hay al menos un artículo traducido al idioma del usuario, solo se mostrarán los artículos traducidos en la página de categorías o la página principal. De lo contrario, todos los artículos se mostrarán en el idioma original.
- Fuerza que la página de artículos se muestre en un idioma específico agregando el parámetro URL lang=LANGUAGE-CODE. Reemplazar LANGUAGE-CODE con el código de idioma de dos letras.
More information
- Si utiliza categorías, todos los artículos deben asignarse a una categoría.
- Puedes crear un enlace de chat interno a un artículo con el botón de mensaje enriquecido .
- Puede crear un enlace a un artículo específico con el atributo URL article=ID, reemplazar ID con el ID del artículo. Ejemplo: https://zampibotpage.zampisoft.com/articles-demo?article=Ucsx6 .
- Puede crear un enlace a una categoría de artículo con el atributo URL category=ID, reemplazar ID con el ID de la categoría. Ejemplo: https://zampibotpage.zampisoft.com/articles-demo?category=LnNaZ .
- Los artículos siempre se incluyen en el entrenamiento de tu chatbot de OpenAI . Si actualizas un artículo, tendrás que volver a entrenar el chatbot; el proceso no es automático.
- Si algún bloque no se guarda, por ejemplo un bloque de texto, desactive todas las extensiones del navegador y vuelva a intentarlo.
- Para ocultar el widget de chat, inserte el siguiente código en la página de artículos: <script>var SB_DISABLED = true;</script>.
Idioma y traducciones
ZampiBot es totalmente multilingüe y ofrece potentes funciones para detectar el idioma del usuario sobre la marcha.
Idioma del chat
ZampiBot ya está traducido a más de 45 idiomas. Hay muchas opciones disponibles para configurar el idioma:
- OPCIÓN 1: Ir aConfiguración > Chat y verificar el Idioma. Configúrelo en plurilingüe para utilizar automáticamente el idioma de chat del navegador del usuario o el idioma guardado en el perfil del usuario.
- OPCIÓN 2: Agregar el parámetro URL lang=LANGUAGE-CODE Al script que carga el chat, reemplaza "CÓDIGO DE IDIOMA" con el código de idioma de dos letras que deseas mostrar.
Por ejemplo: https://chatbot.zampisoft.com/account/js/init.js?id=123456&lang=es.
Esta función obligará al chat a usar siempre el mismo idioma y Configuración > Chat > Idioma ignorará esta opción. Visite wikipedia.org/wiki/List_of_ISO_639-1_codes para ver la lista completa de códigos de idiomas (véase la columna 639-1). Para chino tradicional zt, para uso en chino simplificado zh, para uso en portugués brasileño pt.
- OPCIÓN 3 - SOLO WORDPRESS: La versión de ZampiBot para WordPress usa el idioma predeterminado de la instalación de WordPress; o el idioma de la página o entrada actual si el sitio web es multilingüe. Esta función es compatible con WPML, Polylang y otros plugins multilingües. Esta función se desactiva automáticamente si en Configuración > Chat > Idioma está activa.
Idioma de administración
Para traducir el área de administración siga los pasos a continuación:
- Traduce los textos en tu idioma desde el Configuración > Traducciones.
Para configurar el idioma del área de administración siga los pasos a continuación:
- Activar la opción Configuración > Administración > Traducir automáticamente el área de administración. Esta función traduce automáticamente el área de administración para que coincida con el idioma del perfil del agente o el idioma del navegador del agente.
Chatbot y traducciones de mensajes
Para traducir automáticamente los mensajes del chatbot y otros textos, utilice la aplicación de Inteligencia Artificial y siga los pasos que se describen aquí .
Editar y agregar nuevas traducciones
Puedes traducir prácticamente cualquier contenido personalizado, como mensajes enriquecidos , mensajes integrados , departamentos , encabezados de chat y más. Para añadir una nueva traducción o editar una existente, sigue estos pasos:
- Ir a Configuración > Traducciones, si desea agregar una nueva traducción, haga clic en Nueva traducción.
- Ingrese el contenido en inglés que desea traducir en el primer campo. El texto original debe estar en inglés. Si el texto original tiene saltos de línea, reemplácelos con el codigo .\no.
- Introduzca la traducción correspondiente en el segundo campo. Para añadir saltos de línea, utilice el código \n.
- Si tienes la aplicación de inteligencia artificial también puedes traducir todos los contenidos a cualquier idioma automáticamente a través de la función de traducción multilingüe .
Información
- Si falta una cadena de traducción, agréguela haciendo clic en el botón Añadir nueva traducción.
- Si una cadena de traducción no funciona, asegúrese de eliminar todos los espacios en blanco y los saltos de línea al principio y al final de la cadena.
- Las ediciones de las traducciones no se guardan en la base de datos, sino directamente en los archivos de traducción. Cuando se edita y se guarda una traducción, se crea una copia de seguridad. La copia de seguridad se restaura automáticamente al actualizar y activar el complemento.
- Algunos personajes especiales como & se reemplazan por el código HTML equivalente (ver https://www.w3schools.com/html/html_entities.asp ). Ej.& se reemplaza por &.
- También puedes agregar las cadenas de traducción faltantes mediante código. Edita los archivos de idioma ubicados en tablero de soporte\recursos\idiomas. Después de editar un archivo, las nuevas cadenas serán visibles en Configuración > Traducciones. Recuerda hacer clic Guardar cambios para preservar sus traducciones y evitar perderlas cuando se actualice ZampiBot.
Departamentos
Los departamentos le permiten distribuir conversaciones y asignar agentes a departamentos específicos. Por ejemplo, puede crear un departamento llamado "Ventas" y asignarle conversaciones específicas. Para empezar a usar los departamentos, siga estos pasos:
- Ir a Configuración > Misceláneas y añadir, eliminar y gestionar los departamentos. Después de guardar, recarga la página.
- Ir a Usuarios > Agentes y editar un agente, verás un nuevo campo donde podrás configurar el departamento del agente.
- ¡Recarga la página y listo! En el Área de conversaciones verá una opción para configurar el departamento.
Ajustes
- El tablero muestra la lista de departamentos en el panel de chat y obliga a los usuarios a elegir un departamento antes de iniciar una conversación.
- En la opción mostrar imágenes muestra la imagen del departamento en lugar del color del departamento.
- Mostrar en la lista de conversaciones muestra el color del departamento en la lista de conversaciones del área de administración.
- La opción conversación por departamento restringe que los usuarios abran múltiples conversaciones dentro del mismo departamento, permitiendo que solo una conversación esté activa por departamento.
- La opción Etiqueta reemplazar la etiqueta Departamentos(plural) con otro texto. El nombre se muestra en el área de administración y tickets.
- Etiqueta única reemplazar la etiqueta Departamento(singular)con otro texto. El nombre se muestra en el área de administración y tickets.
- Título del tablero establezca el título de la lista del panel de chat. Predeterminado: Departamentos.
Cómo funciona
- Los agentes y administradores sin un departamento asignado siempre ven las conversaciones de todos los departamentos.
- Los agentes y administradores con un departamento asignado solo pueden acceder a las conversaciones, usuarios y agentes dentro de ese departamento.
- Cuando una conversación se asigna a un nuevo departamento, se envía una notificación por correo electrónico a todos los agentes asignados al nuevo departamento.
- El chatbot puede asignar un departamento a la conversación activa a través de la función de conjunto de datos de preguntas y respuestas , la función de acciones de flujos o las acciones de Dialogflow .
Cómo asignar un departamento a una conversación
Puedes asignar un departamento a una conversación de varias maneras:
- A través de la función de configuración de datos de preguntas y respuestas .
- A través de la función de acciones de flujos .
- A través de Configuración > Misceláneas > Configuración de departamentos > Mostrar en el panel. En este caso, el usuario deberá seleccionar un departamento antes de iniciar una nueva conversación.
- A través de Configuración > Automatizaciones > Agregar nueva automatización.
- A través de JavaScript, con la variable var SB_DEFAULT_DEPARTMENT = ID; Introduce el código en las páginas donde se muestra el chat y reemplaza el ID por el ID del departamento. Para más detalles, consulta la API aquí .
- Vía API .
Cola y Enrutamiento
El sistema de Cola y Enrutamiento de Zampibot permite que el tablero de soporte asigne automáticamente las conversaciones a los agentes disponibles de forma proporcional y equitativa.
Configuración y Activación
Para habilitar estas funciones, acceda a:
-
Cola:
Configuración > Misceláneas > Cola. -
Enrutamiento:
Configuración > Misceláneas > Enrutamiento.
Una vez activo, el sistema distribuirá las conversaciones de los usuarios entre todos los agentes disponibles de manera automática.
Reglas de Asignación Automática
El sistema gestiona la carga de trabajo basándose en la disponibilidad real:
-
Disponibilidad: Solo los agentes con estado en línea son considerados disponibles para recibir nuevas conversaciones.
-
Reparto Proporcional: Las charlas se asignan equitativamente entre los agentes conectados.
-
Sin Agentes Online: Si no hay agentes en línea, la conversación permanecerá como "sin asignar" y se entregará automáticamente al primer agente que se conecte.
-
Administradores: Los administradores están excluidos del ciclo de asignación automática; ellos siempre mantienen visibilidad sobre todas las conversaciones.
Guía para el Agente
Gestión de Estado: Los agentes pueden alternar entre en línea y fuera de línea pasando el cursor sobre su imagen de perfil y haciendo clic en la etiqueta de la ventana emergente (esquina inferior izquierda del área de administración).
Flujo de Trabajo:
-
Completar Tareas: El agente debe archivar una conversación para marcarla como completada. Esto le dará acceso automático a la siguiente conversación en espera.
-
Privacidad: Los agentes solo pueden buscar, filtrar y ver sus propias conversaciones. Sin embargo, pueden ver el historial completo de un usuario si están atendiendo una de sus charlas.
Configuraciones de Visibilidad: Para permitir que los agentes vean conversaciones no asignadas, active: Configuración > Misceláneas > Ocultar conversaciones de otros agentes y Ver conversaciones no asignadas.
Información Detallada: Solo Cola
Cuando la cola está activa, los usuarios entran en ella automáticamente al alcanzarse el límite de chats de un agente.
-
Mensaje de Espera: El usuario verá su posición y el tiempo estimado. Puede usar las variables
{position}y{minutes}en el mensaje de configuración. -
Cálculo de Tiempo: Se calcula como:
Posición X Tiempo de respuesta(configurado enConfiguración > Misceláneas > Cola). -
Abandono: Si un usuario cierra el navegador por más de 1 minuto, perderá su posición. La conversación quedará como "sin asignar" (visible solo para administradores).
-
Apps de Mensajería (WhatsApp): No respetan el límite por agente; las conversaciones se asignan inmediatamente de forma proporcional a los agentes en línea.
Información Detallada: Solo Enrutamiento
-
Desactivar Verificación de Estado: Si activa
Enrutamiento > Desactivar verificación de estado en línea, las conversaciones se distribuirán incluso entre agentes desconectados. -
Reasignación: Si un usuario reabre un chat archivado y el agente asignado está offline, el sistema lo reasignará a un agente que esté en línea.
-
Enrutamiento Manual: Los agentes pueden mover conversaciones a otros compañeros desde el panel derecho si la opción
Ver conversaciones no asignadasestá activa.
Menú de Agentes
El Menú de Agentes permite asignar conversaciones manualmente a personas específicas. Aparece en el lado derecho del área de conversaciones y se habilita automáticamente con la cola o el enrutamiento.
Formas de asignar un agente:
-
Mediante la función Q&A set data.
-
A través de acciones en los Flows (flujos).
-
Mediante las funciones de Cola o Enrutamiento.
-
Activando
Configuración > Chat > Menú de Agentes(el usuario elige al agente antes de empezar). -
A través de
Configuración > Automatizaciones > Más. -
Vía JavaScript usando la variable
var SB_DEFAULT_AGENT = ID;. -
A través de la API.
Cómo probar la cola
-
Abra el chat en diferentes navegadores (Chrome, Firefox, etc.) o en modo incógnito para simular múltiples usuarios.
-
Para resetear una sesión y empezar como usuario nuevo, abra la consola del navegador (F12), escriba
SBF.reset()y presione Enter.
Email Piping (Sincronización de Correo)
El Email piping le permite sincronizar múltiples direcciones de correo electrónico para recibir mensajes directamente en Zampibot. También permite que usted, sus agentes y los usuarios respondan a los mensajes del chat a través del correo electrónico.
Activación
Para poner en marcha esta función, siga estos pasos:
-
Vaya a
Configuración > Notificaciones > Email pipinge ingrese la información de su servidor de correo POP3/IMAP. -
Vaya a
Configuración > Notificaciones > SMTPe ingrese la información de su servidor de correo SMTP. -
Importante: La dirección de correo debe coincidir con la que se conecta el servidor de email piping. Zampibot enviará todos los correos desde esta dirección.
Información y Reglas de Funcionamiento
-
Coincidencia de Emisor: El correo en
Configuración > Notificaciones > SMTP > Sender emaildebe ser el mismo que el del servidor de piping. Si usa varias direcciones, Zampibot incluirá un campo reply-to para asegurar que las respuestas se vinculen correctamente a la conversación original. -
Notificaciones: Las opciones de
User email notificationsyAgent email notificationsse activan automáticamente al habilitar el piping. -
Inteligencia Artificial: Si usa la App de IA y el human takeover está activo, no se enviarán correos si el chatbot puede responder por sí solo.
-
Conversión Global: Si activa Convert all emails, todos los correos recibidos (incluido el spam) se convertirán en chats. Úselo con precaución.
Guía para Agentes y Administradores
-
Cuentas Diferentes: No puede usar la misma dirección de email piping para responder manualmente desde fuera del sistema. Todos los agentes deben tener registrado un correo distinto al del piping.
-
Remitente Autorizado: Los agentes deben responder desde el mismo email con el que están registrados en el panel de Zampibot.
-
Estado del Agente: El sistema solo envía notificaciones por correo a los agentes si estos están fuera de línea.
Detalles Técnicos
-
Google / Gmail: Es obligatorio usar una Contraseña de aplicación de Google. Use el host
imap.gmail.comy el puerto993. -
Módulo PHP: Requiere que el servidor tenga instalado el módulo
php5-imap. -
Delimitador: La opción Delimitador añade el texto:
### Please type your reply above this line ###. Esto evita mensajes duplicados al recortar el historial previo. Si está activo, nadie debe usar la cadena###en sus correos. -
Filtros: Puede añadir palabras clave separadas por comas en la opción Filtros para evitar que ciertos correos se conviertan en chats.
Cron Job (Tareas Programadas)
El sistema procesa los correos cada 60 segundos mediante un cron job.
-
Versión Cloud: Ya viene configurado por defecto.
Mensajes Directos
Los mensajes directos le permiten enviar un único mensaje de chat, correo electrónico o mensaje de texto a un usuario individual o a varios usuarios a la vez. A continuación, se detalla cómo funciona esta característica:
Cómo enviar un mensaje
-
Desde el área de Usuarios: Diríjase a
Usuariosy haga clic en el icono de mensaje directo. -
Desde el perfil: Los botones de mensaje directo también están disponibles dentro del cuadro de perfil de cada usuario.
-
Enviar a todos: Para enviar un mensaje a toda su base de usuarios, escriba
Allen el campoIDs de usuario. -
Enviar a un grupo: Ingrese los IDs específicos en el campo
IDs de usuario. Puede seleccionar a los usuarios en la tabla y luego hacer clic en el icono de mensaje directo para que los IDs se completen automáticamente.
Características Generales
-
Campos de combinación: Todos los tipos de mensajes admiten el uso de campos de combinación (
merge fields). -
Traducción automática: Todos los tipos de mensajes son compatibles con la traducción automática.
Tipos de Mensajes
1. Mensaje Directo de Chat
El mensaje se envía a la conversación activa del usuario. Si no existe una, se iniciará una nueva automáticamente.
-
Notificaciones por Correo: Si la opción
Configuración > Notificaciones > Notificaciones por correo electrónico del usuarioestá activa, los usuarios con email recibirán un aviso por esa vía. -
Notificaciones por SMS: Si la opción
Configuración > Notificaciones > Notificaciones de mensajes de texto > Activo para usuariosestá activa, los usuarios con número de teléfono recibirán un mensaje de texto. -
Notificaciones Push: Si la opción
Configuración > Notificaciones > Notificaciones pushestá activa, se enviará una notificación push a todos los usuarios. -
Apps de Mensajería: El mensaje también se enviará a aplicaciones como WhatsApp y Messenger si el usuario está vinculado a ellas.
-
Filtrar por App: Para enviar un mensaje solo a los usuarios de una plataforma específica, ingrese una de estas cadenas en el campo de IDs:
whatsapp,messenger,instagram,telegram,twitter,zalo,wechat,viber,line. -
Tickets: Ingrese
ticketspara contactar únicamente a los usuarios que hayan creado un ticket a través de la aplicación deTickets.
-
2. Correo Electrónico Directo
-
Puede configurar la apariencia desde
Configuración > Notificaciones > Plantilla de correo electrónico. -
El sistema admite lenguaje HTML para el diseño del mensaje.
-
El asunto del correo también es compatible con campos de combinación (
merge fields).
3. Mensajes de Texto Directos (SMS)
-
Para habilitar esta función, debe activar los SMS en
Configuración > Notificaciones > Notificaciones de mensajes de texto.
4. Mensajes de Plantilla de WhatsApp Directos
-
Esta función permite enviar plantillas oficiales de WhatsApp a los usuarios. Para más detalles técnicos, consulte la sección de
WhatsAppde esta documentación.
Automatizaciones
Las automatizaciones permiten ejecutar tareas automáticas multilingües cuando se cumplen las condiciones específicas que usted configure.
Configuración y Control
-
Gestión de condiciones: Para eliminar una condición, simplemente déjela vacía. Para desactivar una automatización por completo, elimine todas sus condiciones.
-
Frecuencia de envío: Las automatizaciones se envían solo una vez a cada usuario. Si desea que los usuarios que ya recibieron una automatización la vuelvan a ver, deberá eliminarla y crear una nueva.
Reglas de Fecha y Tiempo
-
Repetir: La función de repetición solo es operativa cuando se utiliza en conjunto con el criterio
date time(fecha y hora). -
Criterio exacto: Cuando utilice
date timecon el criterio "es exactamente", el valor no debe incluir horas ni minutos (hh:mm). Por ejemplo:25/10/2021funcionará, pero25/10/2021 10:30no.
📍 Requisitos de Ubicación e Idioma
Para que las automatizaciones basadas en geolocalización o idioma funcionen correctamente, deben cumplirse ciertos requisitos en la configuración:
-
Dependencia general: La opción
Configuración > Usuarios > Registrar a todos los visitantesdebe estar activa para ejecutar automatizaciones al cargar la página. -
Detalles avanzados: Las condiciones de ciudad, país e idioma requieren que también esté habilitada la ruta:
Configuración > Usuarios > Detalles completos del visitante.-
Ciudad: Solo funciona si el detalle de usuario
locationestá configurado como "ciudad, país" o si el detallecityestá definido. -
País: Requiere que
country_code,countryolocationestén configurados. Nota: El nombre del país debe estar escrito en inglés. -
Idioma: Requiere los detalles de usuario
browser_languageolanguage.
-
Comportamiento del Visitante
-
Visitante recurrente: Se considera un "visitante recurrente" únicamente si vuelve a visitar el sitio web después de un periodo de 24 horas o más.
-
Ventanas emergentes (Pop-ups): Aparecen solo si el chat está cerrado y sobrescriben la ventana emergente predeterminada. Puede activar la opción de mensaje de respaldo (message fallback) para enviar un mensaje en lugar de mostrar el pop-up si el chat ya está abierto.
Condiciones Técnicas Especiales
-
Control de conversación: Para evitar interrupciones durante una charla activa, los mensajes automáticos y los respaldos de pop-up se envían solo si el último mensaje del usuario o agente tiene más de 10 minutos de antigüedad.
-
Variables personalizadas: Esta condición verifica variables de JavaScript en su página web. Por ejemplo, la condición
example=ABCse cumple si en el código de su página existe:var example = "ABC";. Puede añadir múltiples variables separadas por comas.
⚠️ Restricciones de Compatibilidad
Las automatizaciones no son compatibles con aplicaciones de mensajería externas, tales como:
-
WhatsApp, Messenger, Instagram, Telegram, Twitter, Zalo, WeChat, Viber y Line.
Newsletter
Siga las instrucciones a continuación para completar la sincronización con su servicio de boletines (newsletter). Los usuarios se suscriben automáticamente en los siguientes casos: a través del formulario de registro, mediante el mensaje de seguimiento, con el mensaje de suscripción o al utilizar el código corto de correo electrónico.
Mailchimp
-
-
Para obtener la Clave (Key), siga las instrucciones en:
https://mailchimp.com/help/about-api-keys/. -
Para obtener el ID de la lista, siga las instrucciones en:
https://mailchimp.com/help/find-audience-id/.
-
Brevo
-
- Obtenga la Clave en:
https://account.brevo.com/advanced/api. -
Obtenga el ID de la lista en:
https://my.brevo.com/lists.
- Obtenga la Clave en:
SendGrid
-
- Obtenga la Clave en:
https://app.sendgrid.com/settings/api_keys. - Para el ID de la lista, ingrese a SendGrid y haga clic en
Marketing > Contacts. Seleccione una lista o cree una nueva; el ID es la última parte de la URL (ejemplo:8558c1e7-3c99-4428-a68f-78df2e437f8e).
- Obtenga la Clave en:
Elastic Email
-
- Para la Clave, vaya al menú de perfil superior derecho en
Settings > Create Additional API key. Elija Plugin o Full access y asegúrese de que el permiso de Contacts esté configurado como View & Modify. - El ID de la lista es el nombre de la lista. Importante: Los nombres de listas o segmentos no deben contener espacios.
- Para la Clave, vaya al menú de perfil superior derecho en
Campaign Monitor
-
-
Obtenga la Clave en el menú de perfil superior derecho bajo
Account settings > API keys > Generate API key. -
Para el ID de la lista, vaya al menú superior en
List and subscribers, seleccione una lista, haga clic enSettingsen el menú izquierdo y copie el List API ID.
-
HubSpot
-
-
Para la Clave, vaya a
Settings > Integrations > Private appsy cree una nueva aplicación. En la pestaña Scope, añada los permisos:crm.lists.write,crm.lists.read,crm.objects.contacts.readycrm.objects.contacts.write. Copie el token generado y péguelo en el campo Key de ZampiBot. -
Obtenga el ID de la lista en
Contacts > List > List details.
-
Moosend
-
-
Obtenga la Clave en
Settings > API key. -
Obtenga el ID de la lista en
Audience > Email lists.
-
GetResponse
-
-
Para el ID de la lista, vaya a
Lists > Your list > Settingsy copie el valor de List token. -
Obtenga la Clave en
https://app.getresponse.com/api.
-
ConvertKit
-
-
Obtenga la Clave en
Settings > Advanced > API secret. -
Para el ID de la lista, vaya a
Grow > Landing Pages & Forms. Abra su formulario y copie la parte numérica de la URL (ejemplo: si la URL es.../designers/3003412/edit, el ID es3003412).
-
ActiveCampaign
-
-
Obtenga la Clave en
Account settings > Developer. -
Para el ID de la lista, vaya a
Left menu > Lists. Copie el ID numérico de la URL. El valor final debe tener el formatodominio:ID-lista. El dominio es la primera parte de la URL de su tablero (ejemplo:schiocco:1).
-
MailerLite
-
-
Obtenga la Clave en
Left menu > Integrations > MailerLite API. -
Para el ID de la lista, vaya a
Left menu > Subscribers > Groups. Abra un grupo y copie el ID de la URL.
-
Mailjet
-
-
Obtenga la Clave en
https://app.mailjet.com/account/apikeyso enAccount settings > Account settings. -
Para el ID de la lista, vaya a
Contacts > Contacts lists > Your list. Obtenga el ID haciendo clic en el icono?junto al correo de la lista.
-
Sendy
-
-
Obtenga la Clave en el área de configuración de Sendy.
-
Para el ID de la lista, seleccione su marca, haga clic en
View all listsy copie el ID. El ajuste debe incluir su URL completa de Sendy y el ID separados por una barra vertical (ejemplo:https://ejemplo.com|TDf6o892Mx11VXGC51ui567u).
-
SendFox
-
-
Obtenga la Clave en
Settings > API > Personal Access Tokens. -
Para el ID de la lista, vaya a
Audience > Lists. Abra una lista y copie el ID de la URL.
-
Mas ajustes
Respuestas guardadas
Las respuestas guardadas, también conocidas como mensajes predefinidos, son una colección de mensajes escritos previamente que los agentes pueden utilizar de forma rápida en el editor del chat. Puede gestionarlas desde la siguiente ruta: Configuración > Administración > Respuestas guardadas.
-
Uso rápido: Las respuestas se pueden insertar escribiendo
#seguido del nombre de la respuesta guardada y un espacio. -
Ventana emergente: Para abrir el panel emergente con todas las respuestas disponibles, escriba
##. -
Formato: Utilice el código
\npara insertar un salto de línea en el mensaje. -
Integración con Dialogflow: Si utiliza el chatbot de Dialogflow, la búsqueda en el panel de respuestas guardadas incluirá resultados de las Intents de Dialogflow.
-
Importación de Intents: Tiene la opción de añadir todas las Intents de Dialogflow a la lista de respuestas guardadas activando la opción en:
Configuración > Inteligencia Artificial > Google > Añadir Intents a respuestas guardadas.
Notificaciones
Para comprender cómo funcionan las notificaciones y cuándo se envían, lea la siguiente información. Si cree que las notificaciones no funcionan, probablemente las esté probando incorrectamente. Lea la siguiente información antes de solicitar asistencia.
Notificaciones por correo electrónico
Tanto los agentes como los usuarios pueden recibir una notificación por correo electrónico cuando se recibe un nuevo mensaje.
Notificaciones por correo electrónico para administradores y agentes
- Cuando un usuario envía su primer mensaje, si la conversación está asignada a un departamento , se envía un correo electrónico solo a los agentes y administradores que estén desconectados y asignados a ese departamento, o a aquellos que no tengan asignado ningún departamento. Si la conversación está asignada a un agente específico, se envía un correo electrónico solo a ese agente; de lo contrario, se envía un correo electrónico a todos los agentes que no estén conectados en ese momento. Los correos electrónicos posteriores se envían solo al último agente de la conversación.
- Las notificaciones por correo electrónico se envían solo a agentes y administradores fuera de línea.
- Si está utilizando la aplicación de Inteligencia Artificial y la función de toma de control humano está activada, no se envían correos electrónicos si el chatbot sabe la respuesta.
- Para evitar que los administradores reciban notificaciones por correo electrónico, marque Configuración > Notificaciones > No enviar notificaciones a los administradores.
Notificaciones por correo electrónico para los usuarios
- Cuando un agente envía un mensaje a un usuario, se le envía un correo electrónico solo si el usuario está desconectado.
- Solo se envía un correo electrónico. Los mensajes posteriores no activarán una nueva alerta.
Crear el correo electrónico
Para administrar los correos y crear los contenidos vaya aConfiguración > NotificacionesPuedes usar texto y HTML. Las nuevas líneas se convierten automáticamente a<br />Puede usar los siguientes campos de combinación en el correo electrónico. Estos campos se reemplazan automáticamente con la información actualizada.
| Merge field | Description |
|---|---|
{recipient_name}
|
El nombre del usuario o agente que recibe el correo electrónico. |
{sender_name}
|
El nombre del usuario o agente que envió el mensaje que activó la notificación por correo electrónico. |
{sender_profile_image}
|
The profile image of the user or agent who was sending the message that triggered the email La imagen de perfil del usuario o agente que envió el mensaje que activó la notificación por correo electrónico.. |
{message}
|
Los enlaces a cualquier archivo adjunto que formaba parte del mensaje que activó la notificación por correo electrónico. |
{attachments}
|
Los archivos adjuntos de los correos electrónicos. |
{conversation_link}
|
Un enlace para abrir la conversación en el área de administración. Este campo de combinación solo está disponible para los correos electrónicos de los agentes. |
{conversation_id}
|
El ID de la conversación. |
Plantilla de correo electrónico
Todos los correos electrónicos enviados por ZampiBot utilizan la plantilla definida en la siguiente ruta: Configuración > Notificaciones > Plantilla de correo electrónico.
Es obligatorio incluir el campo de combinación {content}, el cual será reemplazado automáticamente por el cuerpo real del mensaje de correo electrónico al momento del envío.
Cron job (Trabajos programados)
Puede ejecutar un cron job para el envío de notificaciones por correo electrónico tanto a usuarios como a agentes. Al utilizar este método, las notificaciones mejoran significativamente: incluirán la conversación completa y se enviarán una sola vez.
Configuración requerida: Para utilizar esta función, debe activar la opción en: Configuración > Notificaciones > Notificaciones por correo electrónico a través del trabajo cron.
Ejecución del comando: Puede crear un cron job que ejecute la siguiente URL: [URL-DE-INSTALACION]/include/api.php?email-notifications=true.
-
Obtención de la URL: Puede encontrar su URL de instalación en
Configuración > Misceláneas > Installation URL. -
Versión Cloud: Si utiliza la versión en la nube, emplee esta URL:
https://chatbot.zampisoft.com/script/include/api.php?email-notifications=true&cloud=API-TOKEN(reemplaceAPI-TOKENcon su token de API personal).
Nota: Esta es una función avanzada relacionada con la configuración de su servidor. Nuestro equipo de soporte no ofrece asistencia directa para la gestión de servidores, pero puede contratarnos para ayudarle con esta implementación.
¿Tiene problemas?
Si las notificaciones por correo no se entregan correctamente, puede realizar una prueba de envío desde la siguiente ruta: Configuración > Notificaciones > Send an agent email notification.
Existen diversos motivos por los cuales los correos podrían no entregarse:
-
Problemas de Hosting: El servidor de su proveedor de alojamiento no puede enviar correos o estos son marcados como spam. En este caso, se recomienda activar un servidor SMTP externo en
Configuración > Notificaciones > SMTP. -
Errores de SMTP: Si tras activar el SMTP no recibe los correos de prueba, es probable que los datos de conexión sean incorrectos o su servidor SMTP no esté funcionando.
-
Configuración de Gmail: Si utiliza Gmail o Google Workspace, debe usar una "Contraseña de aplicación" y asegurarse de que el puerto sea
465o587. Además, verifique que el acceso SMTP para aplicaciones de terceros no esté restringido en su consola de administración.
| Razón | Descripción | Solución |
| Problemas de alojamiento (Hosting) | El servidor de su proveedor de hosting no puede enviar correos o estos son detectados automáticamente como spam y eliminados. | Si las opciones en Configuración > Notificaciones > SMTP no están configuradas, su servidor intentará enviar los correos de forma nativa. Contacte con su proveedor de hosting para obtener soporte o active un servidor SMTP externo en la ruta mencionada. |
| Problemas con SMTP | El correo electrónico no se envía a pesar de haber activado la opción SMTP en el área de notificaciones. | Asegúrese de que la conexión funcione enviando un correo de prueba desde Configuración > Notificaciones > Enviar una notificación por correo electrónico al usuario o Enviar una notificación por correo electrónico al agente. Si no recibe el mensaje, su servidor SMTP no funciona. Revise la consola del navegador para ver el error específico. Este problema es externo a ZampiBot; contacte a su proveedor de SMTP o use servicios como SendGrid (40,000 correos gratis el primer mes). |
| Google Gmail | El correo no se envía al intentar utilizar el servidor SMTP de Gmail, incluso con la opción activa. | Para cuentas de Gmail o Google Workspace, debe usar una Contraseña de Aplicación (consulte la guía de Google). Use smtp.gmail.com como anfitrión y el puerto 465 o 587. En Google Workspace, verifique en Consola de administración > Seguridad > Control de acceso y datos > Controles de API > Control de acceso a aplicaciones que el acceso SMTP no esté restringido. |
Notificaciones Push
Las notificaciones push se diferencian de las notificaciones de escritorio tradicionales en que son enviadas directamente desde un servidor. Esto permite que funcionen en todo momento, incluso si su dispositivo está desconectado o si ZampiBot no está abierto en el navegador. Además, son persistentes y permanecen visibles hasta que el usuario las cierra.
ZampiBot es compatible con Pusher y OneSignal, ambos servicios gratuitos para hasta 2000 usuarios o dispositivos.
Nota importante: Pusher no es compatible con dispositivos iOS; si utiliza iPhone o iPad se envia por OneSignal.
Versión Cloud
La versión en la nube de ZampiBot utiliza OneSignal por defecto y ya se encuentra preconfigurada. Para habilitarlas en el área de administración, solo debe seguir esta ruta: Configuración > Notificaciones > Notificaciones push > Activo para agentes, guarde los cambios y recargue el panel.
Activación para Usuarios
Para habilitar las notificaciones push en sus clientes, siga estos pasos:
-
Descargue el archivo del Service Worker desde el enlace proporcionado here.
-
Suba dicho archivo a la raíz de su sitio web en la siguiente ubicación:
https://su-sitio.com/service-worker.js. -
Vaya a
Configuración > Notificaciones > Notificaciones push > URL del Service Workere ingrese la URL completa del archivo.
Información y Requisitos
-
Seguridad: Las notificaciones push solo funcionan en sitios web con protocolo HTTPS completo (a excepción de localhost para pruebas de desarrollo).
-
Funcionamiento en Escritorio: El navegador debe estar ejecutándose (aunque esté en segundo plano) para recibir los mensajes.
-
Sustitución: Cuando las notificaciones push están activas, reemplazan automáticamente a las notificaciones de escritorio estándar.
-
Dispositivos iOS: Disponibles a partir de iOS 16.4. Requiere que ZampiBot esté instalado como una PWA y el uso obligatorio de OneSignal.
-
Interacción: Al hacer clic en una notificación, se abrirá la última página visitada por el usuario y el chat se desplegará automáticamente.
Reglas para Administradores y Agentes
El sistema sigue una lógica inteligente para el envío de alertas:
-
Disponibilidad: Solo se envían notificaciones a agentes y administradores que estén fuera de línea.
-
Segmentación por Departamentos: Si un chat pertenece a un departamento, solo los agentes asignados a este recibirán la alerta.
-
Asignación Específica: Si la conversación tiene un agente asignado, solo esa persona recibirá la notificación.
-
Control de IA: Si la función de human takeover está activa y el chatbot conoce la respuesta, no se enviarán notificaciones al equipo humano.
-
Restricción de Administradores: Puede evitar que los administradores reciban alertas activando:
Configuración > Notificaciones > No enviar notificaciones a los administradores.
Solución de Problemas
Si las notificaciones no funcionan correctamente, verifique los siguientes puntos:
-
-
Permisos del Navegador: En Chrome, revise
Privacidad y seguridad > Configuración de sitios > Notificacionespara asegurarse de que el sitio esté permitido. -
Segundo Plano (Chrome): Asegúrese de que la opción
Seguir ejecutando aplicaciones en segundo plano al cerrar Google Chromeesté activa en la configuración del sistema de su navegador. -
Configuración de Windows: Verifique que el sistema operativo no esté bloqueando las alertas en
Inicio > Configuración > Notificaciones. -
Visibilidad del Panel: Las notificaciones no se mostrarán si el área de administración de ZampiBot ya está abierta y visible; minimice la ventana o use otra pestaña para probar.
-
Reset de Suscripción: Si el problema persiste con OneSignal, acceda a su panel de control, elimine al usuario de la sección
Audience > Usersy suscríbase nuevamente.
-
Notificaciones de escritorio
Las notificaciones de escritorio (también conocidas como notificaciones web) permiten alertar a los usuarios y agentes de forma inmediata, con las siguientes condiciones:
-
No se envían si el usuario está visualizando activamente una página que incluye el chat (el navegador está abierto, visible y la página activa contiene el chat).
-
No son compatibles con dispositivos iPhone o iOS.
-
Funcionan únicamente en URLs seguras que utilicen HTTPS. La URL de administración de ZampiBot debe usar HTTPS obligatoriamente.
-
Si las Notificaciones Push están activas, estas reemplazarán automáticamente a las notificaciones de escritorio.
-
Si experimenta problemas con estas alertas, intente aplicar las soluciones descritas en la sección de Notificaciones Push.
Notificaciones de mensajes de texto (SMS)
Tanto los agentes como los usuarios pueden ser notificados mediante mensajes de texto cuando llega un nuevo mensaje. Este servicio es proporcionado por Twilio. Es un servicio de pago, pero cuenta con una versión de prueba gratuita para realizar tests. Además, los mensajes SMS enviados a su número de Twilio pueden recibirse dentro de ZampiBot, permitiendo una experiencia de mensajería bidireccional.
Activación
-
Regístrese en Twilio y cree una nueva cuenta.
-
Verifique su número de teléfono y elija la opción SMS en el formulario de configuración.
-
Desde su panel de Twilio, haga clic en
Get a Trial Number(Obtener un número de prueba). -
Ingrese al área de administración de ZampiBot y vaya a:
Configuración > Notificaciones > Notificaciones de mensajes de texto. Pegue el SID de la cuenta, el token de autenticación y el número de prueba (o número comprado). -
Pruebas: Si usa la versión de prueba, solo podrá enviar notificaciones a números verificados en su panel de Twilio bajo
Verified Caller IDs. -
Uso en vivo: Para recibir mensajes de texto en ZampiBot, debe comprar un número y configurar la URL en Twilio desde:
Phone numbers > Manage > Active numbers. Obtenga el enlace necesario en ZampiBot en:Configuración > Notificaciones > Notificaciones de mensajes de texto > URL de configuración.
Información importante
-
Lógica de envío: Cuando un usuario envía su primer mensaje, el SMS se envía únicamente a los agentes y administradores que estén fuera de línea y asignados al departamento correspondiente. Los mensajes subsiguientes se envían solo al último agente que participó en la conversación.
-
Restricción de administradores: Puede evitar que los administradores reciban estos SMS activando:
Configuración > Notificaciones > No enviar notificaciones a los administradores. -
Números de Agentes: Asegúrese de que sus agentes tengan un número de teléfono asignado en su perfil para recibir las alertas.
-
Formato: Todos los números deben incluir el código de país comenzando con el símbolo + (ej. +15558675310).
-
Control de IA: Si utiliza la App de Inteligencia Artificial y el relevo humano (human takeover) está activo, no se enviarán SMS si el chatbot conoce la respuesta.
-
Sender ID: Puede personalizar el nombre del remitente en el campo
Sender numbersi su plan de Twilio lo permite.
Notificaciones de sonido
Al habilitar los sonidos en Configuración > Notificaciones > Sonidos, se reproducirá una alerta auditiva cada vez que se reciba un nuevo mensaje o conversación.
-
Interacción obligatoria: Debido a las políticas de seguridad de los navegadores modernos, el audio solo sonará si el usuario o agente ha interactuado previamente con el documento (haciendo clic en cualquier parte del panel de administración o en la página del chat).
-
Bucle: Si el sonido está configurado para repetir, se reproducirá en bucle siempre que el área de administración o la página del chat no estén abiertas o estén minimizadas. Si la ventana está activa y visible, el sonido no se reproducirá.
Notificaciones de Telegram
Para conocer los detalles específicos sobre cómo vincular ZampiBot con Telegram para recibir notificaciones, consulte la sección dedicada a Telegram en esta documentación.
ARTIFICIAL INTELLIGENCE
The settings below are related to the Artificial Intelligence app.
Installation
- From Settings > Apps, click Artificial Intelligence and enter your license key to install and activate the app. More details here. If you have the cloud version click Active.
Human takeover
The human takeover happens in these cases:
- When a human agent replies to a user's message.
- When the Settings > Artificial Intelligence > Human takeover > Active option is checked. It is triggered automatically when the chatbot fails to understand a user's message or it can be requested manually by the user explicitly asking to contact a human agent.
General information
- When the human takeover is activated the chatbot is automatically disabled for as long as the last human agent that replied to the conversation is online. If no agents have responded to the conversation yet, the chatbot will remain active. After that, the chatbot is activated again but no default fallback messages will be sent within 10 days of human takeover if the chatbot doesn't know the answer to the user's question in the same conversation. You can force a Dialogflow message to be always sent by adding to the Intent the custom Payload value "force-message": true.
- The chatbot is fully activated again if the conversation is archived or deleted.
- If you're using Slack, no messages will be sent if the chatbot knows the answer. Once the human takeover is active all conversation's messages are sent to Slack.
- When a human agent reply to a user the human takeover is activated automatically.
- The human takeover feature is compatible with OpenAI and will continue to function even if the Dialogflow chatbot is deactivated.
- To fully disable the chatbot on human takeover, check the option Human takeover > Disable chatbot.
- If the human takeover is already active, it will not be activated again, and the human takeover message will not be sent. The fallback message will be sent instead.
- The Settings > Artificial Intelligence > Human takeover > Fallback message feature sends an automatic fallback message when a user sends a new message while human takeover is active. It's useful for letting users know that their messages have been received and that an agent will reply shortly. The fallback message is sent at most once every 30 minutes and only if the user's new message is sent more than 30 minutes after the last agent reply.
- Human takeover works seamlessly across all messaging apps, like WhatsApp, Messenger, Telegram, and others. Users don't need to click a confirmation button, any text reply confirming the request will activate the human takeover automatically.
Human takeover option
When the option Human takeover is active the following happens:
- If enabled, the request is sent only if the message sent by the user is longer than 3 chars and contains at least two words. This optimization prevents mistaken requests.
- The conversations to which the chatbot was able to answer correctly, are marked as read and moved at the bottom of the Inbox list.
When the user confirms the human takeover, or if it is automatic, the following happens:
- The conversation is marked as unread and moved on top of the Inbox.
- Any future user messages in the same conversation sent within 10 days of the human takeover will trigger agent notifications.
- The notifications are sent according to their settings; see notifications for more details.
- No human takeover requests within 10 days of the human takeover will be sent in the same conversation.
- The follow-up message and offline message are activated.
- If queue settings are active, the queue or routing is activated.
- If the disable outside office hours option is active, the human takeover is disabled outside office hours or if all agents are offline. More details here.
Manual human takeover - Dialogflow Only
- You can manually trigger the human takeover by creating a new Dialogflow Intent with the following Custom Payload response: { "human-takeover": true }.
- The manual takeover automatically notify agents via email and leave the conversation marked as unread.
- To manually send a human take over request use the chips rich message with ID sb-human-takeover. Ex. [chips id="sb-human-takeover" options="Human support,Cancel" message=""].
Manual human takeover - OpenAI Only
- The human takeover can be requested manually by the user explicitly asking to contact a human agent. This setting is active by default.
Human takeover via Q&A
You can enable the human takeover for specific user messages via Q&A by adding the human takeover action in set data and actions.
OpenAI Assistant
To enable human takeover on an OpenAI Assistant add the following function in the OpenAI functions area:
{
    "name": "sb-human-takeover",
    "description": "I want to contact a human support agent or team member. I want human support.",
    "parameters": {
        "type": "object",
        "properties": {},
        "required": []
    }
}
Smart reply
Smart Reply suggests quick responses in real-time during a conversation. Once active, you will see the suggested replies in the conversation area, if any.
Information
- The Smart Reply feature initially checks for suggestions from the Dialogflow chatbot, provided it is active. If there is at least one suggestion, it will promptly display the results. However, if Dialogflow is inactive, or there are Dialogflow suggestions, the OpenAI suggestions will be returned instead.
- If the language detection feature is active, the smart replies will use language detection as well.
- If the multilingual via translation feature is enabled, the smart replies will utilize multilingual translation as well.
- To read the complete text of a smart reply, hover the mouse pointer over it for a duration of 3 seconds.
- To restore the previous message, press the keyboard shortcuts CTRL + Z.
Optimal configuration for the chatbot
ZampiBot provides powerful tools to assist you in the process of creating the chatbot.
- Activate Artificial Intelligence > Google > Dialogflow chatbot. If you have general or specific inquiries that require a definitive response, or if you want to use rich messages like buttons, the Dialogflow chatbot is the best option and it can work alongside the OpenAI chatbot. The Dialogflow and OpenAI chatbots can work together simultaneously. More details here.
- Keep improviding the chatbot from the chatbot training panel.
- Activate Artificial Intelligence > Smart Reply. More details here.
- Activate the following OpenAI settings: Chatbot, Spelling Correction, Dialogflow spelling correction, Rewrite Message Button. More details here.
- Train your OpenAI chatbot with your own content, more details here.
- Set the value of Google > Dialogflow Intent detection confidence to 0.81.
- If your website receives traffic from multiple countries, consider activating the following Google options: multilingual via translation, automatic translation, language detection.
- Change the chatbot name from Settings > Users > Bot name.
Problems?
The most frequent reasons for OpenAI or Google not functioning properly are listed below. For more details about the issue, open the browser developer tools and then the console tab, send a message through the ZampiBot chat, and an error should appear in the console. On Chrome you can open the console from Settings > More tools > Developer tools > Console.
OpenAI and Google
- There is a human takeover.
- You can hire us to make the synchronization for you, details at the hire us page.
OpenAI
- Click the Settings > Artificial Intelligence > OpenAI > Troubleshoot problems button and check for any error. If there is an error, it will be related to your OpenAI account, follow the error message instructions to fix the issue.
- Make sure to check the option Settings > Artificial Intelligence > OpenAI > Chatbot.
- You reached the quote limit or you are encountering billing problems with your OpenAI account. Check it at https://platform.openai.com/account/usage.
- If Dialogflow is enabled, OpenAI may not work correctly because your Dialogflow agent does not have the Fallback Intent. Please verify its presence on the Intents page, and if it's missing, you can create it again by following the instructions here. To quickly check if this is the issue, you can disable Dialogflow and send a message consisting of 2-3 words. Then, check if the browser console has errors.
- If the chatbot is not replying at all and you have some Google setting active, try to disable the Google settings and check if the chatbot is working.
- Make sure to read the general information.
- If the training is not working as intended, for instance, if the chatbot is not responding to questions relevant to the training data, and no training errors are being shown, there may be file permission issues. To address this, please ensure that the uploads folder includes the embeddings folder. It must exists and contains files. This issue only affects the PHP or WordPress versions, if your are using the cloud version ignore this point.
- If the training is not working as intended, for instance, if the chatbot is not responding to questions relevant to the training data, try to delete all training data from Chatbot > Training > Informaion > Delete all training data and train the chatbot again.
- If the training is not working as intended, for instance, if the chatbot replies are cut off or partially incorrect, try asking the same question a few more times. The responses should improve over time. OpenAI is needs to learn from the user interactions.
- If your training data is from a website, and the website is multilingual, make sure the lang attribute of the <html> tag contains the correct language.
- Delete all of your OpenAI settings, leave only the OpenAI key and try again.
- Try to use the OpenAI assistant instead.
- If you are using the cloud version, you can use our OpenAI key by setting Settings > Artificial Intelligence > OpenAI > Sync mode to Automatic. If this resolves your problems, it means that the issue originates from your OpenAI account. You need to purchase credits to use this option.
- Click the Settings > Artificial Intelligence > Google > Troubleshoot problems button and check for any error. If there is an error, it will be related to your Google account, follow the error message instructions to fix the issue.
- Make sure to check the option Settings > Artificial Intelligence > Google > Dialogflow chatbot.
- If your synchronization was not successful we suggest reviewing our documentation and repeating the synchronization steps to correct any errors. If needed, we provide integration services. Details at the hire us page.
- You selected the wrong agent location.
- Make sure are not using a mega agent.
- Make sure to read the general information.
OpenAI
The settings below are related to the Artificial Intelligence app.
Synchronization
Automatic sync mode
This feature is available only on the cloud version of ZampiBot.
- The automatic sync mode is ready-to-use and does not require any additional settings. Set it at Settings > Artificial Intelligence > OpenAI > Sync mode.
- If you want to activate the chatbot, check Settings > Artificial Intelligence > OpenAI > Chatbot.
- You need to purchase credits to use this option.
Manual sync mode
The OpenAI (ChatGPT) integration gives your chatbot the ability to answer general questions about almost anything you can imagine. To start using it, follow the steps below.
- Register at https://platform.openai.com/.
- Get an API key from https://platform.openai.com/api-keys and paste it into Settings > Artificial Intelligence > OpenAI > API key. If you are using the cloud version, set Settings > Artificial Intelligence > OpenAI > Sync mode to Manual.
- Enable the chatbot from Settings > Artificial Intelligence > OpenAI > Chatbot.
Chatbot
To set up your first chatbot, follow these steps:
- Complete the synchronization process.
- Enable the Settings > Artificial Intelligence > OpenAI > Chatbot option, and save your changes.
- Your chatbot should now be active. The playground is accessible from the Chatbot area, which you can find by clicking the 🙂 smile icon on the left menu. If the chatbot isn't working, click the Settings > Artificial Intelligence > OpenAI > Troubleshoot problems button and follow the instructions.
- To further improve your chatbot, explore the training and human takeover sections.
Chatbot Integrations
The following integrations are available from Settings > Artificial Intelligence and can be used to enhance the OpenAI chatbot's capabilities. Integrations are conversational, multilingual, and compatible with any messaging app such as WhatsApp, Messenger, Telegram, and more.
Google Calendar
Enable this integration to allow the OpenAI chatbot to access your Google Calendar, so users can book appointments and manage them on your calendar.
Tasks
- Book an avent: The chatbot can book events in your Google Calendar on behalf of the user.
- Update an avent: The chatbot can update an existing event for a user in your Google Calendar.
- Cancel an avent: The chatbot can cancel an existing event for a user in your Google Calendar.
- List events: The chatbot can list the events of a user from your Google Calendar.
- Show available booking times: The chatbot can show the available booking times.
Setup
- Go to Settings > Artificial Intelligence > Google Calendar integration and click Activate.
- Click Settings > Artificial Intelligence > Google > Synchronize and complete the synchronization process.
- Set the available booking times under Settings > Miscellaneous > Scheduled Office Hours.
- You are done. The chatbot can now book and manage events in your Google Calendar.
Information
- The Slot duration setting is the duration of the booked event.
- The Buffer time setting is used to add a buffer (in minutes) between bookings so you are not booked back-to-back.
- The Minimum booking time setting is the minimum time (in minutes) required to book an event from the current time. It is used to prevent bookings too close to the current time.
TidyCal
Enable this integration to allow the OpenAI chatbot to access your TidyCal account, so users can book appointments and manage them on your TidyCal account.
Tasks
- Book an avent: The chatbot can book events in your TidyCal on behalf of the user.
- Update an avent: The chatbot can update an existing event for a user in your TidyCal.
- Cancel an avent: The chatbot can cancel an existing event for a user in your TidyCal.
- List events: The chatbot can list the events of a user from your TidyCal.
- Show available booking times: The chatbot can show the available booking times.
Setup
- Go to Settings > Artificial Intelligence > TidyCal integration and click Activate.
- In your TidyCal account, go to Integrations > Advanced > API Keys or click here. Create a Personal Access Token, copy it, and paste it into Settings > Artificial Intelligence > TidyCal integration > Access token. Then, save the changes.
- Enter the title of the booking type you want to use in Settings > Artificial Intelligence > TidyCal integration > Booking type title, and save the changes.
- Configure the available booking times, buffer times before and after bookings, and the slot duration directly in your TidyCal account.
- You are done. The chatbot can now book and manage events in your TidyCal account.
Information
- Only events without a price are supported.
- The selected booking type is cached for 24 hours. If you update it, you may need to wait up to 24 hours for the changes to take effect. To apply changes immediately, create a new booking type or change its title and update it in the ZampiBot settings.
Settings
See information about most OpenAI settings here.
Chatbot mode
This feature is related to the Settings > Artificial Intelligence > OpenAI > Chatbot mode option. It allows you to configure the information OpenAI will use to respond to user messages.
- Only general questions OpenAI will respond only to general questions and questions related to previous user messages in the same conversation, without using any information you provide. This is the default setting.
- Only questions related to your sources OpenAI will only respond to questions related to the information you provide. The user messages will be ignored. You have to first train the chatbot with your sources.
- All questions OpenAI will only to questions related to the information you provide, to general questions, and to questions related to previous user messages in the same conversation. You have to first train the chatbot with your sources. This is the recommended mode.
- Assistant Use this mode if you are using an OpenAI Assistant.
Small talk
This feature enable pre-built generic questions anda answers that allow the chatbot to handle casual, polite, and social "chit-chat" like "Hello," "How are you?", or "Tell me a joke," making bots feel more human and engaging, rather than just task-focused.
Assistant
This features allow you to use your own Assistants created at https://platform.openai.com/assistants.
- If you are using the cloud version you have to set Settings > Artificial Intelligence > OpenAI > Sync mode to Manual and use your own API key.
- You can use multiple assistants by adding their IDs in Settings > Artificial Intelligence > OpenAI Assistants - Department linking and selecting Assistant in Settings > Artificial Intelligence > OpenAI > Chatbot mode. To activate an assistant, both the assistant and the conversations must be assigned to a department.
- The assistant is used only for the chatbot, and smart replies, not for the message rewriting and other features.
Chatbot
The OpenAI chatbot feature functions similarly to Dialogflow, providing automated responses to user messages. Select the Chatbot mode setting to specify the questions that the chatbot is capable of responding to. Utilize the human takeover feature to enable the chatbot to redirect the chat to a human agent as necessary.
Fallback message
The fallback message is sent when OpenAI is unable to understand the user question. If the Dialogflow chatbot is enabled, the fallback message will be turned off and the Dialogflow chatbot's fallback message will be utilized instead.
Prompt
The prompt instructs OpenAI on how to respond by providing relevant information that can be utilized to answer user inquiries. To comprehend the process, refer to the example prompts listed below.
If you choose to activate the human takeover feature, you need to tell OpenAI to respond with I don't know if it is unable to provide an answer to the user's question. You should always include the following text in the prompt: Respond "I don't know", if not sure about the answer.
Replies from the training sources can be utilized with the prompt feature as they are compatible.
Spelling correction
This feature automatically fix any spelling mistakes in the agent's message.
Training data language
If you are using training data and your chatbot is multilingual, set here the default training data language. Leave it as default if the training data default language is in English.
Smart reply
This feature allow to enable the Smart Reply feature also if the chatbot is not active. If the chatbot is active the Smart Reply feature will use OpenAI automatically.
Dialogflow spelling correction
In the case where Dialogflow is unable to find the appropriate response to the user's message, this function verifies if there are any spelling errors. If any such errors exist, Dialogflow is prompted again with the correctly spelled version of the message for an accurate response. Although it has a higher priority, this feature can still work together with the Google search spelling correction feature.
Speech recognition
OpenAI supports the use of voice messages through speech recognition. When this option is active, audio messages will be converted to written text.
- You do not need to activate this feature for the chatbot to understand audio messages. The speech recognition feature of the chatbot is always enabled.
- For this feature to work better, the user language should be know. To automatically detect the user's language, you can enable the language detection feature.
- The text will be displayed alongside the audio player.
- The generated text is compatible with the translation features.
Image and file analysis
When this option is enabled, the chatbot analyzes and interprets images and files sent by the users. For the list of supported files, click here. Uploaded files are stored temporarily in your OpenAI account and deleted immediately after OpenAI returns a response.
- Only GPT-4 models and newer support this feature.
- This feature does not work on localhost, it requires an online server or AWS S3.
Source links
When this option is active, the response will automatically include the links to the sources and training data used for generating the answer. To include articles as sources you have first to set the articles page in Settings > Articles > Articles page URL.
Note data scraping
When this option is active, you will see a menu in the notes panel. The menu enables the automatic extraction of specific information from the user's messages like login details, URLs, or even the summary of the conversation.
OpenAI parameters
ZampiBot allows you to adjust various OpenAI parameters such as temperature and logit_bias, for more details visit https://platform.openai.com/docs/api-reference/completions/create. Don't set any values if you don't know what these parameters do or OpenAI may stop working.
Logit bias
The Logit bias parameter must be JSON string and the keys must be strings, for example: {"2435":-100, "640":-100}.
Generate user questions
When this option is active, OpenAI will generate new user questions in real time when you open the chatbot training panel.
Use conversations for training
Automatically use conversations to train the chatbot at regular intervals. You will find the training data in Chatbot > Training > Conversations. The training is done via cron job every 24 hours. Only user and agent messages are used, chatbot messages are ignored. More details here.
Context awareness
When this option is enabled, OpenAI will recognize the context of the web page from which the user is writing the message. The context includes only the page's meta title and meta description texts. T his option is supported solely for the chat widget and is not compatible with messaging channels.

Message rewriting
This feature adds a button to the text field of the conversation area, click on it to rewrite your message and make it more friendly and professional.
- Greetings will be added automatically if there is no previous agent messages.
- If your language is not English, update your agent or admin profile and select the correct language.
- Set the Prompt to guide OpenAI on how to rewrite messages.
- Set Execution mode to automatic to rewrite all messages, or to negative sentiment to rewrite only messages flagged as negative by OpenAI's sentiment analysis.
Training
With this feature, your chatbot can undergo training using your website, texts, PDF documents and more. Once the training is successfully completed, the chatbot will be able to answer questions related to your contents.
Training using files
This training process enables you to train the chatbot using PDF and TEXT files.
- To access this feature, navigate to Chatbot > Training > Files.
- Select your files, click the Train chatbot button and await completion of the training process.
- It is only possible to upload files in PDF and TXT formats.
- As soon as the training is completed, the uploaded files are removed.
Training using a website
This training process enables you to train the chatbot using websites.
- To access this feature, navigate to Chatbot > Training > Website.
- Enter the website URLs, click the Train chatbot button and await completion of the training process.
- If you retrain the same website, you must first delete the previous website's training data; otherwise, only new URLs will be trained.
- You can provide the website URL and all child URLs will be included and crawled, but with large websites, it is more efficient and less prone to errors and infinite link loops to utilize an XML sitemap instead of relying on the website URL. You can create it with a service like https://www.xml-sitemaps.com.
- If you want to train your chatbot using specific pages from your website instead of all of them, you can make use of an XML sitemap. Create one using a tool like https://www.xml-sitemaps.com, and then remove the pages you do not wish to include by editing the file in a text editor. To use the XML sitemap, you need to upload it either onto your server or an external online location. Afterward, add the URL of the sitemap in Chatbot > Training > Website. If your sitemap contains more than 1000 URLs, it's advisable to split it into multiple files and train the chatbot with one file at a time to prevent server crashes.
- You can upload large files and your XML sitemap with a service like https://tmpfiles.org.
Training via questions and answers
This training process enables you to train the chatbot by adding questions and answers individually.
- To access this feature, navigate to Chatbot > Training > Q&A.
- For more details click here.
Training using articles
This training process enables you to train the chatbot using the articles.
- To train the chatbot add you articles and then click the Train chatbot button. The articles are used as training sources automatically.
- For more details click here.
Training using flows
This training process enables you to train the chatbot using the flows.
- To access this feature, navigate to Chatbot > Flows.
- For more details click here.
Training using conversations
This training process enables you to train the chatbot using the conversations from the users and agents.
- To enable this feature, check the Settings > Artificial Intelligence > OpenAI > Use conversations for training option.
- The training data will begin to be generated in the coming days and will be available in the Chatbot > Training > Conversations area.
- While this method is powerful and automated, it can produce low-quality training data if the responses from your human agents or the user messages are unhelpful or incorrect. We strongly recommend reviewing the training data regularly. This method is not recommended for most chatbots. Use the chatbot training panel instead.
Training using the chatbot training panel
Once you have finished training your chatbot, you may want to continue enhancing it. This feature allows you to select conversation messages and use them to add new questions and answers or improve existing ones. You can open the chatbot training panel from the conversation area by hovering the mouse over a message, opening the message's menu, and selecting Train chatbot.
- If Dialogflow is active, a new Intent will be added to the main Dialogflow agent.
- If OpenAI is active, the OpenAI chatbot will be trained automatically with the new information. You can control the questions and answers generated from this window from Chatbot > Training > Questions and answers.
- The Services to update option let you choose what chatbots to update. When updating a Dialogflow Intent, a new OpenAI question and answer will be generated.
- The training window is not compatible with OpenAI assistants.
Training using real-time information
This feature allow the chatbot to answers to questions that require real-time information, such as, "What is the temperature in London today?".
- For more details click here.
Information
- To add new training data, simply train the chatbot again. The previous training data will not be lost, and only the new sources will be added.
- If you are using the cloud version, there are character limits for training the chatbot. However, if you are using the PHP or WP version, there are no limits imposed. You can view the character limits here.
- The embedding model is essential for training your chatbot and handling all user messages. We currently use the text-embedding-3-small model. It is necessary for these scenarios and cannot be disabled or changed. You can find pricing information at https://openai.com/pricing. Check out the pricing for the text-embedding-3-small model in the Embedding models section.
- Go to Chatbot > Training > Information, and click the Delete all training data button to remove all previous training data for the chatbot.
- The embeddings are stored as JSON files in the ZampiBot uploads folder and are secured using the password-by-filename approach.
Run the training via cron job
If you're using the cloud version, just enable the Settings > Artificial Intelligence > OpenAI > Training via cron job option and the cron job will be activated. You can disregard the instructions below.
To automatically train the chatbot with your website content at regular intervals, create a cron job that runs the URL [SUPPORT-BOARD-URL]/include/api.php?open-ai-training=true, or use the command */59 * * * * wget [SUPPORT-BOARD-URL]/include/api.php?open-ai-training=true to run it via a command. Replace [SUPPORT-BOARD-URL] with your Installation URL, get it from Settings > Miscellaneous > Installation URL. If you are using the cloud version, use this URL: https://chatbot.zampisoft.com/script/include/api.php?open-ai-training=true&cloud=API-TOKEN and replace API-TOKEN with your API token.
- For the cloud version, the cron job can be executed at most once every 7 days.
- We strongly recommand providing an XML sitemap instead of the website URL for performance reasons.
- Automatic training is limited to websites; files, Q&A, and articles are excluded. Re-training will delete the previous website training data.
Multilingual training
If your user base is multilingual, you can train the chatbot with content in multiple languages and limit the chatbot to retrieve answers only from the sources in the user's language. To activate this feature, check the Settings > Artificial Intelligence > OpenAI > Multilingual Training Sources option.
- Files Files currently support only one language.
- Websites The language of the website is detected automatically. For ZampiBot to comprehend the language of your web pages, the <html> must contain the attribute lang.
- Q&A Q&A currently support only one language.
- Articles All article languages are used automatically.
- Conversations If automatic translation is active, only messages in the agent's language will be used.
Q&A
The information below is related to the Question and Answers section of the chatbot training area. Add questions and answers to the chatbot to improve its performance. The chatbot will use this information to respond to user inquiries.
Question
Enter the user messages that will trigger the answer. Add as many question variations as necessary. For example the questions to the answer I'm a chatbot! could be Who are you?, What are you?, Are you a bot?.
Answer
Enter the text that will be used to answer the user question.
Tools calling
For more details go here.
Set data and actions
Set the specified user values when the question is asked. You will see such values in the user details panel. You can use the following merge fields to assign values extracted from the user messages. Include these fields in the answer and they will be replaced with the actual values: {language}. You can also use this feature to perform actions like assigning departments, agents, and tags to the conversation.
Flows
The information below is related to the chatbot flows area available under Chatbot > Flows. Flows allows you to esely create conversation flows powered by the chatbot. Use them to guide the user toward a specific goal with a series of pre-defined messages.
Flow blocks
- Start: Use the start block to set when the flows should start. It can be everytime the user start a new conversation, when it sends a specific message, or on page load. If you set conditions, the flow will only start when all conditions are met. If you set a depertment, the flow will only start for conversations assigned to that department. If you set a source, the flow will only start for conversations from that source, for example, WhatsApp or Instagram.
- Send message: Send a message to the user.
- Send choices: Send a list of buttons to the user or allow it to choose one. When conversational mode is enabled, buttons are hidden, the chatbot sends only text, and users select options by replying with text. The AI interprets the message and selects the corresponding option, continuing the flow as if the button were pressed. This creates a more natural, chat-like experience and is automatically activated, only when needed, on messaging channels such as WhatsApp and Instagram. If the user's reply doesn't match any option, a fallback message with the available choices will be sent. You can add variations to the button texts by separating them with the | char, for example: Yes|Yeah|Sure. They will help the AI to understand the user reply.
- Send video: Send a video to the user.
- Get user details: Get the user details and store them in ZampiBot. You will see such values in the user details panel. You can leave the description field empty for default details, but it's required if using custom user fields. Note that user details will not be saved if you test this flow in the playground, as the user there is temporary. To see details saved, test the flow with a real user.

- Set data: Set the specified user values when the block is executed. You will see such values in the user details panel.
- Actions: Execute the specified actions when the block is executed.
- Conditions: Use it to create different branches in the flow. If the conditions are met, the flow will follow the branch set as true, otherwise the one set as false.
- Rest API: Use it to send data to your server. The body must be a JSON array. Details like user ID and conversation ID are automatically included in the data sent to your server under the sb key. Use the save response section to save specified user details with values from your server response. Use the JSON dot notation. Our support doesn't include assistance with this feature, as it is for advanced users and requires custom code on your server. For help with this, feel free to hire us.
- Tools calling: For more details go here.
- Flow connector: Connect the flow to another flow and start it.
Information
- Flows can be multilingual. Add translations for messages, button texts, and other content in the translations area. You can also use the multilingual via translation feature for automatic translations. If the default language of your flows is not English you have also to set the default language under Settings > Artificial Intelligence > OpenAI > Training Sources Language.
- Users can move back to earlier steps and update previously entered details in a conversational manner. For example, they might say "Sorry, I entered the wrong email", "I need to update my email and phone number", or even a general message like "Sorry, I entered the wrong details, go back", which will return them to the previous step.
Tools calling
Tools calling allows to connect the chatbot to external tools and systems to retrive information needed to answer the user. The chatbot will query your server and return the information from your server to the user. The data sent to your server is in the body and it includes the user input, user ID, and conversation ID. Tools calling is used by Q&A and Flows. More details here. Our support doesn't include assistance with this feature, as it is for advanced users and requires custom code on your server. For help with this, feel free to hire us.
Parameters
- URL: Enter the URL of the API endpoint that will supply the necessary values for the function.
- Headers: If you are setting up a Q&A, enter key-value header parameters, separated by commas. E.g. apikey:123345, json:true. If you are setting up a flow, enter add key-value header parameters by clicking the Add new item button.
- Properties: Enter values that the user must provide to the chatbot. For example a city, a tracking number, etc. The chatbot will ask the user for these values. If you already know all the possible values, you can enter them in the Allowed values field.
Data sent to your server
ZampiBot will send the following information to your server. If you use the POST method, it will be included in the JSON body, if you use the GET method, it will be included in the header.
{
    "sb": {
        "user_id": "123",
        "conversation_id": "123",
        "user_language": "es"
    },
    "arguments": {}
}
The arguments array contains the values provided by the user. The keys are the name converted to kebab case, for example if the property name is Order Number, the key will be order-number. The user_id is the ID of the user in ZampiBot and conversation_id is the ID of the conversation. You can use these IDs to retrieve more information about the user and the conversation via the REST API.
Response from your server
Your server must returns a JSON array with the values required by the chatbot. Include success: true only when the request is successful and the expected information is returned. Do not include it if the information cannot be retrieved (e.g., when an invalid order number is provided). See the example below for more details.
{
    "order_status": "Delivered 2 hours and 25 minutes ago",
    "success": true
}
Information
- If OpenAI is not working, click here.
- If Dialogflow is active, the OpenAI query is performed only if the chatbot does not know the answer to the user's question and if the length of the user's message is greater than 4 characters.
- The following settings are compatible with OpenAI: smart reply, human takeover, disable for the tickets area, disable during office hours, bot response delay, reply to user emails, reply to user text messages.
- The following Google settings are compatible with OpenAI: multilingual via translation, automatic translation, language detection.
- Set the OpenAI chatbot language from Settings > Chat > Language. Set it to Multilingual if your website supports multiple languages or if your users speak different languages. If you are using messaging channels like WhatsApp, or Instagram, you must detect the user language via language detection. For more details click here.
- If a human takes control, the OpenAI chatbot is deactivated, and is remains deactivated also if the agent goes offline. The Dialogflow chatbot continues to function whenever necessary.
- The default model is gpt-5-mini.
- Consecutive user messages are treated as a single message by the chatbot, resulting in one unified reply
The settings below are related to the Artificial Intelligence app.
Synchronization
To start using the Google AI services and Dialogflow follow the steps below.
Automatic sync mode
This feature is available only on the cloud version of ZampiBot.
- Click Synchronize now and complete the procedure.
- If you want to activate the Dialogflow chatbot, check Settings > Artificial Intelligence > Google > Dialogflow chatbot. Also, you have to enter your chatbot Project ID or Agent Name, to get it follow the steps below.
- You need to purchase credits to use this option.
Manual sync mode
- Enable the ZampiBot > Settings > Artificial Intelligence > Google > Dialogflow Chatbot option and save the changes.
- Go to console.cloud.google.com and sign in.
- Select or create a project by clicking the Select a project button on top-left. Name the project as you want.
- Activate the Dialogflow API by entering Dialogflow API on the top search bar. Click Dialogflow API and then click Enable. Do the same for the Cloud Natural Language API, Cloud Translation API, and Google Calendar API.
- Select the project and the go to Left menu > APIs and services > OAuth consent screen. Select External and click Create. In App name enter what you want, in User support email and Developer contact information enter your email. Click Save and continue.
- In the Data access area, click Add or remove scopes, scroll bottom and into the Manually add scopes area enter https://www.googleapis.com/auth/dialogflow,https://www.googleapis.com/auth/cloud-language,https://www.googleapis.com/auth/cloud-translation,https://www.googleapis.com/auth/calendar. Click Add to table and then Update and Save and continue.
- In the Audience area, click Add users and add your Google email, use the same email as the currently logged in account. Click Save and continue. Click PUBLISH APP. There is no need to complete the review process, leave it in the pending review state.
- Go to Left menu > APIs and services > Credentials and click Create credentials, select OAuth client ID. As Application type select Web application. Enter any name you want. In Authorised redirect URI enter the redirect URL, get it from ZampiBot > Settings > Artificial Intelligence > Google > Authorised redirect URI. Click Create.
- Copy Client ID and Client Secret and paste them into ZampiBot > Settings > Artificial Intelligence > Dialogflow. Save the settings.
- Click ZampiBot > Settings > Artificial Intelligence > Google > Synchronize. Login with the same Google account you have used till now. On the next screen click Continue. On the next screen select all scopes and click Continue.
- Copy the Refresh token and paste it into ZampiBot > Settings > Artificial Intelligence > Google > Refresh token.
- You are done! If you want to activate the Dialogflow chatbot, check Settings > Artificial Intelligence > Google > Dialogflow chatbot. Also, you have to enter your chatbot Project ID or Agent Name, to get it follow the steps below. Note that the app does not need to be approved by Google.
- If you are a Google Workspace user, go to https://admin.google.com/ and click Google Cloud Session control. Set Re-authentication policy to Never require re-authentication.
Dialogflow
The information provided below is relevant to Dialogflow. Warning! We will stop supporting Dialogflow by the end of 2025. All its features will be available in ZampiBot through OpenAI. Please use OpenAI instead of Dialogflow.
Get Project ID
- Log in to the Dialogflow ES console by going to dialogflow.cloud.google.com. You must sign in with the same Google account used during the synchronization.
- Click the gear icon at the top left, near the chatbot name, and open the settings area. . If you haven't created a chatbot yet, follow the instructions below to create your first bot.
- Copy the Project ID .
- Make sure to choose US / GLOBAL on the top left of the Dialogflow dashboard. Please note that our system does not support mega agents. .
Get Dialogflow CX Agent Name
- Log in to the Dialogflow CX console by going to https://dialogflow.cloud.google.com/cx/.
- Select the project of the desidered agent and go to the agents page. You can enter the agents page by selecting the agent and by clicking the top button Agents > View all agents .
- Click the options menu for the desiderate agent in click Copy name .
- More details at https://cloud.google.com/dialogflow/cx/docs/quick/api#detect-intent-drest.
Location
Set the location or region of your Dialogflow agent. This setting is optional if your agent location is set to global.
Welcome Intent
Trigger the Dialogflow Welcome Intent for new visitors. The option Settings > Messages & Forms > Welcome message must be active.
Send the user details
Send the user details of the registration form and email rich messages to Dialogflow.
Add Intents to saved replies
Include the Dialogflow Intents into the saved replies. To access the saved replies option, go to Settings > Admin > Saved replies.
Create a basic chatbot
If you haven't created a chatbot yet, follow the instructions below to create your first one. The creation and management of your Dialogflow chatbot is handled entirely by Dialogflow. There are a lot of tutorials online that can help you create and configure your Dialogflow bot.
- To create your first chatbot enter the Dialogflow console and create an agent. As Google project select the same project used during the synchronization.
- Add a new Intent from the left menu and open it.
- In the Training phrases area adds the user's question you want the chatbot to reply to, add as many variants are you can. For example, if you want to the chatbot to reply to users asking for your business address, add variants like "what is your address", "address", "where are you".
- In the Responses area adds the chatbot answer as a text response. If you want to add buttons, cards, etc., you can use the rich messages.
- You have created your first question and answer! Test if from the right area or from the ZampiBot chat. Add new Intents to populate your chatbot with the questions and answers you want. You can include basic pre-built questions and answers by enabling the Small Talk feature from the left menu.
Here are some great resources to help you build a more complex chatbot:
Actions
The following actions give the chatbot the ability to interact with the website autonomously on behalf of the user. To use an action go to Dialogflow, edit an Intent, and add a new Custom Payload response with the following syntax: { "ACTION-NAME": ACTION-VALUE }.
| Action code | Description |
|---|---|
{ "human-takeover": true }
|
Start human takeover and disable the chatbot. |
{ "redirect": "URL" }
|
Redirect the user to the given URL. Add the value "new-window": true to open the URL in a new window. |
{ "open-article": ID }
|
Open the article with the given ID. |
{ "transcript": true }
|
Generate the conversation transcript as a text file and download it. Set it to email to send the transcript to the user's email, add the value message: "Your message" to include a message in the email. |
{ "tags": ["Tag 1", "Tag 2"] }
|
Assign tags to a conversation. |
{ "department": ID }
|
Change or set the conversation department and notify the agents. |
{ "agent": ID }
|
Change or set the agent assigned to the conversation and notify the agent. |
{ "send-email": { "recipient": "active_user", "message": "", "attachments": [] } }
|
Send an email to the active user or agents. Attachments syntax: [["name", "link"], ["name", "link"],...]}. Recipient value can be active_user or agents. |
{ "update-user": true }
|
Tells the admin area to update the user of the active conversation. Use this action in combination with other actions to update the user details of the admin area in real-time. |
{ "archive-chat": true }
|
Archive the chat and send the close message if active. |
{ "update-user-details": { "email": "", "last_name": "", "first_name": "", "extra": { "phone": ["+123456789", "Phone"] }}}
|
Update the details of the active user. You can update all details, including first_name, last_name, email, user_type, password You can update the user extra details, like the phone number, by entering the values into the extra key, the values must use the following syntax: "slug": [value, "label"]. Download an example here. To upload an Intent go to the Intents area and click the 3-dots menu icon on the top-right, then click Upload Intent. Start the conversation by sending the message "start". |
{ "update-user-language": "$language" }
|
Update the user language, and the chatbot language if multilingual chatbots feature is active, to match the language requested by the user. The Dialogflow Entity value for the language is represented by the parameter $language. |
Dialogflow fulfillment
The fulfillment data sent to your webhook URL is like below:
{
	"responseId": "4a58fc4f...",
	"queryResult": {
		"queryText": "fullfilment",
		"parameters": [],
		"allRequiredParamsPresent": true,
		"fulfillmentText": "Example",
		"fulfillmentMessages": [{
			"text": {
				"text": ["Response"]
			}
		}],
		"outputContexts": [{
			"name": "projects/schiocco...",
			"parameters": {
				"no-input": 0,
				"no-match": 0
			}
		}],
		"intent": {
			"name": "projects/schiocco...",
			"displayName": "Fullfilment"
		},
		"intentDetectionConfidence": 1,
		"languageCode": "en"
	},
	"originalDetectIntentRequest": {
		"payload": {
			"support_board": {
				"conversation_id": "3002",
				"user_id": "3777"
			}
		}
	},
	"session": "projects/example/agent/sessions/3777-3002"
}
The payload and session fields contain the ZampiBot user ID and conversation ID.
Dialogflow Information
OpenAI
If OpenAI is enabled, Dialogflow takes priority over it. The OpenAI API will only be used if Dialogflow cannot answer the user's question.
Chatbot training and optimization
- It will require some time for your chatbot to consistently provide correct answers to all questions. To improve its performance, you and your human agents should continuously train the chatbot by incorporating new question variations and Intents. This approach will effectively enhance the capabilities of your chatbot.
- Agents can add new Intents and chatbot responses, and add new training phrases to existing intents on the fly from the admin area by moving the mouse cursor over a message and clicking the Dialogflow Intent icon. Enable Settings > Artificial Intelligence > OpenAI > Generate user questions to automatically add variations of the question and to rewrite the answer. New Intents will contain also the responses, while the update of existing intents will add new training phrases only, but not new chatbot responses. If you're using Dialogflow CX, the chatbot responses will be added to the latest flow used in the conversation if any, otherwise to the start flow.
- If the chatbot is replying with the wrong intents, go to Dialogflow Console > chatbot Settings > ML Settings, and set the ML CLASSIFICATION THRESHOLD to a larger number, such as 0.6. Also check the Intent detection confidence.
Dialogflow Intent detection confidence
When searching for a matching intent, Dialogflow scores potential matches with an intent detection confidence, also known as the confidence score. These values range from 0.0 (completely uncertain) to 1.0 (completely certain). Specify a value ranging from 0.1 to 1.0. Any answer provided by Dialogflow that is less than this value will not be considered. If you are utilizing Dialogflow alongside your OpenAI chatbot that is trained using your resources, it is recommended to configure the value as 0.81.
Knowledge Base
Knowledge Base are automatically enabled. Knowledge Base is a feature that gives your chatbot the ability to search within documents (such as a PDF) or web pages to find an answer. To create your first Knowledge Base, go to cloud.google.com/dialogflow/docs/knowledge-connectors
Dialogflow response
The full Dialogflow JSON response is automatically saved in the database, sb_messages, column payload.
Ignore an Intent if it doesn't fit the provided keywords
Sometimes Dialogflow gives incorrect answers due to similar questions with different subjects. To solve this, you can instruct ZampiBot to ignore an Intent if specific keywords are not present in the user's message. Here's how you can do it:
- Enter Dialogflow and edit the Intent.
- For each training phrase, select the keywords you want to be required and link them to a new Entity, or an existing one.
- Under Actions and parameters check Required and add a new Prompt with value skip-intent
- Save the Intent.
User attachments
User attachments are sent to Dialogflow by appending the attachment URLs to the message.
Chatbot attachments
To allow the chatbot to send attachments, add a Custom Payload response and insert this JSON code:
{ "attachments": [["name", "YOUR-LINK"], ["name", "YOUR-LINK"], ["name", "YOUR-LINK"]]}
Rich messages
To allow Dialogflow to send rich messages, simply enter the rich message shortcode into the TEXT RESPONSE field or add a new Custom Payload response and insert this JSON code: { "rich-message": "shortcode" }. Replace "shortcode" with the rich message shortcode, to have a valid JSON code you need to replace all " chars with \". To obtain the shortcodes or to learn how to create a rich message, please click here.
Rich message response
When the user interacts with rich messages via the ZampiBot chat (e.g. by clicking a button), the rich message response is sent to Dialogflow in the following format: ID|response, or ID if the rich message type is registration, email, follow up, in this case the rich message values are sent as array in the queryParams['payload'] key. ID is the rich message ID, which can be set by adding the attribute id="YOUR-ID" to the shortcode. If no ID has been set, a random ID will be used instead. response is the input or selection of the user. To block Dialogflow from replying to a rich message add a new intent with ID as the only user expression and no response.
If the user is interacting with the chatbot via a messaging app (e.g. WhatsApp), the response of the rich message does not contain the rich message ID and Dialogflow contexts must be used to allow Dialogflow to understand which Intent to activate for a specific rich message response.
Get rich message response for registration, email, follow up
- Check the option ZampiBot > Settings > Artificial Intelligence > Google > Send user details.
- From Left menu > Fulfillment enable Webhooks, you only need to enter the URL of the file that will receive the Dialogflow webhook data.
- Create an Intent with the ID of the rich message, for the registration form, enter registration, for the follow up form enter sb-follow-up-form, for email forms enter email.
- Enable the Fulfillment for the Intent.
- You're done! The file of the webhook URL will receive the ZampiBot rich message user details.
Sequential survey
To create a sequential survey like the one of the demo you need to enter the Rich message ID in the Training phrases, check the example below.
- Go to Dialogflow and create a new intent. In the Training phrases area enter the user expression survey example. In the Responses area enter the code [buttons id="test-survey-1" options="Software,Physical products,Services" title="What is your type of business?" message="Please choose the type that best suits your company." success="Your company type is "]
- Create a new intent. Enter the user expression test-survey-1 and as response enter [select id="seq-survey-2" options="Priority post, Express courier, International courier" title="Shipping methods" message="Choose the preferred shipping method of your customers" success="Your customers preferred shipping method is"]
- Create a new intent. Enter the user expression test-survey-2 and as response enter Thank you for completing our survey!.
- You're done.
Department linking
- Get the department IDs from Settings > Miscellaneous > Departments.
- Get the project IDs from the Dialogflow settings area of your agents.
More information
- Dialogflow supports the use of voice messages through speech recognition. WhatsApp audio messages and .ogg audio files are not natively supported. To support WhatsApp audio messages and .ogg audio files, activate Settings > Artificial Intelligence > OpenAI > Speech recognition.
- You can activate the chatbot via API but sending a message with no text and payload { "event": "activate-bot" }.
- The following details are sent to Dialogflow in the queryParams parameter when detecting an intent: conversation_id, user_id.
- To trigger the welcome event in Dialogflow CX, create a Event Handler and insert Welcome as Custom Event.
- ZampiBot articles are synchronized automatically with the Dialogflow knowledge base.
- Use the JS variable SB_DIALOGFLOW_AGENT = "AGENT ID" to change the default Dialogflow agent, replace "AGENT ID" with the project ID.
- If the user sends the same message again, triggering the same Intent in Dialogflow, and OpenAI is active, ZampiBot will attempt to send a message from OpenAI and will ignore the response from Dialogflow.
- You can access the user_id and conversation_id of the current user and conversation in Dialogflow CX using the $session.params.user_id and $session.params.conversation_id codes, which are located in the Condition area of the route.
Multilingual chatbot
The feature Artificial Intelligence > Google > Multilingual checks if there is a Dialogflow agent in the user's language and activate it.
- For this feature to work the user language must be know. The user language is based on the language user detail of the user if set, otherwise on the user browser language. The language can also be detected with the language detection feature.
Automatic translation
The automatic translation feature automatically translates user messages into agent language and agent messages into user language. To enable it check the option Settings > Artificial Intelligence > Automatic translation. If you are using the cloud version and Artificial Intelligence > Google > Sync mode is set to Automatic, the multilingual features will work automatically. Otherwise you have to complete the synchronization and the setup below. The multilingual via translation and language detection features also require these steps.
Setup
- Log in to https://console.cloud.google.com with your Google account and select the project of your Dialogflow Agent.
- On the top search bar type cloud translation, select the Cloud Translation API service and enable it. Please note that this is a paid service with a free tier, additional charges may occur.
- Enable the billing by clicking Left menu > Billing and by enabling a billing account with a valid payment method.
Information
- The user messages in the admin area are translated automatically in real-time to match the agent language.
- The agent messages are translated automatically in real-time to match the user language.
- Agents can view the original message by opening the message menu and by clicking View original message.
- The agent language is based on the language user detail of the agent if set, otherwise on the browser language, or admin area language.
- The user language is based on the language user detail, if set, otherwise on chat language, if set, otherwise on the browser language. The language can also be detected with the language detection feature.
- The notifications are also translated.
- To avoid translating a string, enclose it with the characters ` or ```.
Multilingual via translation
The feature at Settings > Artificial Intelligence > Multilingual via translation automatically translates user messages into the default language of Dialogflow or OpenAI, and translates Dialogflow or OpenAI messages into the language spoken by the user. Additionally, this feature translates all text displayed within the chat, such as the chatbot's rich messages, articles, registration forms, and pop-up notifications. To enhance performance and minimize translation costs, the translations are automatically integrated into the translation files. Combine this feature with the language detection feature for optimal results.
- If English is one of the languages, English must be the default language, the original texts must be in English.
- If you are using OpenAI with training data, set the default training data language under Settings > Artificial Intelligence > OpenAI > Training Sources Language. Leave it as default if the training data default language is in English.
Language detection
Detect the language of the user' messages and change the user language and Dialogflow agent language accordingly, if available, otherwise, show a fallback message. You can use the following merge fields in the message: {language_name}.
- The user message must be at least 2 words long.
- Language detection is executed only for the first 2 user messages of a conversation.
- As long as the OpenAI chatbot is operational and programmed to respond to generic inquiries, the fallback message will never be dispatched, since OpenAI will consistently provide answers to any use message.
Google search
The Google search feature at Settings > Artificial Intelligence > Google search gives your chatbot the ability to search for answers on Google. This feature is helpful for providing answers to questions that require real-time information.
- Register at https://programmablesearchengine.google.com/.
- Create a search and setup it is as you want. We recommend to add only your website and Wikipedia if you want your chatbot to reply to general questions, leave disabled the option Search the entire web. Use the Entities option to exclude invalid results.
- Go to Edit search engine > Setup > Basic and copy the Search engine ID value, paste it in ZampiBot.
- To get the API key visit https://developers.google.com/custom-search/v1/overview and click Get a key.
Spelling correction
In the case where Dialogflow is unable to find the appropriate response to the user's message, this function verifies if there are any spelling errors. If any such errors exist, Dialogflow is prompted again with the correctly spelled version of the message for an accurate response. Although it has a lower priority, this feature can still work together with the OpenAI Dialogflow spelling correction feature.
Entities
The Entities setting analyze the user's message and recognize and extract entities like cities, events, dates, and more. Use it to exclude invalid results returned by Google search. To enable this setting follow the steps below.
- Log in to https://console.cloud.google.com with your Google account and select the project of your Dialogflow Agent.
- Enter Cloud Natural Language API in the search bar at the top, select Cloud Natural Language API and enable the API .
- Enable the billing by clicking Left menu > Billing and by enabling a billing account with a valid payment method. Enable billing for the project of your Dialogflow agent.
Information
- The Google search is performed only if the chatbot does not know the answer to the user's question and if the length of the user's message is greater than 4 characters.
- If the Google search returns a result, the Dialogflow context google-search is automatically activated. The context contains the attribute link which is the website's link of the Google search result. Use the context to create a new intent that provides the link, if the user sends a message like tell me more or I want to know more.
- Google search is not required to activate the spelling correction. You can disable Google search and activate only spelling correction.
- Google search is compatible with the OpenAI chatbot.
Tickets
The settings below are related to the Tickets app. The Tickets app allows users to create conversations and send messages via a UI different from the chat.
Installation
- From Settings > Apps, click Tickets and enter your license key to install and activate the app. More details here. If you have the cloud version click Active.
Display the tickets area
PHP VERSION
To display the tickets area include the following script into your page.
<script src="supportboard/js/min/jquery.min.js"></script> <!-- Not required if jQuery is already loaded -->
<script id="sbinit" src="supportboard/js/main.js?mode=tickets"></script>
- You can not include both chat and tickets area on the same page. Make sure to remove the script that loads the chat. You can show the tickets area also by inserting the code <script>SB_TICKETS = true;</script> into any page showing the chat.
- To set the position of the tickets area Enter the code <div id="sb-tickets"></div>. The tickets area will be displayed inside this div element. By default, the tickets area is appended to the body.
WORDPRESS VERSION
To display the tickets use the shortcode [sb-tickets]. Insert it in any page, post, or post type item.
CLOUD VERSION
To display the tickets area include the chat embed code into your page and add the attribute &mode=tickets to the script URL, e.g. <script id="chat-init" src="https://chatbot.zampisoft.com/account/js/init.js?id=65895623&mode=tickets"></script>. You can show the tickets area also by inserting the code <script>SB_TICKETS = true;</script> into any page showing the chat.
Information
- If the tickets area is not visible, make sure to uncheck the option Tickets > Manual initialization. Additionally, you can explore other potential reasons for this issue here.
- You can also use the tickets area to display an inline or full-width chat panel.
- Tickets are the same of chat conversations on the admin-side, the only difference from chat conversations is the front-end UI.
- Most of the settings of the chat are compatible with the Tickets App but not all of them. The dashboard settings, the pop-up message, and more are not compatible.
- Dedicated APIs for the Tickets App are available in the API section.
- To remove the mandatory 'New ticket' form for new users, activate the welcome message of Settings > Messages & Forms > Welcome message. The welcome message delay is ignored in the tickets area, the message is sent immediately..
- To manually disable the mandatory registration only on a single page use the JavaScript code var SB_REGISTRATION_REQUIRED = true. Set it to true to force the registration instead.
- The tickets area is compatible with Google reCaptcha v3.
The settings below are related to the WhatsApp app.
Installation
- From Settings > Apps, click WhatsApp and enter your license key to install and activate the app. More details here. If you have the cloud version click Active.
WhatsApp Cloud API Setup - Automatic sync mode
This feature is available only on the cloud version of ZampiBot.
- Click Synchronize now and complete the procedure.
- To add new numbers, visit https://business.facebook.com/wa/manage/phone-numbers/. If you add new numbers after the sync process, you will need to sync them again. All numbers will be automatically synchronized. If you wish to disable specific numbers, you can delete them from Settings > WhatsApp > Cloud API numbers.
- If you sync again with the same phone number and do not receive the verification SMS or call, you can enter the latest PIN you received and it will work.
If you do not receive the messages sent to your WhatsApp number in ZampiBot, please check the following:
- Click Reconnect and complete the procedure.
- Go to the Meta Business Suite and add a payment method.
WhatsApp Cloud API Setup - Manual sync mode
- Create a new account at https://developers.facebook.com or login with your existing account.
- Create a new app, enter the app name, as uses cases select Connect with customers through WhatsApp, and select the Business Account used for WhatsApp.
- In ZampiBot > Settings > WhatsApp > Cloud API > Secret key enter a random string then go to https://developers.facebook.com/apps and select your app.
- From the left menu, click Use cases > Connect with customers through WhatsApp > Customize.
- Click Configuration. Under the Configure webhooks section enter Callback URL and Verify Token:
- Retrieve the Callback URL from ZampiBot > Settings > WhatsApp > Cloud API > Configuration URL.
- Set the Verify Token in ZampiBot > Settings > WhatsApp > Secret key and save the changes, then use it to verify the webhook.
- In Webhook Fields select the following: messages.
- Click API testing.
- Get a phone number for testing by clicking Get new text number.
- Click Add a recipient phone number and add your personal WhatsApp number to verify it.
- Copy the Phone number ID and paste it into ZampiBot > Settings > WhatsApp > Cloud API numbers > Phone number ID.
- Send the message, check for the message in your personal WhatsApp account and send a reply, and it should then appear in ZampiBot.
- To reply to the test number from ZampiBot, generate the Temporary access token and paste it in ZampiBot > Settings > WhatsApp > Cloud API numbers > Token.
- To activate the WhatsApp integration for all phone numbers and add a live phone number, refer to the following guidelines.
In ZampiBot > Settings > WhatsApp > Cloud API numbers > Token enter the permanent access token, follow the instructions below for getting it.- Visit https://business.facebook.com and go to Left menu > Settings > Business settings, then go to Users > System Users to view your admin system user, or create a new one. Open the user and click Add Assets, then select the app used for the WhatsApp API integration and check Develop App, or Full control. The system user needs to be an admin. If you do not see the option, click Business settings.
- Click Left menu > Account > Apps. Select your app or add it. Make sure the system user is there and has full control. If not, click Add user, select the system user, click Full control, and click Assign.
- Click Left menu > Apps and under Select Assets choose your app, assign Full control and save.
- From Left menu > WhatsApp accounts select the WhatsApp account linked to your appp, then click Assign people and select the System user, grant to it Full control.
- From Users > System Users select the user you just created and click Generate New Token, click Apps and select the app used for the WhatsApp API integration, set the Token expiration to Never, enable the following permissions: whatsapp_business_management, whatsapp_business_messaging, business_management. Click Generate Token and save. Paste the token in ZampiBot > Settings > WhatsApp > Cloud API numbers > Token.
- To add additional phone numbers, go to https://developers.facebook.com, select your app, and click Left menu > WhatsApp > API Setup. To get started, click on Add phone number at the bottom and follow the instructions provided.
- After activating the number, copy the Phone number ID and paste it into ZampiBot > Settings > WhatsApp > Cloud API numbers > Phone number ID.
- If the number is in pending status, you need to enter your app dashboard and then from Left menu > WhatsApp > API Setup click Generate access token.
- Please keep in mind that if you use your current WhatsApp business number in ZampiBot, it will no longer be usable with your WhatsApp Business app, and you will need to migrate it following these instructions.
- Your app must be submitted for review and approved by Meta. From the left menu, click Review and complete the submission process for all the permissions you added. Please note that help with this is not included in our support. If you require assistance, you can hire us.
360dialog Account Setup
- Go to https://www.360dialog.com/ and create a new account.
- Enter your dashboard and from Left menu > WhatsApp Accounts generate the API key and copy and paste it in ZampiBot > Settings > WhatsApp > 360dialog settings.
- Click ZampiBot > Settings > WhatsApp > 360dialog settings > Synchronize now.
- Done! ZampiBot should start receiving the WhatsApp messages sent to your number, and you can reply to those messages from ZampiBot.
- Note that you can also use the free sandbox account for testing, more details at https://docs.360dialog.com/whatsapp-api/whatsapp-api/sandbox. The sandbox account has limitations and some features, such as media attachments, will not work.
Twilio Account Setup
- Go to https://www.twilio.com and create a new account.
- Verify your phone number.
- Complete the form and choose WhatsApp, Alerts & Notifications, With no code at all, 3rd party integrations.
- From the Twilio console copy ACCOUNT SID and AUTH TOKEN and paste them into ZampiBot > Settings > WhatsApp > Twilio settings, save the changes.
- You will now set up a free test account to run some tests and make sure the integration works with ZampiBot. From the left menu click Messaging > Settings > WhatsApp sandbox settings and enter into WHEN A MESSAGE COMES IN and STATUS CALLBACK URL the URL of ZampiBot , get it from ZampiBot > Settings > WhatsApp > Twilio settings > Get configuration URL. Mind that localhost will not work, you need a public URL and a live server.
- From the left menu click Messaging > Try it out > Send a WhatsApp message. Follow the instructions and send the message with the code to the WhatApp number provided. Click the next buttons until the configuration is complete.
- Done! ZampiBot should start receiving the WhatsApp messages sent to the sandbox account, and you can reply to those messages from the ZampiBot.
- To publicly use the WhatsApp integration with your customers you need also to complete the steps below:
- Update your account and enable billing, you can do that here.
- Purchase a Twilio number, which will be the phone number of your official WhatsApp Business account. More details here. You cannot use the phone number of your existing WhatsApp Business account, you must use a Twilio number. More details here.
- From the Twilio console go to Messaging > Services and create a new Messaging Service. Click Add Senders, select WhatsApp Number as the sender type, and add the Twilio number you purchased. Copy the Service SID and paste it into ZampiBot > Settings > WhatsApp > Twilio settings > Sender.
Unofficial WhatsApp API
Support Boar only supports the Official WhatsApp Cloud API, 360dialog, or Twilio. Unfortunately, unofficial WhatsApp APIs are not supported. However, you can still implement them using the Support Board API and Webhooks. For more details, visit https://zampibotpage.zampisoft.com/docs/api/web. Please be aware that you must possess coding skills as a developer to proceed with this task. Additionally, our default integrations are equipped with advanced features including chatbot support, automated messages, human takeover, WhatsApp rich messages, attachments, and more. Consequently, although setting up a basic integration for sending and receiving text messages is relatively straightforward, ensuring its flawless functionality is a more intricate process.
Templates
As for WhatsApp Business Policy, you cannot send outbound marketing and solicitation messages to end users. End user users must reach out to you first. You have 24 hours from when the end user's message was sent from WhatsApp to reply to the message. To communicate with a user who has not contacted you before or has not been in touch for more than 24 hours, you must opt for the text message fallback or the WhatsApp message template.
- To send message templates you have to add a payment method to your WhatsApp Business Account. You can do it from https://business.facebook.com/billing_hub/.
- To send a specific message template to a group of users, use the direct messages feature.
Text message fallback
To enable the text message fallback you must set up the SMS in Settings > Notifications > Text message notifications.
More details here.
WhatsApp message templates
A WhatsApp message template is a message format that you can use over and over again to message users once they have opted-in and given your app permission to send them messages. You can not Enter the original message into the template, you must use it to notify the user of a new message and instruct him on how to view it, for example by providing a link to your website where the chat is shown.
WhatsApp Cloud API
- To get the Template name and manage the templates visit https://business.facebook.com and go to Left menu > Settings > More system settings, then go to Accounts > WhatsApp accounts > Settings and click WhatsApp Manager.
- In Template languages enter all the language codes supported by your template, separated by commas. Language codes list here (copy only the language code, e.g. it, es, en_US). If you use a template that supports multiple languages, the matching language for the user will be automatically selected. Otherwise, the default template language will be used.
- In Header variables and Body variables enter the values separated by commas, you can use the following merge fields: {recipient_name}, {recipient_email}. The number of parameters entered here must match the number of parameters of the template. Use this feature if your template uses dynamic values. For image headers, pass the image URL as the first parameter. Order is important, the first merge field will be used as the first template parameter.
- In Button variables enter the link of your custom buttons, or the text of the quick replies with prefix quick_reply_, e.g. quick_reply_abcde. Each value must be separated by a comma. The number of parameters entered here must match the number of parameters of the template. If there are buttons or call to actions with static values like a static URL, enter skip_parameter. Order is important, the first merge field will be used as the first template parameter. Example:
Template fallback
Set the WhatsApp template sent as fallback from Settings > WhatsApp > Cloud API template fallback. If you are using multiple numbers with different WhatsApp Business Account, a dedicated template must be created for each WhatsApp Business Account, you can set a different template for each number but template name and language code must be the same. The test template button, sends a test template from the first number.
Send template messages to a user who has not contacted you before
- In Settings > WhatsApp > Cloud API numbers > Business Account ID enter you Business Account ID. Get it from https://developers.facebook.com. Choose your app and go to Left menu > WhatsApp > API Setup.
- To send the template to specific users, go to the ZampiBot Users section and choose the intended recipients. Then, click on the WhatsApp icon located at the top right corner.
- If you are using the WhatsApp Cloud API with a template that supports multiple languages, the matching language for the user will be automatically selected. Otherwise, the default template language will be used.
- If you are using Twilio and have parameters in your template, input the parameter values separated by commas in the Body section.
- For more details click here.
Twilio
Enter the Template SID and the template attributes separated by commas into ZampiBot > Settings > Twilio template.
360dialog
- Get the Namespace value from Left menu > WhatsApp accounts > Details.
- Get Template name and Template default language from your 360dialog templates area.
- In Custom parameters Enter the values separated by commas, you can use the following merge fields: {recipient_name}, {recipient_email}. Use this feature if your template uses dynamic values. Order is important, the first merge field will be used as the first template dynamic value.
- ZampiBot will try to use the template with the same language as the user, if it is not available, it will use the template with the default language. The following template languages are not compatible: en_GB(use en_US), pt_PT(use pt_BR), zh_HK and zh_TW(use zh_CN), es_AR and es_MX(use es_ES).
WhatsApp calls
The WhatsApp call features enable users and agents to initiate and receive voice or video calls directly from the chat interface and admin area.
- WhatsApp calls are enabled by default for all WhatsApp numbers integrated with ZampiBot. You can also enable or disable the WhatsApp calling feature from the WhatsApp Manager. To do so, go to WhatsApp Manager, navigate to Left menu > Settings > More system settings, then open Accounts > WhatsApp accounts > Settings and click WhatsApp Manager. From there, open the settings panel of your phone number and toggle the Voice and Video Calls option.
- To initiate a WhatsApp call from the admin area, open a user profile and click the phone or video icon at the top right corner. You have to create a calling permissions request template from WhatsApp Manager > Message templates. As template type choose Calling permissions request. Enter the template ID in Settings > WhatsApp > Calls > Call permission template ID. You must also add a valid payment method to your Business Portfolio before you can send the template.
WhatsApp flows
For more details about the WhatsApp Flows click here.
Built-in flows
The ZampiBot automatically generates and sends the following flow. To regenerate a flow, click the Settings > WhatsApp > Clear flows button.
- Registraton - This flow is sent when a new user sends their first message to the WhatsApp number, and the Settings > Users > Require registration option is enabled.
- Follow-up - This flow is sent if the Settings > Messages & Forms > Follow-up message option is active and the user does not have an email address.
Send custom flows
To send custom flows use the merge field {wa_flow id="123" header="" body="" button=""}. Replace 123 with the flow ID and enter a text for the attributes header, body, and button.
WhatsApp shop
To displays the products of your shop use the merge fields below.
| Merge field | Description |
|---|---|
| {catalog id="123" product_id="123" body="" footer=""} | Display a single product. Replace id with the catalog ID and product_id with a product ID. The attributes body and footer are optional. |
| {catalog id="123" product_id_1_1="123" product_id_1_2="123" product_id_2_1="123" section_1="" section_2="" header="" body="" footer=""} | Display multiple products. Replace id with the catalog ID. Add products by grouping them into sections, via the attributes product_id_[A]_[B], replace [A] with the section index, starting from 1, replace [B] with the product index, starting from 1 for each section. You must also add the attribute section_[A]="" for each section, replace [A] with the section index. The attributes header and body are required, footer is optional. |
- When the user sends the order, the order information is sent to the URL specified in Settings > WhatsApp > Order webhook. The page at that URL should process the order and send a message to the user via the PHP API function sb_whatsapp_send_message().
- To connect the shop to WooCommerce click here.
More information
- You cannot send a WhatsApp message to a user who has sent you a message more than 24 hours ago or has never messaged you before. WhatsApp prohibits this action. Instead, you must use a WhatsApp template or send an text message. If you encounter an "Error message: Re-engagement," it indicates this situation.
- If you does not receive WhatsApp messages make sure you are not assigning the WhatsApp conversations to a department and that the WhatsApp number used for testing is not a phone number of a ZampiBot admin or agent. Also, if you are not using the cloud version, make sure you setup correctly the WhatsApp webhook URL .
- If you can not send messages, an error should appear in the admin area when you try to send a message to the user.
- We cannot provide support for Twilio or 360dialog configuration, including all related issues.
- We cannot provide support in getting your WhatsApp account or WhatsApp message template approved.
- WhatsApp conversations and messages are compatible with queue and routing.
- If you are testing with the sandbox and after 72 hours you can no longer send messages to your phone number you must link again your phone number to your sandbox.
- You can send rich messages to WhatsApp. If you send chips, buttons or select rich messages, with more than 3 options, you can use the whatsapp="Your menu text" shortcode attribute to set the text of the WhatsApp message menu.
- The follow-up message is supported, but the message is always sent, also if an agent replies.
- The offline message is supported, but the timetable is not sent.
- The chatbot is supported. The human takeover feature is also supported. To enable the Dialogflow chatbot support for audio messages, activate Settings > Artificial Intelligence > OpenAI > Speech recognition
- The supported AI features include language detetction, spelling correction, multilingual via translation, Google search.
- Twilio and 360dialog has many limitations. For example, Twilio does not support messages longer than 1600 characters. We strongly recommend to use the Official WhatsApp API.
Messenger
The settings below are related to the Messenger app.
Installation
- From Settings > Apps, click Messenger and enter your license key to install and activate the app. More details here. If you have the cloud version click Active.
Automatic sync mode
- Complete the synchronization by choosing at least 1 Facebook page and enter the returned information in Settings > Messenger > Facebook pages.
- You're done. All messages sent to the Facebook pages and Instagram accounts you selected will appear in the conversation admin area of ZampiBot. Mind that only new messages will be synchronized, the old ones will not be imported.
Manual sync mode
- Create a new account at https://developers.facebook.com/ or login with your existing account.
- Create a new app, enter the app name, as uses cases select Manage messaging & content on Instagram, Engage with customers on Messenger from Meta, Manage everything on your Page.
- In Business tab, select I don't want to connect a business portfolio yet..
- From the left menu, click Use cases > Engage with customers on Messenger from Meta > Customize, then click Messenger API Setup. Under the Configure webhooks section enter Callback URL and Verify Token:
- Go to ZampiBot > Settings > Messenger and set Sync mode to manual.
- Retrieve the Callback URL from ZampiBot > Settings > Messenger > Get configuration URL.
- Set the Verify Token in ZampiBot > Settings > Messenger > Secret key and save the changes, then use it to verify the webhook.
- In Webhook Fields select the following: inbox_labels, message_deliveries, message_echoes, message_reactions, message_reads, messages, messaging_account_linking, messaging_handovers, messaging_optins, messaging_policy_enforcement, messaging_postbacks, messaging_referrals, feed
- In the Generate access tokens section, click on Connect. Select the pages you want to sync and complete the process.
- Under the Webhook Subscription column, click on Add Subscriptions. Select the following scopes: messages, messaging_postbacks, messaging_optins, message_reads, feed, and message_echoes.
- In the Tokens column, click on Generate. Copy the access token provided and paste it into Settings > Messenger > Facebook pages.
- Copy the Page ID and Page Name and paste them into Settings > Messenger > Facebook pages.
- Repeat these steps for all pages.
- Save the changes.
- From the left menu, click Use cases > Permissions and Features and add the following permissions: pages_manage_metadata, pages_messaging, pages_read_engagement, pages_show_list.
- If you want to sync comments, follow these steps:
- From the left menu, click Use cases > Manage everything on your Page > Customize.
- From the left menu, click Use cases > Permissions and Features and add the following permissions: pages_read_user_content, pages_manage_engagement.
- If you want to sync Instagram as well, follow these steps:
- From the left menu, click Use cases > Manage messaging & content on Instagram > Customize, then click API setup with Instagram login.
- Retrieve the Callback URL from ZampiBot > Settings > Messenger > Get configuration URL.
- Set the Verify Token in ZampiBot > Settings > Messenger > Secret key and save the changes, then use it to verify the webhook.
- In Webhook Fields select the following: messages, messaging_postbacks, messaging_seen, messaging_handover, message_reactions, standby, comments.
- Enter your Instagram ID in Settings > Messenger > Facebook pages > Instagram ID. To get it, open your web browser and enter the following URL: https://graph.facebook.com/FACEBOOK-PAGE-ID/?access_token=ACCESS-TOKEN&fields=instagram_business_account. Replace FACEBOOK-PAGE-ID and ACCESS-TOKEN with the corresponding Page ID and access token from the Facebook page linked to Instagram.
- Save the changes.
- From the left menu, click Use cases > Permissions and Features and add the following permissions: instagram_basic, instagram_business_basic, instagram_manage_comments, instagram_manage_messages, instagram_business_manage_messages
- From the left menu, click Publish.
- Your app must be submitted for review and approved by Meta. From the left menu, click Review and complete the submission process for all the permissions you added. Please note that help with this is not included in our support. If you require assistance, you can hire us.
To link Instagram to your Facebook page and ZampiBot follow the steps below.
- Enter the Settings area of your Facebook Page and click Left Menu > Instagram (https://www.facebook.com/YOUR-PAGE-SLUG/settings/).
- Click Connect account and complete the setup.
- Sync Messenger with ZampiBot again and you're done. Mind that only new messages will be synchronized, the old ones will not be imported.
Comments
Comments posted on your connected Instagram account and Facebook pages are delivered to ZampiBot, where you can reply to them as you would in a normal conversation.
- The DM for Comments feature allows you to send a direct message to users who comment for the first time on your Instagram posts or Instagram Page automatically. Leave the Post ID field empty to enable this feature for all posts.
- The chatbot is supported for comments, including the human takeover feature. You can disable the chatbot for comments from Settings > Messenger > Disable chatbot for comments.
- Support for rich messages in comments is included. However, certain elements such as images, videos, chips, buttons, and select options are not supported. You will see the actual comment rendered after you send the message.
Information
- If you don't receive Instagram messages:
- Make sure to enable Settings > Privacy > Messages & Forms > Connected tools - Allow access from your Instagram mobile app.
- Make sure your Instagram account is not setup as a professional account, it must be a business account.
- Go to Meta Business Suite, select your account, and go to Users > People. Under Instagram account click Manage and make sure to enable all the permissions.
- If you don't receive Facebook Messenger messages, make sure that the Facebook page does not send automated replies, such as the welcome message.
- In case you encounter duplicated messages or an ongoing chat cycle between the chatbot and Instagram messages, you are facing a problem due to the presence of two ZampiBot installations or ZampiBot Cloud accounts that are both synchronized with the same Instagram account. To resolve this, access the second ZampiBot admin area, navigate to Settings > Messenger > Facebook pages, remove the Instagram ID value and save the changes. Try also to click the Unsubscribe button.
- The Unsubscribe button remove the webhook subscription from all of your Facebook pages, it is useful if you want to stop receiving messages from a Facebook page.
- Every ZampiBot user has only 1 Facebook conversation and 1 Instagram conversation.
- ZampiBot rich messages are automatically converted to Facebook rich messages when possible, some part of the rich message could be removed or changed. Buttons, chips, and selects support a maximum of three choices and are only supported in the Instagram mobile app.
- Only private Facebook messages will get sent to your team inbox. If someone posts a Facebook message on your wall it won't appear in your team inbox.
- When someone sends a message to your company Facebook page or Instagram account they will get designated as a lead in ZampiBot. You'll only be able to see the user's Facebook or Instagram name and profile picture.
- Messenger conversations and messages are compatible with queue and routing.
- The chatbot is supported. The human takeover feature is supported.
- The supported AI features include language detetction, spelling correction, multilingual via translation, Google search.
- If the chatbot is enabled, it is necessary to deactivate any automatic replies on Facebook Messenger, such as the welcome message.
- The follow-up message is supported, but the message is always sent, also if an agent replies.
- The offline message is supported, but the timetable is not sent.
- Only 1 Facebook account can be synchronized, to link pages from multiple Facebook accounts, the account synchronized in ZampiBot must be an admin of all Facebook pages of the other Facebook accounts.
- Using this integration of Instagram and Facebook Messenger comes at no additional cost.
- If the message exceeds 1000 characters, only the initial 1000 characters will be transmitted due to the character limit.
- Only new messages, sent after the synchronization, will be synchronized, the old ones will not be imported.
- User Data Deletion Request (cloud version only): To delete all of your data from ZampiBot, click Settings > Messenger > Unsubscribe then delete your account from here.
- To enable the typing indicator on Messenger, you need to set up and enable the async PHP process.
The settings below are related to the Twitter app.
Installation
- Register at https://developer.twitter.com. Make sure to verify your phone at https://twitter.com/settings/phone or the registration will fail.
- Create your first app by entering the app name and clickGet keys, copy API Key (Consumer key) and API Key Secret (Consumer secret) and paste them in ZampiBot > Settings > Twitter.
- Request the Elevated access from https://developer.twitter.com/en/portal/products/elevated. Click Apply for Elevated and complete the form as follow: In the first area In your words and in Will your app use Tweet, Retweet, Like, Follow, or Direct Message functionality? enter I need access to the Account Activity API to start receiving Twitter Direct Messages to my chat software(ZampiBot ) and to reply to them directly from ZampiBot , details at https://board.support/twitter. Disable all the other fields by clicking No: Are you planning to analyze Twitter data?, Do you plan to display Tweets or aggregate data about Twitter content outside Twitter?, Will your product, service, or analysis make Twitter content or derived information available to a government entity?
- Wait a few days for Twitter to review and approve the Elevated access, you will receive an email from Twitter.
- Once you have Elevated access, enter the developers dashboard (https://developer.twitter.com/en/portal/dashboard) and from the left menu click Products > Premium > Dev environments and under Account Activity API / Sandbox click Set up dev environment, in Dev environment label enter sb or the same value entered in Settings > Twitter > Synchronization > Dev environment label.
- Enter your app Settings area from Left menu > Projects & Apps > Your project > Your app and under User authentication settings click Set up and activate OAuth 1.0a. In App permissions check Read and write and Direct message, in Callback URI / Redirect URL enter the URL you get from ZampiBot > Settings > Twitter > Get callback URL, in Website URL enter your website URL.
- Enter your app Keys and tokens area from Left menu > Projects & Apps > Your project > Your app > Keys and tokens and under Authentication Tokens generate Access Token and Secret, copy and paste them in ZampiBot > Settings > Twitter.
- Enter your Twitter profile username in ZampiBot > Settings > Twitter > Your username. Get it from your Twitter profile page, copy the name starting with @ or the URL part containing your username. Ex. https://twitter.com/SupportBoard1.
- Save the ZampiBot settings and click the button ZampiBot > Settings > Twitter > Subscribe and you're done. All messages sent to your Twitter account will be received by ZampiBot.
More information
- If you receive duplicate messages, the Twitter account you are using for testing may be the same as the one you synced. Try sending a message from another Twitter account.
- Use a live domain, localhost is not supported.
- When a message is received from a Twitter user you may send up to 5 messages in response within a 24 hour window. No messages can be sent after 24 hours of receiving the Twitter message.
- You can send maximum 3 or 4 attachments depending by the media type.
- The following ZampiBot rich messages are not supported: images slider, slider, card.
- The chatbot is supported. The human takeover feature is supported.
- The supported AI features include language detetction, spelling correction, multilingual via translation, Google search.
Telegram
The settings below are related to the Telegram app.
Installation
- From Settings > Apps, click Telegram and enter your license key to install and activate the app. More details here. If you have the cloud version click Active.
- Once the app is installed visit https://t.me/botfather.
- If you have already created a Telegram bot in the past, type the command /mybots and open your bot, then click API token.
- If you never created a Telegram bot before, type the command /newbot to create a new bot. The BotFather will ask you for a name and username, enter them and generate the authentication token. More details at https://core.telegram.org/bots.
- Copy the token and paste it into ZampiBot > Telegram > Token, then click Synchronize now. Your website must use HTTPS (SSL certificate), HTTP is not supported.
- You're done. All messages sent to your Telegram bot will appear in the conversation admin area of ZampiBot.

More information
- ZampiBot rich messages are automatically converted to Telegram rich messages when possible, otherwise they are removed from the message.
- Telegram conversations and messages are compatible with queue and routing.
- The chatbot is supported. The human takeover feature is supported.
- The supported AI features include language detetction, spelling correction, multilingual via translation, Google search.
- The Settings > OpenAI > Speech recognition feature is not supported for Telegram audio messages.
- The follow-up message is supported, but the message is always sent, also if an agent replies.
- The offline message is supported, but the timetable is not sent.
- You can verify the webhook status from https://api.telegram.org/bot><your_bot_token>/getWebhookInfo. Replace <your_bot_token> with your token.
Notifications
Agents can be notified via Telegram when a new message comes in.
- Notifications are sent only when required, according to the other notification settings. Enable Settings > Telegram > Notifications > All messages to always receive notifications for all messages.
Activation
Viber
The settings below are related to the Viber app.
Installation
- From Settings > Apps, click Viber and enter your license key to install and activate the app. More details here. If you have the cloud version click Active.
- Create the bot at https://partners.viber.com/account/create-bot-account.
- Copy the token and paste it into ZampiBot > Viber > Token, then click Synchronize now. Your website must use HTTPS (SSL certificate), HTTP is not supported.
- You're done. All messages sent to your Viber bot will appear in the conversation admin area of Support Board.
More information
- ZampiBot rich messages are automatically converted to Viber rich messages when possible, otherwise they are removed from the message.
- Viber conversations and messages are compatible with queue and routing.
- The chatbot is supported. The human takeover feature is supported.
- The supported AI features include language detetction, spelling correction, multilingual via translation, Google search.
- The follow-up message is supported, but the message is always sent, also if an agent replies.
- The offline message is supported, but the timetable is not sent.
Slack
The settings below are related to the Slack App.
Installation
- From Settings > Apps, click Slack and enter your license key to install and activate the app. More details here. If you have the cloud version click Active.
- Once the app is installed go to Settings > Slack, click the Synchronize now button, and follow the instructions.
Having Problems?
The synchronization of Slack may not be successful for a number of reasons; below are the most common ones:
| Problem description | Solution |
|---|---|
| You can receive messages on Slack, but you cannot send messages from Slack to ZampiBot | Navigate to /supportboard/apps/slack/post.php from your browser. Also, in Workspace Settings > Permissions, you must allow anyone to create public channels. If you have further issues please contact the Slack support team at https://api.slack.com/support. |
| Slack sync not working | Double check whether or not you chose a public Slack channel when you attempted to synchronize Slack. If you did not, try syncing Slack once again, this time choosing a public channel instead. The general channel is a good option. |
Manually archive channels
To archive a channel in Slack, follow these steps:
- Open the Slack channel you want to archive.
- On the top right click the gear icon and select Additional options.
- Click the info icon in the top right area of the screen, then click the More icon, and then click Additional options.... Click Archive this channel.
Department linking
If the Settngs > Slack > Department linking option is active, when a conversation in the ZampiBot is assigned to a department, a new message is sent to the linked Slack channel, informing Slack users that a new conversation has started and inviting them to join the dedicated user Slack channel. However, the full conversation can only be accessed on the dedicated Slack channel of the specific user.
- Get the department IDs from Settings > Miscellaneous > departments.
- Get the channel IDs by clicking the button Get channel IDs.
User fields
The Settings > Slack > User fields option allows you to choose which user details to include in the message sent to the main channel when a new user sends the first message. You can include the slug of your custom user details or the following slugs: browser, browser_language, location, email, user_type, token, creation_time, country_code, current_url, os, city, address, postal_code, phone, birthdate, company, timezone, website. Default: email, browser, browser_language, location.
Information
- When a new user sends the first message, a Slack message with the user details and a button to join the user's channel is sent to the main channel selected during the synchronization, or to the channel linked to the conversation's department. Only the Slack account used during the synchronization will automatically join the user's channel, other Slack members will have to join it manually via the button.
- When Settings > Slack > Agent linking is set, if the conversation is assigned to a department, only agents assigned to that department will receive the message, if the conversation is assigned to a single agent only that agent will receive the message.
- Slack is free to use. Only large companies may need a paid subscription plan, more details here.
- Push notifications are compatible with Slack, when agents send messages via Slack, Push notifications are sent to users.
- If you're using Dialogflow, no messages will be received in Slack if the chatbot knows the answer. Once the human takeover is active all conversation's messages are sent to Slack.
- The Slack app is compatible with email piping and the messaging apps.
- Deleting or leaving a channel is not supported, only archiving a channel is supported.
- When a conversation is archived in ZampiBot , the linked Slack channel is also archived.
- When replying via Slack to a user, if the user is notified by email or text message, a Slack message is sent to notify you.
- Use the Slack command /archive to archive a conversation from Slack.
LINE
The settings below are related to the LINE app.
Installation
- From Settings > Apps, click LINE and enter your license key to install and activate the app. More details here. If you have the cloud version click Active.
- Login at https://developers.line.biz/console/ or create a new account.
- Create a new Provider and then a new Messaging API channel, select Messaging API as channel type
- From the channel Basic settings area copy Channel secret and paste it into Support Board > Settings > Line > Synchronization > Channel secret.
- From the channel Messaging API area generate a Channel access token (long-lived), copy it and paste it into ZampiBot > Settings > Line > Synchronization > Access token.
- Enter your Webhook URL into Webhook URL and click Verify. Get the Webhook URL from ZampiBot > Settings > Line > Synchronization > Webhook URL.
- Enable Use webhook.
- Scan the QR code with your LINE mobile app to start writing to your channel.
- Disable the Auto-reply messages setting.
- You're done. All messages sent to your LINE bot account will appear in the conversation admin area of ZampiBot.
More information
- You have 7 days from when the end user's message was sent from WhatsApp to reply to the message.
- Stickers are not supported.
- ZampiBot rich messages are automatically converted to LINE rich messages when possible, otherwise they are removed from the message.
- LINE conversations and messages are compatible with queue and routing.
- The chatbot is supported. The human takeover feature is supported.
- The supported AI features include language detetction, spelling correction, multilingual via translation, Google search.
- The follow-up message is supported, but the message is always sent, also if an agent replies.
- The offline message is supported, but the timetable is not sent.
The settings below are related to the WeChat app.
Installation
- From Settings > Apps, click WeChat and enter your license key to install and activate the app. More details here. If you have the cloud version click Active.
- Visit https://mp.weixin.qq.com/cgi-bin/readtemplate?t=register/step1_tmpl&lang=en_US and register a Service account.
- After the registration enter Official accounts area and from the left menu click Settings and development > WeChat verification. You must complete the verification, it takes a few weeks and costs USD 99, or CNY 300 for chinese entities.
- From the left menu click Settings and development > Basic configuration and copy Developer ID(App ID), Developer Password(App Secret). Paste the information into ZampiBot > Settings > WeChat.
- From the left menu click Settings and development > Basic configuration and complete the server configuration (服务器配置(已启用). In Server Address(URL) enter the URL you get from ZampiBot > Settings > WeChat > Synchronization > Get configuration URL. In Token insert any value you want, the same value must be entered in ZampiBot > Settings > WeChat > Token.
- You're done. All messages sent to your WeChat account will appear in the conversation admin area of ZampiBot.
More information
- If you receive an error like {"errcode":41001,"errmsg":"access_token missing rid: 631111-470b3b22-48553870"} you need to whitelist your server IP address from Official Account > Settings and Development > Basic Configuration > IP whitelist.
- WeChat files and location attachments are not supported and are not received by ZampiBot.
- Links are not supported in WeChat, they are converted to texts.
- ZampiBot rich messages are automatically converted to WeChat rich messages when possible, otherwise they are removed from the message.
- WeChat conversations and messages are compatible with queue and routing.
- The chatbot is supported. The human takeover feature is supported.
- The supported AI features include language detetction, spelling correction, multilingual via translation, Google search.
- The follow-up message is supported, but the message is always sent, also if an agent replies.
- The offline message is supported, but the timetable is not sent.
Zalo
The settings below are related to the Zalo app.
Installation
- From Settings > Apps, click Zalo and enter your license key to install and activate the app. More details here. If you have the cloud version click Active.
- Register at https://developers.zalo.me/ and create a new App. Enter the required information and save.
- Copy the Application ID and Application secret key from the app you just created and paste them into ZampiBot > Settings > Synchronization > Zalo.
- From the left menu click Webhooks and set the URL, get the URL from ZampiBot > Settings > Zalo > Synchronization > Webhook URL.
- From the left menu click Webhooks copy OA Secret Key and paste it into ZampiBot > Settings > Zalo > Synchronization > OA secret key.
- From the left menu click Webhooks and enable the following webhook events: user_send_location, user_send_image, user_send_link, user_send_text, user_send_sticker, user_send_gif, user_received_message, user_seen_message, oa_send_text, oa_send_image, oa_send_list, oa_send_gif, user_send_audio, user_send_video, user_send_file, user_reacted_message, user_received_message.
- From the left menu click Official Account > OA Management and link your Official Account.
- From the top menu click Tools > API Explorer or go to https://developers.zalo.me/tools/explorer/. As Access token type select OA Access Token, click Get Access Token and select your Official Account. Copy the Refresh token and paste it into ZampiBot > Settings > Zalo > Synchronization > Refresh token. More details here.
- From the left menu click Role and a test user as admin. You will use this user to send message to your Zalo Official Account and test the integration.
- From the left menu click Sign up to use API > Official AccountAPI enable User Management and click Submit for review.
- You're done. All messages sent to your Zalo Official account will appear in the conversation admin area of ZampiBot.
More information
- You need a Zalo Official Account to use this integration. ZampiBot will receive messages sent to your Zalo Official Account.
- The slider rich message only send the first element to Zalo.
- ZampiBot rich messages are automatically converted to Zalo rich messages when possible.
- Zalo conversations and messages are compatible with queue and routing.
- The chatbot is supported. The human takeover feature is supported.
- The supported AI features include language detetction, spelling correction, multilingual via translation, Google search.
- The follow-up message is supported, but the message is always sent, also if an agent replies.
- The offline message is supported, but the timetable is not sent.
Zendesk
The settings below are related to the Zendesk App.
Installation
- From Settings > Apps, click Zendesk and enter your license key to install and activate the app. More details here. If you have the cloud version click Active.
- Get the domain from the URL of your Zendesk admin area, copy the first part of the URL: https://domain.zendesk.com/. For example, the domain of https://supportboard.zendesk.com/agent/get-started/ticketing-system/ticketing-intro is supportboard.
- Get the API key from Left menu > Admin > Channels > API > Settings. Click Add API token.
- The email is your Zendesk account email.
More information
- Tickets converted by ZampiBot are automatically synchronized when new messages are sent and received in ZampiBot , and they are linked to an existing Zendesk user if any, otherwise a new Zendesk user is created.
- ZampiBot links Zendesk users to ZampiBot users via email or phone number.
Perfex
The settings below are related to the Perfex app.
Installation
The installation requires two steps:
- From Settings > Apps, click Perfex and enter your license key to install and activate the app. More details here. The cloud is not compatible with the Perfex app.
- Once the app is installed go to Settings > Perfex and enter the database information and the Perfex URL. You can get the information from the file application/config/app-config.php in your Perfex installation folder. If you do not know the Perfex prefix leave it empty, the default prefix is tbl.
- Go to the admin area of Perfex, then go to Setups > Modules and install the ZampiBot module by uploading the file module.zip. Once the module is installed go to Setups > ZampiBot and enter the ZampiBot plugin URL, get it from Settings > Miscellaneous > Installation URL. If you're using the WordPress version, the URL must be like this: https://example.com/wp-content/plugins/supportboard/supportboard.
To show ZampiBot inside the Perfex admin area, ZampiBot must be installed in the same domain and same file system of the Perfex installation. If you have issues, or if you have changed the Perfex database details, make sure the file supportboard/config.php use the correct Perfex database details. Updating the details in Support Board will not update the details in the config.php file.
WHMCS
The settings below are related to the WHMCS App.
Installation
The process requires two installations, one is the WHMCS add-on, and one is the ZampiBot App.
App installation
WHMCS add-on installation
- Enter the folder supportboard inside the addon.zip (download it here) file into the /modules/addons/ directory of your WHMCS installation.
- Go to Configuration > System Settings > Addon Modules, find the ZampiBot module, and click Activate. More details at https://docs.whmcs.com/8-13/addon-modules/addon-modules/
- Click the Configure button and enter the ZampiBot plugin URL.
How to update
Updating the WHMCS App in ZampiBot is easy, you can enable the automatic updates or manually update it. Details here. To update the WHMCS add-on you will need to download the latest version of the add-on from https://zampibotpage.zampisoft.com/docs/files/whmcs/addon.zip and manually replace the /modules/addons/supportboard/ directory of your WHMCS installation with the new one just downloaded.
If you have issues, or if you have changed the WHMCS database details, make sure the file supportboard/config.php use the correct WHMCS database details. Updating the details in Support Board will not update the details in the config.php file.
OpenCart
The settings below are related to the OpenCart App.
Installation
- From Settings > Apps, click Martfury and enter your license key to install and activate the app. More details here. If you have the cloud version click Active.
- Once the app is installed go to Settings > OpenCart and enter the OpenCart details. To get the Username and API key enter the admin area of OpenCart and go to System >Users > API . You'll see a predefined user named Default. Edit it generate the API key, then set the Status to enable. Next, add your IP to list of permitted for API access.
- With a file manager or FTP, edit file catalog/controller/common/header.php in the OpenCart installation folder and add the following key-value in $data variable:
$data['supportboard'] = $this->customer->getFirstName() ? 'var SB_DEFAULT_USER = { first_name: "' . $this->customer->getFirstName() . '", last_name: "' . $this->customer->getLastName() . '", email: "' . $this->customer->getEmail() . '", extra: { opencart_id: ["' . $this->customer->getId() . '|' . (isset($_COOKIE['OCSESSID']) ? $_COOKIE['OCSESSID'] : '') . '", "Open Cart ID"], phone: ["' . $this->customer->getTelephone() . '", "Phone"], opencart_store: ["' . $this->config->get('config_name') . '", "OpenCart Store"], opencart_store_url: ["' . $_SERVER['HTTP_HOST'] . '", "OpenCart Store URL"] } };' : ''; - Edit the file /catalog/view/theme/default/template/common/header.twig and add <script>{{ supportboard }}</script> somewhere within the <head> tag. Mind that if you are not using the default theme the path will be different.
- Enter the OpenCart Extensions page and click the top-right button Update.
- Download the sb.php file and upload it into catalog/controller/api.
More information
- This app supports OpenCart Multistore.
- On OpenCart update you have to apply code above again.
- Currently only Opencart 3 is supported.
Active eCommerce
The settings below are related to the Active eCommerce app.
Installation
The process requires two installations, one is the ZampiBot App, and one is the installation in Active eCommerce.
App installation
- From Settings > Apps, click Active eCommerce and enter your license key to install and activate the app. More details here. The cloud is not compatible with the Active eCommerce app.
- Once the App is installed go to Settings > Active eCommerce and enter the database information, the Active eCommerce URL, and the other settings.
- The Secret key can be found in the file .env located in the root directory of Active eCommerce. Copy the APP_KEY value.
- If you have issues, make sure the file supportboard/config.php use the correct Active eCommerce database details.
Installation in Active eCommerce
- Edit the file \resources\views\frontend\inc\footer.blade.php in the directory of Active eCommerce and Enter the code below just after the footer opening tag <footer. Replace [YOUR-SITE] with the URL of your ZampiBot installation, get it from Settings > Miscellaneous > Installation URL.
<script src="https://[YOUR-SITE]/js/min/jquery.min.js"></script>
<script id="sbinit" src="https://[YOUR-SITE]/js/main.js"></script>
@php
$sb_code = '';
$sb_cart = false;
if (Auth::check() && !isAdmin()) $sb_code = 'var SB_AECOMMERCE_ACTIVE_USER = '. Auth::user()->id. ';';
if (isset($detailedProduct)) $sb_code.= 'var SB_DEFAULT_AGENT = "aecommerce-'. $detailedProduct->user->id. '";';
if (auth()->user() != null) $sb_cart = \App\Models\Cart::where('user_id', Auth::user()->id)->get(); else { $temp_user_id = Session()->get('temp_user_id'); if ($temp_user_id) { $sb_cart = \App\Models\Cart::where('temp_user_id', $temp_user_id)->get(); }}
if ($sb_cart && count($sb_cart) > 0) { $sb_code.= 'var SB_AECOMMERCE_CART = ['; foreach ($sb_cart as $key => $item) { $sb_code.= '["'. $item['product_id']. '", "'. $item['price']. '", "'. $item['quantity']. '"],'; } $sb_code = substr($sb_code, 0, -1). '];'; }
if ($sb_code != '') echo '<script>'. $sb_code. '</script>';
@endphp
How to update
Updating the Active eCommerce App in ZampiBot is easy, you can enable the automatic updates or manually update it. Details here. If you update Active eCommerce, you will need to insert again the code above in the file footer.blade.php.
Sellers chat
To force sellers to see only the conversations of users writing from their product pages enable the option Settings > Miscellaneous > Hide conversations of other agents. After that, just click the button Settings > Active eCommerce > Import vendors and you're done! The sellers will be registered in ZampiBot and can log in to the admin area.
Admins can always see the conversations of all agents(sellers).
Martfury
The settings below are related to the Martfury app.
Installation
- From Settings > Apps, click Martfury and enter your license key to install and activate the app. More details here. The cloud is not compatible with the Martfury app.
- Once the app is installed go to Settings > Martfury and enter the database information, Martfury URL, Secret key. Get the information from the .envfile located in the root directory of Martfury.
- Set the Martfury path in Settings > Martfury > Martfury path. Get this information by uploading this file in the /public/ folder of the root directory of Martfury, after the upload open it via browser (e.g. https://shop.com/public/path.php).
- To show the chat on the website enter the ZampiBot code of the PHP installation into Martfury Admin > Appearance > Custom JS > Footer JS. Do not include jQuery.
- If you have issues, make sure the file supportboard/config.php use the correct Martfury database details.
How to update
Updating the Martfury App in ZampiBot is easy, you can enable the automatic updates or manually update it. Details here.
Sellers chat
To force stores to see only the conversations of users writing from their product pages follow the steps below.
- Check the options Settings > Martfury > Private chat, Settings > Chat > Disable dashboard, Settings > Chat > Allow only one conversation.
- From Settings > Martfury > Import vendors import all vendors.
- In Settings > Martfury > Private chat linking each each vendor to the correct store. You can get the vendor IDs from Users > Agents and Admins.
WordPress
The settings below are related to the WordPress version of ZampiBot that is installed on your WordPress website. If you are using the cloud version of ZampiBot and its WordPress plugin, the feature below are not available.
User synchronization
WordPress users can be automatically synchronized with ZampiBot by selecting "WordPress" under the Users system in the Settings > WordPress area. When active, the front-end chat automatically recognize all logged-in WordPress users and create a new ZampiBot user account with the same details (name, surname, email, and password). Also, the log-in form recognize the email and password of each WordPress user. On ZampiBot login, the user is automatically logged in WordPress as well.
- To create a WordPress user when a visitor register to ZampiBot enable the option Settings > WordPress > WordPress registration and include password and email fields in the registration form, they are required. The WordPress user if logged in automatically.
More information
Direct access and PWA
You can access the admin area directly without going through WordPress by navigating to /wp-content/plugins/supportboard/supportboard/admin.php and logging in with your default WordPress user or agent email and password. Keep in mind that your wp-content folder might be different. By accessing the admin directly, you will also be able to use the admin area as a Progressive Web App. You can find more details on this by clicking here.
Login and logout
To logout from the admin area of ZampiBot , logout from WordPress from the admin area of Support Board , once logged-out you will be able to login with another WordPress account. To access the admin area from within WordPress you must log in with one of the following WordPress user roles: administrator, author, editor.
Get a page or Post Type ID
To get the ID of a specific page or Post Type, go to the admin area of WordPress and edit the page or post. The ID is displayed in the address bar. Example: http://your-site.com/wp-admin/post.php?post=11&action=edit&lang=en (the page/post ID is equal to 11).
Get a Post Type slug
The Post Type slug of the blog archive and posts is post. The Post Type of the pages is page. To obtain the slug of a custom Post Type, go to the admin area of WordPress and open the custom Post Type page from the left menu. The slug is displayed in the address bar. Example: http://your-site.com/wp-admin/edit.php?post_type=food (the slug is food).
Disable WordPress Emoji
The prevent WordPress from replacing the chat emoji with the WordPress ones Enter the code below in the file functions.php of your theme.
function disable_emojis() {
     remove_action("wp_head", "print_emoji_detection_script", 7);
     remove_action("admin_print_scripts", "'print_emoji_detection_script");
     remove_action("wp_print_styles", "print_emoji_styles");
     remove_action("admin_print_styles", "print_emoji_styles");
}
add_action("init", "disable_emojis");
WordPress Multisite
If you have multisite installation, you must install ZampiBot in the main website.
WordPress Multilingual
If you want the chat to use the same language as the pages on your website, disable the Settings > Chat > Language option.
WooCommerce
The settings below are related to the WooCommerce App for the WordPress version of ZampiBot.
Installation
From Settings > Apps, click WooCommerce and enter your license key to install and activate the app. More details here. The cloud and PHP versions are not compatible with the WooCommerce app.
Chatbot
Getting started
To start using the chatbot with WooCommerce you only have to enable it, for more details click here. The chatbot will start replying to questions related to your shop automatically.
Built-in chatbot questions and answers list
The OpenAI chatbot can answer the questions like the below ones.
- Do you sell any shoes for less than $299?
- Show me your bags
- Do you have anything for women in promotion?
- What are the best shoes of 2020?
- Add Abstract Print to the cart
- Remove Abstract Print from the cart
- What's the status of my order?
- What is the price of the Abstract Print?
- Display the products in my cart!
- Do you ship in Australia?
- Where do you ship?
Multilingual
- The multilingual feature is compatible with WPML and Polylang plugins.
- To activate the multilingual feature go to Settings > WordPress > Multilingual plugin and choose WPML or Polylang.
- The multilingual feature for the WooCommerce products attributes requires the WooCommerce Multilingual Plugin if you're using WPML, or Polylang for WooCommerce Plugin if you're using Polylang.
More information
- The chatbot can display up to 15 products via the slider rich message.
- The chatbot is automatically updated every 60 minutes by default, but it can take longer. If you update a product, category, tag, or attribute, please wait a few hours for the new contents to take effect.
- The synchronization detects the following events: product deleted, product restored from trash, product updated, new product added, product deleted, category or tag deleted, category or tag updated, new category or tag added.
- To improve the chatbot add all the possible variants of an attribute, including the variants not used in your products. Example: if you sell only yellow and red t-shirts add all possible colors to the attribute color, not only yellow and red.
- Products must have the Regular price attribute set.
- Products names must not use the double-quote char: ".
- Some multilingual feature is not compatible with sub-domains or external domains language URLs.
- If your store uses UTF-8 characters (this applies if your language includes special characters like ñ, ü, ç, 蝦餃, حار, or, for example, a product name like e-Karta brązowa), make sure your database collation is set to utf8mb4_unicode_ci or utf8mb4_unicode_520_ci, and the charset is utf8mb4. Also, ensure your wp-config.php includes define('DB_CHARSET', 'utf8mb4'); You can verify that strings are stored correctly by checking the wp_post table using a tool like phpMyAdmin. If you see corrupted characters like �� (), it means your table's text is corrupted, and the chatbot will not be able to perform actions such as finding products.
Merge fields and shortcodes
The following merge fields and shortcodes can be used in emails and messages.
| Code | Description |
|---|---|
{product_images id="123"}
|
Display a slider of the product's images using the images slider rich message. If there are no results, the full message is replaced by "No results found". Replace 123 with the product ID. |
{product_name id="123"}
|
Display the product name. Replace 123 with the product ID. |
{product_image id="123"}
|
Display the main product image. Replace 123 with the product ID. |
{product_price id="123"}
|
Display the main product price. Replace 123 with the product ID. |
{product_description id="123"}
|
Display the product description. Replace 123 with the product ID. |
{product_rating id="123"}
|
Display the product rating. If the product has no ratings yet, the full message is replaced by "[product name] has no ratings or reviews yet". Replace 123 with the product ID. |
{product_link id="123"}
|
Product link. Replace 123 with the product ID. |
{shipping_locations}
|
List of the shipping countries. |
{shop_link}
|
Shop link. |
{cart_link}
|
Cart link. |
{cart}
|
Display a list of the products in the user's cart. If the cart is empty, the full message is replaced by "Your cart is currently empty". |
{order_status}
|
Status of the last user's order. If the user has never placed an order, the full message is replaced by "You haven't placed an order yet". |
{order_details)
|
Details of the last order user's order. If the user has never placed an order, the full message is replaced by "You haven't placed an order yet". |
{product_card id="123" link-type="purchase" link-text="Purchase"}
|
Display a product using the card rich message. Attributes:
|
{products_slider id="123,456" tag="new" category="shoes" discounted="true" max-price="90" min-price="10" attribute="red" link-type="purchase" link-text="Purchase" language="es"}
|
Search for the products matching the given attribures and display them using the slider rich message. If there are no results, the full message is replaced by "No results found". Attributes:
|
{payment_methods}
|
Available payment methods. |
{coupon discount="110" expiration="2 days"}
|
Generate a coupon code. Attributes:
|
{html_product_card}
|
Product card for email notifications. |
{html_products_list}
|
List of product cards for email notifications. |
Rich Messages
| Shortcode | Description |
|---|---|
[woocommerce_button name="" ids="" coupon="" checkout="true"] |
Add a product or multiple products to the user's cart. Optionally apply a coupon code, and redirect the user to the checkout page. |
More information
Disable chatbot store integration
If you want to disable the chatbot store integration, go to Settings > WooCommerce > Disable store integration. The chatbot will no longer connect directly to your WooCommerce store data (e.g. products and categories) to reply to questions related to your products. Instead, you will have to train the chatbot via website training to allow it to reply to questions related to your products. This feature is useful if the chatbot is providing wrong answers, in this case training it via website training may improve the answers.
Waiting list
- The message is sent automatically when a user visits a page of a product that's out of stock.
- The message is sent automatically when a user tries to purchase a product that's out of stock via the chatbot.
- The message is sent a maximum of 1 time every 24 hours for each out of stock product.
- If the user'email is not set, the chat asks for the user' email automatically.
Removed item from cart notification
- If the coupon is included, the chat message is sent only for the first removed item, then again after coupon expiration.
- The coupon is valid only for the removed items.
- The following merge fields can be used in the email subject too: {coupon}, {discount_price}, {original_price}, {product_names}, {customer_name}.
- Only the users with an email will get notified via email.
Returning visitors notification
- The chat message is sent after 15 seconds.
- The chat message is sent to the active conversation, if any, otherwise to a new conversation.
- A visitor is a "returning visitor" only if at least 24 hours have passed since the last visit.
- The chat message is sent only 1 time, if the visitor returns again, the message is not sent.
Follow-up message
- If the message contains a coupon, the message is sent only if there are no other valid coupons assigned to the user.
Miscellaneous
- You can optimize the chatbot by adding Q&A that make use of the WooCommerce merge fields.
- When a visitor completes a purchase, if an existing ZampiBot user exists, it is updated with the details provided in the checkout form.
- The automatic messages(abandoned cart message, follow-up messages,...) are sent to the active conversation, if any, otherwise to a new conversation.
- The default coupon values are 0% discount and 7 days expiration.
- Coupons in the trash are still valid, you must permanently delete them.
- All coupons can be used only 1 time.
- Expired coupons are deleted automatically via cron jobs.
- The products pop-up of the admin conversations area search by product name, description, and price.
- The products pop-up of the admin conversations area is multilingual and displays automatically the products of the user's language if available.
- To view orders of guest users who did not send any chat message before the purchase you need to enable Settings > Users > Register all visitors.
- The Ticket products selector > Exclude products setting accepts WooCommerce product IDs separated by commas.
WhatsApp shop
To allow a user to purchase your WooCommerce shop products on WhatsApp the product ID of your WhatsApp shop products must be the same as the product ID of your WooCommerce products. Once the user has sent the WhatsApp order, WooCommerce automatically saves it, use the merge field {catalog_checkout} to send the user the checkout link.
Use the plugin https://wordpress.org/plugins/facebook-for-woocommerce/ to automatically synchronize the WooCommerce products with the WhatsApp shop products.
Ultimate Membership Pro
The settings below are related to the Ultimate Membership Pro app.
App installation
- From Settings > Apps, click Ultimate Membership Pro and enter your license key to install and activate the app. More details here. The cloud and PHP versions are not compatible with the Ultimate Membership Pro app.
- Once the App is installed go to Settings > Active eCommerce and enter the database information, the Active eCommerce URL, and the other settings.
- The Secret key can be found in the file .env located in the root directory of Active eCommerce. Copy the APP_KEY value.
- If you have issues, make sure the file supportboard/config.php use the correct Active eCommerce database details.
Users synchronization
New users are synchronized automatically. To manually syncronize existing users go to Settings > WordPress > Synchronize users and click Import users.
More information
- To limits the access to a specific plan only use this shortcode [ihc-hide-content ihc_mb_type="show" ihc_mb_who="4" ihc_mb_template="2"]<script id="sbinit" src="YOUR-URL/supportboard/supportboard/js/main.js"></script>[/ihc-hide-content] Replace 4 with the user's level you want and YOUR-URL with your WordPress /plugins/ folder URL. You also have to check Settings > WordPress > Manual init.
ARMember
The settings below are related to the ARMember app.
App installation
- From Settings > Apps, click ARMember and enter your license key to install and activate the app. More details here. The cloud and PHP versions are not compatible with the ARMember app.
- Once the App is installed go to Settings > Active eCommerce and enter the database information, the Active eCommerce URL, and the other settings.
- The Secret key can be found in the file .env located in the root directory of Active eCommerce. Copy the APP_KEY value.
- If you have issues, make sure the file supportboard/config.php use the correct Active eCommerce database details.
Users synchronization
New users are synchronized automatically. To manually syncronize existing users go to Settings > WordPress > Synchronize users and click Import users.
More information
- A user is a paid member only if it has at least one active paid plan which is not expired.
Cloud version
The information in this section is exclusively related to the cloud version of ZampiBot, accessible at https://chatbot.zampisoft.com.
Credits
Credits are used only in the cloud version of ZampiBot. Credits are used by the following functions, only in Automatic sync mode. The Manual sync mode doesn't use credits. If you do not want to use credits, you can use the Manual sync mode and your API keys.
- Artificial Intelligence > Google > Dialogflow chatbot and Automatic Translations, Language detection, Multilingual via translation.
- Artificial Intelligence > OpenAI > Chatbot and Spelling correction, Message rewriting, Speech recognition.
- Note data scraping
- Copilot
You can change the sync mode at any time from Settings > Artificial Intelligence > OpenAI > Sync mode or Settings > Artificial Intelligence > Google > Sync mode.
Pricing
Credits must be purchased from https://chatbot.zampisoft.com/account?tab=membership. Here are the costs of functions that use credits.
- Dialogflow ES $0.004 per request.
- Dialogflow CX $0.014 per request.
- Dialogflow ES Audio Message $0.000866 per second of audio.
- Dialogflow CX Audio Message $0.002 per second of audio.
- Google Translations $0.00004 per char.
- OpenAI gpt-3.5-turbo-instruct $0.000004 per token.
- OpenAI gpt-3.5-turbo $0.000004 per token.
- OpenAI gpt-3.5-turbo-0125 $0.000001 per token.
- OpenAI gpt-3.5-turbo-1106 $0.000002 per token.
- OpenAI gpt-5 $0.00001 per token.
- OpenAI gpt-5-mini $0.000002 per token.
- OpenAI gpt-5-nano $0.0000004 per token.
- OpenAI gpt-4 $0.00012 per token.
- OpenAI gpt-4-32k $0.00024 per token.
- OpenAI gpt-4-turbo $0.00003 per token.
- OpenAI gpt-4o $0.00001 per token.
- OpenAI gpt-4o-mini $0.00000015 per token.
- OpenAI gpt-4.1-nano $0.0000004 per token.
- OpenAI gpt-4.1-mini $0.0000016 per token.
- OpenAI gpt-4.1 $0.000008 per token.
- OpenAI o1 $0.00006 per token.
- OpenAI o1-mini $0.000012 per token.
- OpenAI o3-mini $0.0000044 per token.
- OpenAI o4-mini $0.0000044 per token.
- OpenAI ada $0.0000001 per token.
- OpenAI text-embedding-3-small $0.00000004 per token.
- OpenAI audio-to-text whisper $0.0002 per second of audio.
- OpenAI whisper $0.0001 per second of audio.
Information
- When your credits run out, if the automatic recharge is not enabled, you will be notified via email. You will receive a maximum of two email notifications. Activate the automatic recharge to prevent running out of credits.
- When automatic recharge is enabled, the credit will be recharged once it falls below 1.
Shopify
The Shopify integration is available only in the cloud version of ZampiBot and allow you to synchronize your Shopify store and users with ZampiBot.
- To use the Shopify integration, you must have a Shopify store and install the ZampiBot Shopify App. After the installation, the chat widget should appear on your Shopify store. If it doesn't, go to Sales channels > Online store and on the left menu, click App embeds, make sure the ZampiBot block there and it is active.
- The chatbot can access your store products, collections, tags, variants, and vendors to answer the user's questions. No setup is required. It works automatically. To enable the chatbot, go to Settings > Artificial Intelligence > OpenAI > Chatbot and enable the option. More details here.
- If your store is multilingual, go to Settings > Chat > Language and set it to Multilingual. The chat and chatbot will then automatically use the store's language.
- Th Shopify logged in user details are detected and synchronized with ZampiBot.
- Use the following merge field to display product cards and sliders in the chat: {shopify product_id="12345678"}. Replace 12345678 with the product ID. Show a slider of multiple products by adding multiple product IDs separated by commas.
- The search feature of the products pop-up of the admin area only search by product title and product type.
- Shopify collections, tags, varians, vendors are cached and refreshed every 10 days. The chatbot will use them to answer the user's questions.
- If your store URL changes, you need to delete and reinstall the ZampiBot Shopify app.
Information
- You can find your API token at https://chatbot.zampisoft.com/account/?tab=installation.
- You can switch between accounts without having to sign out and in by adding the accounts in Settings > Admin > Switch accounts.
- The cloud version is hosted on our Amazon AWS server.
- If you are experiencing a white screen while accessing the cloud version, add the URL attribute reset-login to the URL and open it again. E.g. https://chatbot.zampisoft.com/?reset-login.
Miscellaneous
This section contains help for other features not listed above.
Progressive Web App
The ZampiBot admin area is a PWA, which means that you can install it on desktop, Mac, iPhone, or mobile devices and use it like a fully-functional app. Note: This feature is optimized for Google Chrome and Safari. The PWA is supported on all versions of ZampiBot.
Desktop installation
Enter in your admin area (e.g. https://www.your-site.com/supportboard/admin.php or https://chatbot.zampisoft.com), and click the + icon on the top right of the URL bar of your Chrome browser. If you are using the WordPress version see the information below.
Mobile installation - Android - Cloud version only - Not recommended
If you are using the cloud version of ZampiBot on Android you can use the apps available on Google Play. We recommend using the PWA instead of the Android app to have the latest features and updates.
Google Play
Mobile installation - Android and Windows - All versions
- Enter in your admin area with Google Chrome (e.g. https://www.your-site.com/supportboard/admin.php or https://chatbot.zampisoft.com/)
- Open your browser's settings.
- Scroll down and tap Add to Home screen.
- Confirm by tapping Add.
Mobile installation - iPhone or Mac - All versions
- Enter in your admin area with Safari (e.g. https://www.your-site.com/supportboard/admin.php or https://chatbot.zampisoft.com/)
- Press the Share button and select Add to Home Screen from the popup.
- Tap Add in the top right corner to finish installing the PWA.
WordPress installation
To install the PWA on WordPress, you need to access the admin area directly by going to:
[SUPPORT-BOARD-URL]/admin.php
Replace [SUPPORT-BOARD-URL] with your Installation URL, get it from Settings > Miscellaneous > Installation URL.
Change PWA icon and name
Download the manifest.json file here. Edit it and replace YOUR NAME with your brand name, YOUR NAME DESCRIPTION with any text you want, and example.png with the URL of your icon, the icon size must be 512x512px. After finishing the file edit, move it to the ZampiBot installation folder where the admin.php file is located. Please note that help with this is not included in our support. If you require assistance, you can hire us.
Keyboard shortcuts
Admin area keyboard shortcuts are enabled on both PC and MAC and work as follows:
| Shortcut | Description |
|---|---|
ENTERor SPACE |
Confirm or close a dialog alert; the same as clicking OK. |
ESCor CANCEL |
Decline a dialog alert and close it. |
SHIFT + ENTER or
CTRL + ENTER |
Add a line break to a message. This only works for the admin editor. |
ESC |
Close a lightbox. |
CANCEL |
In the admin conversations area, archive a conversation, or delete it. |
CTRL + UP/DOWN ARROW |
In the admin conversations area, navigate between the conversations of the list. |
CTRL + RIGHT/LEFT ARROW |
In the admin users area, navigate between the users. |
CTRL + V |
Paste an image from the clipboard and send it as message. |
CTRL + Left mouse click |
To select multiple conversations in the conversations list of the admin area, hold down the CTRL key while clicking each one. You can then perform bulk actions like archiving, deleting, marking as read or unread, and more on all selected conversations. |
Config file
The config.php file is a special file that contains the MySQL database log-in details and other import settings. Most of the settings are generated automatically, but some are optional. You can add the following settings below:
| Code | Description |
|---|---|
define('SB_UPLOAD_URL', 'YOUR-URL')
|
Change the uploads directory (the default directory is: /supportboard/uploads/). Enter a URL: for example, https://your-site.com/myuplaods/. For this setting you need also to define the SB_UPLOAD_PATH. |
define('SB_UPLOAD_PATH', 'YOUR-PATH')
|
Change the uploads directory path (the default path is: /supportboard/uploads/). Enter a PATH: for example, C:\xampp\htdocs\uploads. Finding the root path of your website can be a bit tricky. You can try copying the path displayed in your FTP client or simply contact your web hosting provider for additional support. |
$GLOBALS['SB_LOCAL_SETTINGS'] = [] |
Overwrite the default settings. The value is an array of keys and values, each key is a setting, e.g. ["registration-required" => [true]]. View an example here. Get the settings list from resources/json/settings.json and the files settings.json inside the app folders. |
Cron Jobs
- Cron jobs are executed by the first user that visit the website at any given hour of the day.
- Cron jobs are executed every 60 minutes (60 seconds for email piping), but it can take longer, or it can take less time as well, in relation to the traffic of your website.
- Because cron jobs are initiated by users, if you have less than 1 visitor per hour (per minute for email piping), it could take longer. As long as there is at least one active user on the site, execution every 60 minutes (60 seconds for email piping) is guaranteed.
- You can speed up the cron jobs execution by manually run them via WEB API, or PHP API.
- You can speed up the cron jobs also by creating a cron job that runs the URL [SUPPORT-BOARD-URL]/include/api.php?cron=true. Use the command */59 * * * * wget [SUPPORT-BOARD-URL]/include/api.php?cron=true to run it via a command. Replace [SUPPORT-BOARD-URL] with your Installation URL. To obtain the URL, follow these steps:
If you are using the WP or PHP version, go to Settings > Miscellaneous > Installation URL. If you are using the cloud version, use this URL: https://chatbot.zampisoft.com/script/include/api.php?piping=true&cloud=API-TOKEN and replace API-TOKEN with your API token.
Logs
- You can enable the log file from Settings > Miscellaneous > Logs. This feature is not available in the cloud version.
- The log file is saved in the ZampiBot installation directory.
- The logs record the following actions of agents and administrators: message sent, message deleted, conversation archived, conversation deleted, conversation restored, conversation assigned to an agent, conversation assigned to a department, user updated, user deleted.
URL parameters
Front-end chat
URL parameters allow the chat to perform specific actions on page load. To use them, append the URL parameters below to any URL on your website that displays the chat. Ex. https://example.com/?conversation=1234
| URL parameter | Description |
|---|---|
?token=TOKEN |
Login an existing user. Replace TOKEN with the user's token. Get it from the user's profile box in the admin area. |
?conversation=ID |
Open a conversation. Replace ID with the conversation ID. The attribute token is required for not logged in users. |
?chat=open |
Open the chat. |
Admin area
URL parameters allow the administration area to perform specific actions on page load. To use them, append the URL parameters below to your admin URL. Ex. https://example.com/supportboard/admin.php?conversation=1234 or https://chatbot.zampisoft.com/?conversation=1234.
| URL parameter | Description |
|---|---|
?conversation=ID |
Open a conversation of the conversations area. Replace ID with the conversation ID. |
?user=ID |
Open the profile box of a user. Replace ID with the user ID. |
?setting=ID |
Open a setting of the settings area. Replace ID with the setting ID. |
?report=ID |
Open a report of the reports area. Replace ID with the report ID. |
?area=name |
Open an area of the admin. Replace name with: conversations, users, settings, reports. |
?login_email=email&login_password=password |
Login an existing agent or user automatically. Replace email with the account email and password with the account password. |
Calendly
Follow the steps below to send a Calendly booking invitation.
- Create an event type from https://calendly.com/event_types/user/me.
- Click share and copy the URL.
- To send the Calendly invitation, utilize the rich message button type. Ensure to enter the Calendly URL you copied in the previous step as the URL. Additionally, include the success attribute to customize the message that will be sent after the booking is successfully completed. E.g. [button link="https://calendly.com/federicoschiocchet/sb" name="Schedule a meeting" success="Thank you! Your meeting has been scheduled."]
Zapier
Zapier app - Cloud version only
If you are using the cloud version use the Zapier app available at https://zapier.com/apps/support-board/integrations.
Manual integration - All versions
Integrate Zapier with ZampiBot by following the steps below. Integration is based on the ZampiBot webhooks, each webhook is a Zapier trigger, so you have 15+ Zapier triggers available, for more details visit the webhooks page. If you are using the PHP or WordPress version, the manual integraton is the only available option.
- Go to https://developer.zapier.com/ and login, or register a new account.
- Create a new integration by clicking Start a Zapier Integration, or visit https://developer.zapier.com/app/new. Fill in all required fields, like name and description, and click Create, you can enter any text you want, but keep the name of the app in mind because you will need it later.
- From the left menu click Triggers and then Add Trigger.
- Fill in all required fields, like key and description, and click Save And Continue, you can enter any text you want.
- On top click API Configuration, choose REST Hook as Trigger Type, and click Save.
- Go back to the Settings area of the trigger, or go to https://zapier.com/app/zaps, and click Create a Zap.
- Search for your newly created app by entering the app name and click it. In Trigger Event select your trigger and click continue.
- Copy the Webhook URL, click Continue, and then enter the ZampiBot admin area and enter it into Settings > Miscellaneous > Webhooks > URL, activate the webhooks, save the settings and reload ZampiBot.
- Make something to trigger a webhook like sending a message, or creating a new user, then go back to Zapier and click Test Trigger and you should see the ZampiBot webhook data. Click Continue.
- Click the right button Filters and set up the filter in order to trigger the integration only if a variable exists. You need the filter because ZampiBot will send all webhooks to all zaps. Example: if your zap wants to integrate the messages of ZampiBot , you will need to set the filter to continue only if the variable message exists.
- Click Continue, or + and add your integration.
- To use multiple zaps and webhooks you will need to update Settings > Miscellaneous > Webhooks > URL and add the new zap IDs, separated by commas. Example: if you have two zaps with URLs https://hooks.zapier.com/hooks/catch/10352851/bbad21f/ and https://hooks.zapier.com/hooks/catch/10352851/aaaa66t/, the URL must be https://hooks.zapier.com/hooks/catch/10352851/bbad21f,aaaa66t/.
Envato purchase code validation
- Get the token from https://build.envato.com/create-token. Select the following scopes: View and search Envato sites, View the user's items' sales history, Verify purchases of the user's items, Verify purchases the user has made, View the user's purchases of the app creator's items
- Add multiple product IDs, separated by commas.
Security
Security is critical here at ZampiBot. We work with security experts who perform periodic security audits. We continually implement the latest security technologies and stay up-to-date on the latest security threats. Find below some of the security measures that have been implemented in ZampiBot.
IP ban
ZampiBot permits a maximum of 10 unsuccessful login attempts within an hour. In case the limit is exceeded by a user, admin, or agent, they will be unable to access their account or the admin area for a period of 1 hour. This blocking mechanism is based on the user's IP address and serves to deter brute force attacks aimed at uncovering login credentials. If you encounter the "Too many login attempts. Please retry again in a few hours." error, you have two options: either wait for a few hours or make changes to the ZampiBot database by deleting the ip-ban row from the sb_settings table.
XSS injection protection
To prevent XSS injection protection attacks, all sensitive user inputs undergo sanitization.
Cross-Site Request Forgery (CSRF) protection
To prevent CSRF attacks, all requests are validated by checking the login cookie and the client-side login string.
Active sessions termination on user update
Whenever the password or the details for an admin or agent is changed, all active sessions are automatically logged out when sensitive operations are executed or after 1 hour.
AES-256-bit encryption
We use 256-bit AES encryption to encrypt sensitive data such as active session login data.
Password by filename protection
ZampiBot ensures that all uploads are renamed with a random alphanumeric string prepended to the original file name to prevent discovery of the URL and unauthorized download of the uploaded file. Kindly note that, for this feature to function properly, your server must prohibit directory listing.
MySQL encrypted connections
To configure ZampiBot and MySQL to use encrypted connections edit the ZampiBot config.php file and add the following constants: SB_DB_CERTIFICATE_PATH, SB_DB_CERTIFICATE_CLIENT_KEY, SB_DB_CERTIFICATE_CLIENT, SB_DB_CERTIFICATE_CA. Enter the appropriate values for each constant. More details here.
Performance
ZampiBot is one of the fastest support systems on the market. Its JavaScript and CSS file sizes are significantly smaller than those of most competitors, ensuring faster load times. Server-side performance is equally impressive. The system is extremely lightweight, built without frameworks or unnecessary code. It's modular, minimal, and fully optimized for maximum performance. Nevertheless, you can further improve performance from Settings > Miscellaneous > Performance optimization. Below is a description of each available optimization setting.
- Minify JS: Enable loading of minified JavaScript and CSS files for the front-end chat widget to reduce file size and improve loading speed.
- Disable reports: Disable the reports area and stop recording report data. This prevents the system from consuming resources to collect and store report-related information.
- Disable articles: Disable the articles area and article functionality. This reduces resource usage by preventing the system from loading articles on both the admin and client sides.
- Archive old messages: Move messages older than the specified interval to a dedicated database backup table. Archived messages and their associated conversations will no longer appear in the admin or user conversation areas. However, if a user sends a new message in the future, the system will automatically restore the conversation and its message history. You can also manually access and restore archived conversations at any time by opening the user's profile and selecting the archived conversation. Activate this feature if you handle a large volume of messages (in the millions). It will drastically improve performance.
Async PHP process
An asynchronous PHP process is a PHP script that runs independently in the background, without blocking or waiting for the main script to finish. It allows long-running or secondary tasks (e.g., showing typing indicators) to execute concurrently while the main PHP request continues or completes immediately. To enable the async PHP process, follow the steps below.
- Ensure your web hosting provider supports the PHP exec() function. Some providers disable it for security reasons.
- Edit the ZampiBot config.php file and add the define('IEE_PHP_PATH', 'YOUR-PHP-PATH'); constant, replacing YOUR-PHP-PATH with the path to your PHP executable. The PHP installation path on your server, e.g., /usr/bin/php or /opt/plesk/php/8.3/bin/php. If your installation is on a Windows server, you also need to add the define('IEE_WINDOWS', true); constant, set it to true.
Please note that help with this is not included in our support. If you require assistance, you can hire us.
Customization
You can fully edit the source code of ZampiBot PHP and WordPress versions. See the terms of service for more details. The cloud version source code is not editable, but you can customize it by using the JavaScript API and the Web API, or with JavaScript and CSS. The chat widget does not use an iframe, so you can easily customize it with JavaScript and CSS.
Hire us
If you want us to customize ZampiBot for you, please contact us and send us your requirements. We will provide you with a quote based on the complexity of the work. Our hourly rate is 100 USD. Contact us throught the chat here on the right bottom corner of the page or email us at sales@board.support. We usually reply within 24 hours.